Tower Hobbies Tower Trainer 40 ARF Скачать руководство пользователя страница 28

❍ 

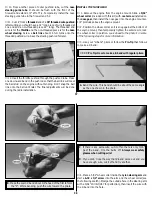
3. Assemble a simple flight kit which should include a starting

battery and glo-plug clip (or ni-starter), "chicken stick" for flipping the
prop, fuel and a means of filling the tank, a couple of small
screwdrivers, #64 rubber bands (or wing bolts), spare prop and 
glo-plug, 6" adjustable wrench, and a pair of needle nose pliers. In
addition to tools, you should also take along some paper towels and
spray window cleaner to remove residue after each flight.

❍ 

4. When you load up to go to the flying field be sure that the

batteries have charged for at least 14 hours. Be sure you have
your fuselage, wing, transmitter, flight box and, most important,
you have your AMA license.

❍ 

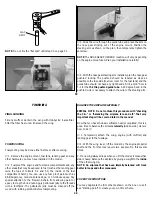
5. Range check the radio! See page 53.

TAXIING

Start the engine and set the throttle trim for a slow, steady idle.
Have your instructor or a helper hold the plane while you work
the controls. Upon release advance the throttle slightly to start
rolling, then back-off the power to prevent going too fast and
possibly taking off. Stand behind the plane as it taxies away from
you and note the direction it turns as you move the rudder
control. One thing to keep in mind with R/C models (whether it
be cars, boats, or planes) is that the steering controls may seem
to "reverse" when the model is moving toward you. For example,
if you are flying toward yourself, and you give a right control
input (ailerons or rudder), the model will move off to your left.
The fact of the matter is that the controls are not reversed and the
aircraft did actually enter a right turn. The plane does move off to
your left from your vantage point, but if you imagined yourself in
the cockpit you would realize the plane turned to the right as
commanded. All it takes is a little practice to maintain proper
orientation of your aircraft, but that's why we recommend
finding an instructor.

When you feel comfortable, advance the throttle a little while
standing behind the plane to get the feel of a takeoff roll, but pull
back on the power before the Tower Trainer 40 lifts off. Try this
several times, adding a little more power each time. If the plane
starts to veer off, immediately cut the power to prevent a mishap.

★★★★

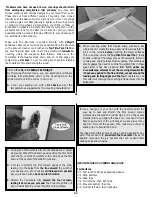
Pro Tip: USING RUBBER BANDS

Since you are using rubber bands to attach your wing, the
rule of thumb is to use two #64 rubber bands per pound of
model weight. If your model tipped the scales at 7 pounds,
you need 14 rubber bands. It doesn't matter too much how
many you run straight across the wing or how many are criss-
crossed, so long as the last two are criss-crossed. This trick
stops the other bands from popping off. Do not use oily
rubber bands for more than a few flying sessions. Check each
rubber band before using it and watch out for cracks. Rubber
bands can be conditioned by storing the oily ones in a 
zip-top storage bag partially filled with talcum powder or
corn starch. Both products will absorb the oil.

55

Although many R/C pilots have taught themselves to fly, we
strongly recommend that you find an instructor to help get you
started. Although the Tower Trainer 40 series of trainers offer the
greatest opportunity of success for the self-taught, there is a high
probability that you will crash your airplane on the first flight.
Protect your investment of time and money–obtain the assistance
of an experienced R/C pilot.
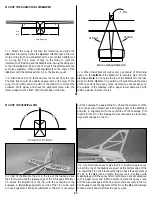
TAKEOFF

Your first flights should be made in little or no wind. If you have
dual rates on your transmitter, set the switches to "low rate" for
takeoff. Taxi into position, pointing directly into the wind.
Although this model has good low speed characteristics, you
should always build up as much speed as your runway will
permit before lifting off, as this will give you a safety margin in
case of a "flame-out." Advance the throttle smoothly to the wide
open setting.  When the plane has sufficient flying speed (you
won't know until you try), lift off by smoothly applying a little up
elevator (don't "force" it off to a steep climb!), and climb out
gradually, trying to keep it straight and the wings level. The Tower
Trainer 40 will climb at a 20 or 30 degree angle under full
throttle. Climb to about 100 feet before starting a VERY gentle
turn by moving the aileron stick. Apply a little more back
pressure on the elevator stick as the Tower Trainer 40 turns. Stop
the turn by moving the aileron stick in the opposite direction
until the wings are level, then return the stick to the neutral
position. Pull the power back to 1/3 throttle. 

FLIGHT

We recommend that you take it easy with your Tower Trainer 40
for the first several flights and gradually "get acquainted" with
this great plane as your engine becomes fully broken-in.  The
Tower Trainer 40 is designed to fly level with neutral elevator
trim at approximately 1/4 to 1/3 throttle – this is the best speed
for learning to fly. On later flights, if you want the Tower Trainer
40 to maintain level flight at full throttle, you will need to give it
a little down trim. 

Your first flights should consist mostly of straight and level flight
with gentle turns to keep the model over the field. These flights
will give you practice at coordinating your control inputs and
maintaining the proper orientation of the airplane. As mentioned
earlier, turns are accomplished by banking the aircraft with the
ailerons, then gently adding some back stick (up elevator).
Enough back stick should be held in to keep the aircraft at a
constant altitude. To stop turning, apply opposite aileron (or
rudder) to level the wings, then release the sticks. There is a
memory aid that may help keep you out of trouble when the
plane is flying toward you – "put the stick under the low wing."
In other words, move the stick in the direction of the low wing
to raise that wing. When  you are comfortable flying the aircraft,
you can practice using the rudder along with the ailerons to
'coordinate' the turns – usually, a small amount of rudder
applied in the direction of the turn will keep the tail following in
the exact same track as the nose.

56

Содержание Tower Trainer 40 ARF

Страница 1: ...ls and workmanship at the date of purchase This warranty does not cover any component parts damaged by use or modification In no case shall Tower s liability exceed the original cost of the purchased kit Further Tower reserves the right to change or modify this warranty without notice In that Tower has no control over the final assembly or material used for final assembly no liability shall be ass...

Страница 2: ...uilding or flying this model please call us at 217 398 8970 and we ll be glad to help If you are calling for replacement parts please look up the part numbers and the kit identification number a white sticker on the end of the carton and have them ready when calling Our e mail address is www productsupport hobbico com PRECAUTIONS 1 You must build the plane according to the plan and instructions Do...

Страница 3: ...mended wheels are 2 1 2 for the main and nose wheels If you are flying off grass or an uneven surface you may wish to use larger wheels than those recommended The standard wheels have been tested on grass and work fine but 3 wheels would work even better ITEMS REQUIRED FOR COMPLETION 4 Channel radio with 4 servos Engine 40 46 2 stroke or 52 4 stroke Propeller Top Flite Power Point 10 oz Fuel tank ...

Страница 4: ...he die cut parts are difficult to punch out do not force them Instead cut around the parts with a hobby knife After punching out the die cut parts use your bar sander or sanding block to lightly sand the edges to remove any die cutting irregularities As you identify and mark the parts separate them into groups such as fuse fuselage wing fin Stab Stabilizer and hardware NOTES ON USING GLUES There a...

Страница 5: ...per will require more pressure and may gouge the surface Now on to building your Tower Trainer 40 BUILD THE TAIL SURFACES Build the Stabilizer and Elevator 1 Cut the Stabilizer Elevator section from the fuselage plan sheet and tape it on your building board Tape a piece of wax paper or Plan Protector over the plan 10 2 Place the 1 4 x 1 x 10 balsa stick over the portion of the plan marked Stab For...

Страница 6: ...ieces Examine and add thick CA glue to any open joints then use your sanding block or bar sander with medium 150 grit sandpaper to sand both sides of the Dorsal Fin smooth 11 5 Use the remaining section of 1 4 x 1 3 8 x 30 balsa to make the Rudder 6 Place the Fin Dorsal Fin and Rudder flat on your work surface and sand them flat using a sanding block or bar sander and 120 grit sandpaper Don t forg...

Страница 7: ...ts in the same line going slightly deeper each time As you make these additional cuts work on going straight into the wood Continue this process while wiggling the knife handle back and forth until the blade has reached the proper depth for the hinge 13 designate the inside of the Right and Left fuselage sides Be sure to make a RIGHT and a LEFT fuselage side Sand both sides of the fuse sides using...

Страница 8: ...r the formers 15 15 Drill 1 4 holes as shown through the fuselage sides for the wing dowels using the notches in the upper triplers for alignment Carefully sand the bottom edges of the fuselage sides flat to provide a good surface to glue the bottom of the fuse into position Fuse Structure Assembly 1 Locate the die cut 1 8 plywood F1A Former and the two die cut 1 8 plywood F1B Formers Center the F...

Страница 9: ...l position on the waxed paper With everything in its proper place apply thin CA glue to all the joints around the formers and along the bottom Keep checking the parts fit and alignment as you glue Wait a minute for the glue to set then apply thick CA to the joints to make sure a good bond exists especially in the joints that do not fit perfectly Note The use of CA accelerator will be helpful when ...

Страница 10: ...be glued after the Fin has been installed 19 18 Test fit the Firewall Assembly into position Make sure it is fully seated against the fuse doublers Remove the firewall and use 30 minute epoxy to glue it in position Check the firewall periodically to make sure it remains pressed tight against the fuse doublers 19 Position the Main Landing Gear on the bottom of the fuse using the plans as reference ...

Страница 11: ... Wing Ribs into place on the Bottom Spar 7 Place the shaped balsa Leading Edge against the front of the ribs and pin it in place 21 8 Place the shaped balsa Trailing Edge against the rear of the ribs and pin it in place 9 Lay two pieces of leftover 1 16 balsa Cut 1 4 off one end of the 1 16 x 3 x 14 7 8 Shear Web material near the Leading and Trailing Edges under the location of Wing Rib R 2 this ...

Страница 12: ...e Use a razor saw to cut off the spars and the leading and trailing edges at the marked angles A bar sander is used to clean up the angled ends of the spars leading edges and trailing edges 23 20 Use a razor saw and a bar sander to trim the tip ends of the spars leading and trailing edges flush with the outermost R 3 rib 21 Carefully cut a 2 1 2 long piece off the 17 32 x 1 1 2 x 30 tapered balsa ...

Страница 13: ...it will ooze out between the dihedral braces and spars This excess epoxy can be cleaned up before it cures using a paper towel dampened with rubbing alcohol Note If there are any small gaps between the ends of the spars or LE s or TE s do not be overly concerned They will not significantly weaken the structure After the wing joining process is complete fill them with leftover balsa and medium CA g...

Страница 14: ... 10 Cut out and remove the remaining piece of balsa from across the servo bay in the bottom side of R 1C using a hobby knife or razor saw 27 11 Snap the die cut 1 8 plywood Aileron Servo Tray Support in place as in the photo Use medium CA to glue in the Servo Tray Support while using the servo tray to hold it in position Do not glue the servo tray in at this time 12 Bevel the root ends of the tape...

Страница 15: ...gainst the TE and mark the location where the torque rod would enter the aileron Carefully drill a 3 32 hole into the aileron to the depth shown on the plan Use a hobby knife to cut a groove in the front of the aileron for the aileron torque rod 20 Use the plan as a reference to mark the location of the hinges Make slots for the hinges using the same technique as you did for the Elevator and Rudde...

Страница 16: ...ll sand everything smooth later 6 Use leftover balsa to fill areas where there may be large openings or gaps An example would be at the ends of the dihedral braces and the R 3 ribs Using balsa will mean using less filler later 31 FINAL ASSEMBLY 1 Insert the 1 4 x 5 1 8 Hardwood Dowels into the holes drilled earlier during the fuselage assembly The holes can be enlarged in the fuselage with a round...

Страница 17: ...utside of the fuselage with a paper towel dampened with rubbing alcohol before it cures STRING STRING T PIN EQUAL MEASUREMENTS B B A A B B A A Wing Stab Align 33 MOUNT THE VERTICAL FIN 1 Test fit the Fin into the slot in the top of the fuselage Slide the Fin forward until the leading edge of the Fin is against Former F5 Check the alignment of the Fin with the centerline of the Fuselage A straighte...

Страница 18: ...or the choke mechanism This is acceptable and will not cause a balance problem 35 4 Remove the engine and engine mount from the fuse Use a center punch or sharpened nail to dimple the marks on the rails then drill a 3 32 hole through the rails at each punch mark If you have access to a drill press this is the best tool for the job However if you are using a hand held electric drill try to keep the...

Страница 19: ...screw installed on the nose gear then install the nose gear into the engine mount so 1 4 protrudes above the engine mount 2 Position the wheel collar so it is snug against the bottom of the engine mount then temporarily tighten the set screw to lock the wheel collar in position Look ahead to the photo s in some of the following steps for more information 3 Use your Z bend pliers or follow the Pro ...

Страница 20: ...h as the landing gear rails the tops of formers F 2 and F 3 the inside of the fuel compartment hatch You can use any fuel proof paint such as K B Superpoxy model airplane dope or 30 minute epoxy Pay special attention to the firewall Refrain from allowing paint or epoxy to clog the blind nuts Apply petroleum jelly to the threads with a toothpick The petroleum jelly must be cleaned off the wood with...

Страница 21: ...e fin and stab except around the leading and trailing edges and the tip Modelers who do this often cut through the covering and part way into the balsa stab Pro Tip COVERING TECHNIQUE By following this technique you can practically eliminate wrinkles that sometimes occur in the covering when the model is left out in the sun or in your car A Cover your sealing iron with a Hot Sock and set the tempe...

Страница 22: ...ng and trace the outline onto the covered wing Trim the covering 1 16 inside of the lines drawn using a sharp hobby knife Use Medium CA to glue the TE Plates onto the wing 43 APPLYING WINDOWS Use the patterns on the fuse plan or make your own templates to cut the window shapes from TowerKote film or self adhesive TowerKote Trim Sheet After cutting the pieces to size wipe the area on the fuselage t...

Страница 23: ...rks Wick two to three drops of Thin CA into the holes to harden the underlying balsa The horns are screwed in place using 2 56 x 5 8 machine screws and nylon nut plates Do not tighten the screws as to crush the underlying balsa 2 Mount the servos into the main servo tray oriented as shown on the fuselage plan top view Mount the aileron servo in the aileron tray Since the main servo tray is adjusta...

Страница 24: ...collars not included as shown on the plans 12 Locate the die cut 1 8 plywood hatch retainer HR Center the hatch retainer on the 1 8 x 4 x 5 balsa tank compartment hatch with approximately 3 8 protruding from the edge then glue it in position 47 13 Position the hatch on the fuselage Mark a cut line on the hatch to indicate the front of the firewall Trim the front of the hatch to fit flush with F1A ...

Страница 25: ...ay temporarily remove the servo tray or just the throttle servo Cut the lines to the proper length and connect them to the carburetor and muffler pressure fitting 9 Place more foam on the sides and top of the tank 10 Glue the servo tray securely to the fuse doublers and fuse sides with medium CA at the position required to achieve balance IMPORTANT After the model is 100 complete recheck the balan...

Страница 26: ...y the radio manufacturer BALANCE THE PROPELLER Balance your propellers carefully before flying An unbalanced prop is the single most significant cause of vibration Not only will engine mounting screws and bolts vibrate out possibly with disastrous effect but vibration will also damage your radio receiver and battery Vibration will cause your fuel to foam which will in turn cause your engine to run...

Страница 27: ...od condition so fuel will not leak onto a hot engine causing a fire To stop the engine cut off the fuel supply by closing off the fuel line or follow the engine manufacturer s recommendations Do not use hands fingers or any body part to try to stop the engine Do not throw anything into the prop of a running engine 53 AMA SAFETY CODE excerpt Read and abide by the following Academy of Model Aeronaut...

Страница 28: ...lthough many R C pilots have taught themselves to fly we strongly recommend that you find an instructor to help get you started Although the Tower Trainer 40 series of trainers offer the greatest opportunity of success for the self taught there is a high probability that you will crash your airplane on the first flight Protect your investment of time and money obtain the assistance of an experienc...

Страница 29: ...s are slop free If it fluttered once it will probably flutter again under similar circumstances unless you can eliminate the slop or flexing in the linkages Here are some things which can result in flutter Excessive hinge gap Not mounting control horns solidly Sloppy fit of clevis pin in horn Elasticity present in flexible plastic pushrods Side play of pushrod in guide tube caused by tight bends S...

Страница 30: ... bright TowerKote makes multi color trim schemes a breeze Its low heat requirements are ideal for use with foam and most plastics and the film s pliability let it conform easily to corners and curves Available in 9 colors and 6 x 26 rolls Tower Hobbies thermostat controlled Custom Sealing Iron tacks covering tight anywhere It features a tapered upswept non stick sole for easy use in the tightest c...

Отзывы: