16
❏
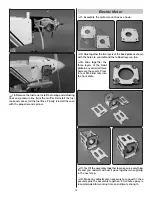
5. Make a
battery strap
by connecting two of the opposing
Velcro strips and slipping them down, under and out a set
of the slotted holes in the battery mount plate, then apply
a strip of rougher, “hook” side of adhesive-back Velcro (not
included) to the battery mount plate. Test-mount the battery
with the strap as shown.
FINAL ASSEMBLY
Final Radio Installation
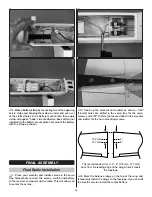
❏
1. Place your elevator and rudder servos in the servo
tray. Temporarily connect the servos, switch and battery
to the receiver and power up the radio. This will allow you
to center the servos.
❏
2. Hook up the elevator and rudder as shown – 1/16"
[1.6mm] holes are drilled in the servo tray for the servo
screws and 3/32" [2.4mm] holes are drilled in the elevator
and rudder for the horn mounting screws.
4"
5"
102 mm
127 mm
The recommended C.G. is 4"− 5" [102 mm −127 mm]
back from the leading edge of the wing where it meets
the fuselage.
❏
3. Mark the balance range on the top of the wing and
temporarily install the wings to the fuselage. If you’ve built
the electric version install the motor battery.
Содержание KAOSARF .60/EP
Страница 23: ...23 NOTES ...
Страница 24: ...TOWA2058 2015 Tower Hobbies A subsidiary of Hobbico Inc ...

