background image

10

OPERA

TIONS

 MM491G

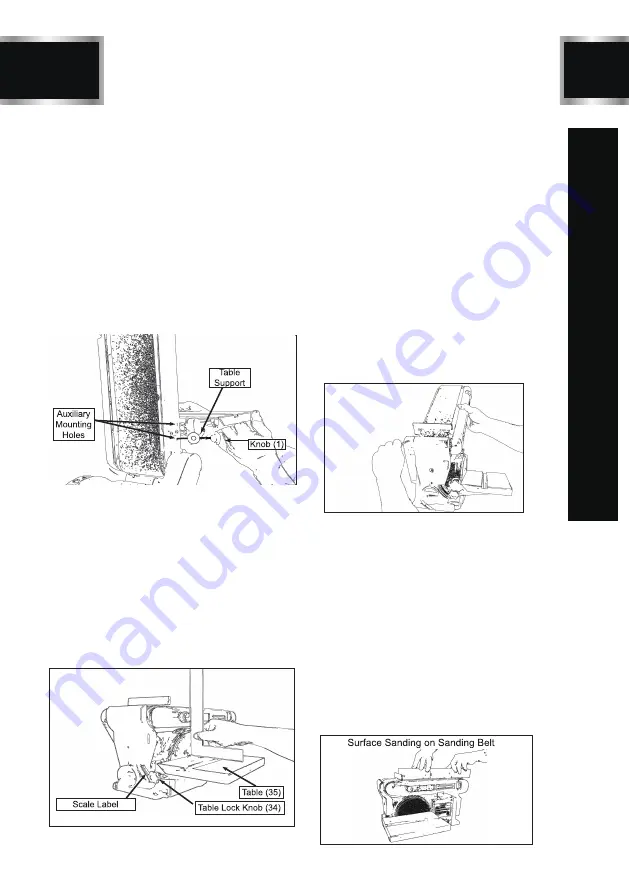
Remounting Table for 

Vertical Sanding

1. Remove backstop lock bolt and remove work 

    support.
2. Unscrew knob (34) and remove.
3. Pull table support (33) index pin out of mo-

    unting hole.

4. Loosen hex socket screw (75) and raise 

    sanding bed to the desired sanding position.

5. Insert the table index pins into the auxiliary 

    (upper) holes in the sanding bed.
6. Tighten hex socket screw (75). Make sure 

    table is not touching sanding belt.

Leveling Table Assembly

1. Place a combination square on the table (35) 

    so that it also touches the sanding pad (7). 

    See below. If the table is 90 degrees to the 

    pad, the square is flush on the pad.
2. If the table is not 90 degrees to the with the 

    pad, loosen the table lock knob (34) and tilt

    the table until the square is flush with the pad

.

3. Retighten the knob to secure the table.
4. Attach the scale label to the ‘0’ degrees mark 

    on the dust guard.

Installing and Adjusting the 

Sanding Belt

1. Turn power switch to the OFF position and 

    disconnect power cord from the main elec

    tricity supply.

2. Move tension lever (66) to the right to rel-

    ease the sanding belt tension (10). 

3. Place the sanding belt over the drive and 

    idler drums (13 and 65), making sure that 

    the inside direction arrow points down, 

    towards the drive drum (13) as shown in 

    illustration..

4. Centre belt on both drums.

5. Slide tension lever (66) to the left to tighten 

    belt tension.

6. Tighten hex. socket screw (56) when bed

    (4) is in desired working position.

7. Reconnect the power cord to the main 

    electricity supply. Turn the no-volt release 

    switch (21) ON, then OFF, while viewing 

    the belt movement. If the belt looks like it 

    was going to slide off either drum, the belt

    tracking needs to be adjusted (described

    in the next step).

8. If the sanding belt (87) moves towards 

    the sanding pad (7) when turned ON, turn 

    the tracking knob (55) clockwise ¼ turn,

    and test again.

9. If the sanding belt moves away from the

    sanding pad when it was turned ON, turn

    the tracking knob counterclockwise ¼ turn,

    and test again.

Содержание MM491G

Страница 1: ...IMPORTANT For your own safety read and follow all of the Safety Guidelines and Operating Instructions before operating this product MM491G 4 X 36 BELT AND 6 DISC SANDER INSTRUCTION MANUAL...

Страница 2: ......

Страница 3: ...Y PARTS DIAGRAN 7 ASSEMBLY MOUNTING 9 OPERATION 11 MAINTENANCE 12 TROUBLESHOOTING GUIDE 13 EXPLONED VIEW 14 PARTS LIST 17 WARRANTY 18 ELECTRICAL SAFETY 5 SPECIFICATIONS 2 Motor 120 VAC 4 3A 60 Hz 1 2...

Страница 4: ...WORK AREA CLEAN Cluttered areas and benches invite accidents ALWAYS KEEP VISITORS AWAY FROM RUNNING MACHINES All visitors should be kept a safe distance from the work area ALWAYS MAKE THE WORKSHOP CH...

Страница 5: ...sition prior to plugging in the machine 11 Always make sure the power switch is in the OFF position when doing any assembly or setup operation 12 Always wear a dust mask and use adequate dust collecti...

Страница 6: ...rsonnel if the grounding instructions are not completely understood or if in doubt as to whether the tool is properly grounded Use only three wire extension cords that have three prong grounding plugs...

Страница 7: ...PACKAGE CONTENTS No Description Qty 1 2 3 4 5 6 7 1 1 1 1 1 2 1 Sander Body Miter Gauge Work Table Miter Gauge Knob Big Flat Washer Hex Socket Round Head Screw Limited plate MM491G 1 2 3 4 5 6 7 Figur...

Страница 8: ...BD4603 7 KEY PARTS DIAGRAN Miter Gauge MM491G Work Table Sander Belt Sander Disc Belt Tension Knob Switch Limited plate Belt Adjustable Knob...

Страница 9: ...sanding disc over plate When aligned press sandpaper disc firmly onto backing disc 3 Position disc guard 6 onto lower portion of sanding disc so that the mounting holes align 4 Using a Phillips screwd...

Страница 10: ...Place washer 32 on knob 34 shaft and insert through slot into threaded holes in base 6 Loosen the three hex screws 31 and adjust table so that there is a maximum of 1 5mm 1 16 space between the sandin...

Страница 11: ...lling and Adjusting the Sanding Belt 1 Turn power switch to the OFF position and disconnect power cord from the main elec tricity supply 2 Move tension lever 66 to the right to rel ease the sanding be...

Страница 12: ...BD4603 11 MM491G OPERATIONS...

Страница 13: ...them 3 Place drive belt around drive pulley 71 then drive pulley 78 4 Tighten the three screws slightly 5 Adjust tension of drive belt by placing a standard screwdriver in the adjusting hole by pushi...

Страница 14: ...electrician carry out repair Timing belt too tight Applying too much pres sure on workpiece Wood burns while sanding Sander does not operate Motor slows when sanding Sanding disc or belt is loaded wit...

Страница 15: ...14 EXPLODED VIEW MM491G...

Страница 16: ...1 Wire Connection Box 1 12 Phillips Screw M5X8 M5X8 7 13 Phillips Screw M5X25 Spring Washer M5X25 3 14 Belt Tension Knob 1 15 Screw Bushing 1 16 Phillips Screw M5X16 Toothed Lock Washer Big Flat Washe...

Страница 17: ...7 1 40 Tension Spring 1 41 Bushing 2 42 Belt Tension Support 1 43 Spring Retaining Ring for Shaft D12 D12 2 44 Bearing 5 45 Idler Drum 1 46 Idler Shaft 1 47 Phillips Screw 3 5 9 5 3 5 9 5 4 48 Sw itch...

Страница 18: ...XL 1 71 Driven Pulley 1 72 Phillips Screw M6X25 Flat Washer spring w asher M6x25 3 73 Hex Socket Round Head Screw M8X25 M8X25 1 74 Cog Belt Guard Cover 1 75 Square Nut M8 M8 1 76 Cord Plug 1 77 Tube 8...

Страница 19: ...Having Problems Give us a chance to help you before returning this product Email After the phone 844 866 5687 ONE YEAR LIMITED WARRANTY info toolots com PARTS LIST 18 EXPLODED VIEW MM491G WARRANTY...

Страница 20: ......

Отзывы: