


68
69
Netw
ork/
USB memor
y
3
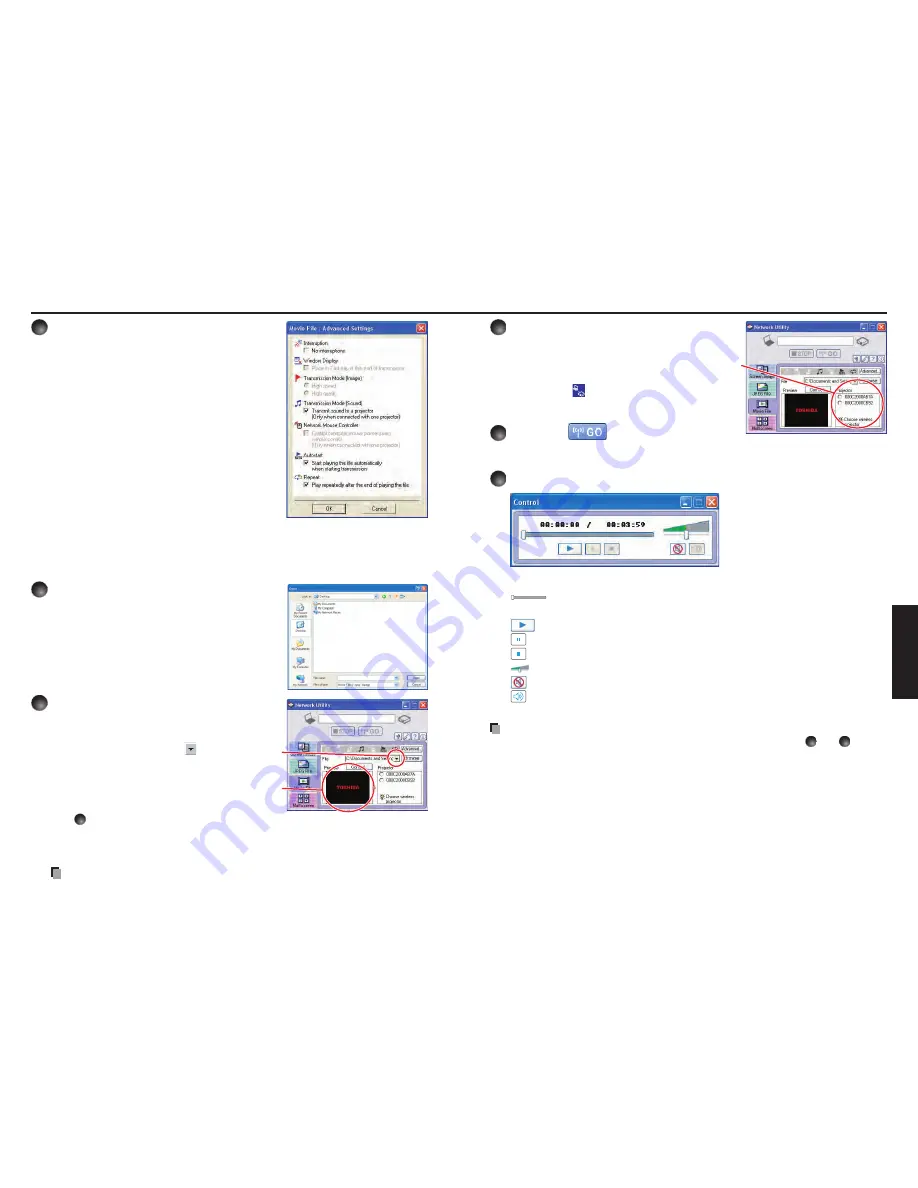
Click the Advanced button.
The
Movie file: Advanced Settings
dialog
appears. Set the dialog as shown below, as
necessary.
Interruption
Check the
No Interruptions
checkbox to
prevent other computers from interrupting the
projector, for example, during a presentation.
Transmission Mode (Sound)
Check the
Transmit sound to a projector
(Only when connected with one projector)
checkbox to transmit the sound being played on
a computer to the projector.
Autostart
Check the
Start playing the file automatically
when starting transmission
checkbox to
automatically start playing the video file when
connecting to the projector.
Repeat
Check the
Play repeatedly after the end of playing
checkbox to automatically
repeat from the beginning when the file reaches the end.
4
Click the Browse button and select
the file to send.
Clicking on the
Browse
button displays the
Open
dialog box. Select the file to send then click the
Open
button.
The selected file is added to the pull-down list in
the
Network Utility
’s
Select file
field.
5
Select the file to send from the pull-
down list of the Transmission File
field.
Click the
Transmission File
field’s
button to display the
pull-down list. Select the file to send from this list.
A thumbnail of the selected file appears in the
Preview
box. The file displayed here will be
transmitted.
Step
4
can be skipped.
The way that drag and drop the file to send from the desktop or Windows Explorer into
the
Preview
box is also available. In this case as well, the selected file is added to the
pull-down list.
Note
You may not select a file by drag and drop with Windows Vista
®
.
•
•
•
•
•
6
Select the projector to transmit to.
The IDs of projectors accessible for transmission
will be listed. (If the projector name has been
set up already, it is shown.) Select the checkbox
of the projector to be transmitted to from this
list. Then icon
is displayed on the projector's
screen for a few seconds.
It is possible to select only one projector.
7
Click the
button.
The selected file's image is displayed by the projector and the Control window appears
as well.
8
Play the video file via the Control window.
The function of each button and box is as follows:
(Current position):
Indicates the playing position. Dragging the slider
can move the playing position.
(Play):
Starts playing the video file.
(Freeze):
The picture is paused.
(Stop):
Stops playing the video file.
(Volume):
Adjusts sound volume contained in the video file.
(Mute):
Cuts off picture and sound contained in the video file.
(Release mute):
Restores picture and sound contained in the
video file.
Notes
Only one file can be sent at a time. To send another file, repeat steps
5
and
7
.
MPEG/AVI/ASF/WMV files can be transmitted.
The update speed of the transmitted file depends on your computer's performance and
the surrounding radio environment.
The projector ID is the MAC address of the wired LAN mounted on the projector.
The audio signals transmitted by a computer become mono.
Playing contents protected by copyright is not supported.
•
•
•
•
•
•
Using the Network Utility (Continued)
Содержание TLP-WX200
Страница 53: ......


