


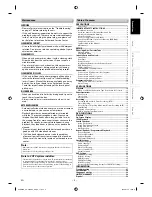


DVD Functions
Information
Español
Precautions
Setup
VCR Functions
EN
– 3 –
1. Read these instructions.
2. Keep these instructions.
3. Heed all warnings.
4. Follow all instructions.
5. Do not use this apparatus near water.
6. Clean only with dry cloth.
7. Do not block any ventilation openings. Install in
accordance with the manufacturer’s instructions.
8. Do not install near any heat sources such as radiators,
heat registers, stoves, or other apparatus (including
amplifiers) that produce heat.
9. Do not defeat the safety purpose of the polarized or
grounding-type plug. A polarized plug has two blades
with one wider than the other. A grounding type plug
has two blades and a third grounding prong. The wide
blade or the third prong are provided for your safety. If
the provided plug does not fit into your outlet, consult an
electrician for replacement of the obsolete outlet.
10. Protect the power cord from being walked on or pinched
particularly at plugs, convenience receptacles, and the
point where they exit from the apparatus.
11. Only use attachments/accessories specified by the
manufacturer.
12. Use only with the cart, stand, tripod,
bracket, or table specified by the
manufacturer, or sold with the
apparatus. When a cart is used, use
caution when moving the cart/
apparatus combination to avoid injury
from tip-over.
13. Unplug this apparatus and disconnect the antenna or
cable system during lightning storms or when unused for
long periods of time.
14. Refer all servicing to qualified service personnel. Servicing
is required when the apparatus has been damaged in any
way, such as power-supply cord or plug is damaged,
liquid has been spilled or objects have fallen into the
apparatus, the apparatus has been exposed to rain or
moisture, does not operate normally, or has been
dropped.
15. Do not overload wall outlets; extension cords, or integral
convenience receptacles as this can result in a risk of fire
or electric shock.
16. Never expose the apparatus to dripping or splashing or
place items such as vases, aquariums, any other item
filled with liquid, or candles on top of the unit.
17. Keep your fingers well clear of the disc tray as it is closing.
Neglecting to do so may cause serious personal injury.
18. Do not place anything on top of this unit.
19. Do not place the apparatus on amplifiers or equipment
that may produce heat.
20. Never block or cover the slots or openings in the unit.
Never place the unit:
• on a bed, sofa, rug, or similar surface;
• too close to drapes, curtains, or walls; or
• in a confined space such as a bookcase, built-in cabinet,
or any other place with poor ventilation.
The slots and openings are provided to protect the unit
from overheating and to help maintain reliable operation.
21. Do not use a cracked, deformed, or repaired disc. These
discs are easily broken and may cause serious personal
injury and apparatus malfunction.
22. If the apparatus should emit smoke or an unusual odor,
immediately disconnect the power cord from the wall
outlet. Wait until the smoke or smell stops, then ask your
dealer for a check and repair. Neglecting to do so may
cause fire.
23. During thunderstorms, do not touch the connecting
cables or the apparatus.
24.
DANGER: RISK OF SERIOUS
PERSONAL INJURY OR DEATH!
• Use extreme care to make sure you are never in a
position where your body (or any item you are in
contact with, such as a ladder or screwdriver) can
accidentally touch overhead power lines. Never locate
the antenna near overhead power lines or other
electrical circuits.
• Never attempt to install any of the following during
lightning activity: a) an antenna system; or b) cables,
wires, or any home theater component connected to an
antenna or phone system.
25. Always make sure the antenna system is properly
grounded to provide adequate protection against
voltage surges and built-up static charges (see Section
810 of the National Electric Code).
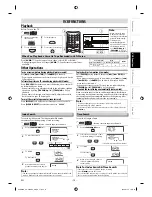
IMPORTANT SAFETY INSTRUCTIONS
EXAMPLE OF ANTENNA GROUNDING
AS PER NATIONAL ELECTRICAL CODE
ANTENNA
LEAD
WIRE
ANTENNA
DISCHARGE UNIT
(NEC SECTION 810-20)
GROUNDING CONDUCTORS
(NEC SECTION 810-21)
GROUND
CLAMP
GROUND CLAMP
ELECTRIC
SERVICE
EQUIPMENT
POWER SERVICE GROUNDING
ELECTRODE SYSTEM
(NEC ART 250, PART H)
NEC – NATIONAL ELECTRICAL CODE
S2898A
This unit has been designed and manufactured to assure personal safety. Improper use can result in electric shock or fire hazard.
The safeguards incorporated in this unit will protect you if you observe the following procedures for installation, use and servicing.
This unit is fully transistorized and does not contain any parts that can be repaired by the user.
DO NOT REMOVE THE CABINET COVER, OR YOU MAY BE EXPOSED TO DANGEROUS VOLTAGE. REFER SERVICING TO
QUALIFIED SERVICE PERSONNEL ONLY.
Do not place the unit on the furniture that is capable of being tilted by a child and an adult leaning, pulling, standing or
climbing on it. A falling unit can cause serious injury or even death.
E8EB5UD_SD-V296KU_EN_ES_v1.indd 3
E8EB5UD_SD-V296KU_EN_ES_v1.indd 3
2008/07/14 10:36:12
2008/07/14 10:36:12


