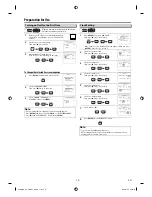
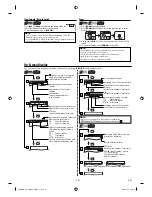
Toshiba SD-V296 - DVD/VCR Скачать руководство пользователя страница 12

– 12 –

EN

1

Be sure your TV’s input is set to VIDEO. (Name may 
vary with TV manufacturer. See your TV manual for 
details.)

2

Select your on-screen language.
Then press 

[

B

]

 to continue.

3

When “CLOCK SET” menu appears, 
go to step 2 in “Clock Setting” on this page.

or

1

Press 

[SETUP]

 and select “CLOCK SET”.

Then press 

[

B

]

 to go to next step.

•  If the clock is not set, “CLOCK SET” menu appears when you press 

[SETUP]

. In this case, go to step 2.

2

Select the current month.
Then press 

[

B

]

 to go to next step.

3

Select the current day.
Then press 

[

B

]

 to go to next step.

4

Select the current year.
Then press 

[

B

]

 to go to next step.

5

Select the current hour.
Then press 

[

B

]

 to go to next step.

6

Select the current minute.
Then press 

[

B

]

 to go to next step.

7

Select “AM” or “PM”.

8

Press 

[SETUP]

 to exit “CLOCK SET” menu.

To Change the Selected On-screen Language

Preparation for Use

Note:

• To go back, press 

[

s

]

 during steps 2 to 7.

• Clock setting will be lost after a power failure, or this unit has been 

unplugged for more than 30 seconds.
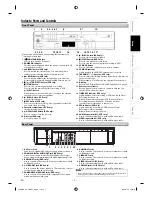
SETUP

or

SETUP

or

or

or

or

or

or

LANGUAGE SELECT


B

 ENGLISH 

      [ON]

 FRANCAIS

 ESPAÑOL

             - M E N U -

 
 TIMER 

PROGRAMMING

 SATELLITE 

LINK


AUTO REPEAT      [OFF]


B

 CLOCK SET

 LANGUAGE 

SELECT

CLOCK SET

 MONTH   DAY 


YEAR


1 0  / 

- - 


- - - -

 HOUR  

MINUTE 

AM/PM

  - 

- : - 


-

CLOCK SET

 MONTH   DAY 


YEAR


1 0  /  0 7 


- - - -

 HOUR  

MINUTE 

AM/PM

  - 

- : - 


-

CLOCK SET

 MONTH   DAY 


YEAR


1 0  /  0 7 

TUE  2 0 0 8

 HOUR  

MINUTE 

AM/PM

  - 

- : - 


-

CLOCK SET

 MONTH   DAY 


YEAR


1 0  /  0 7 

TUE  2 0 0 8

 HOUR  

MINUTE 

AM/PM


0 5  : 

- - 

 - -

CLOCK SET

 MONTH   DAY 


YEAR


1 0  /  0 7 

TUE  2 0 0 8

 HOUR  

MINUTE 

AM/PM

  0 

5 : 4 


-

CLOCK SET

 MONTH   DAY 


YEAR


1 0  /  0 7 

TUE  2 0 0 8

 HOUR  

MINUTE 

AM/PM

  0 

5 : 4 


M AM


B

 PM

Turning on Unit for the First Time


VCR

VCR

Clock Setting


VCR

VCR

Please note: most instructions in this man-
ual refer to remote control use.

Note:

• If you accidentally select Spanish or French and need English:

Press 

[SETUP]

 and choose “SELEC. IDIOMA” or “SELECTION LANGUE”. 

Press 

[

B

]

 and select “ENGLISH”. Finally, press 

[SETUP]

.

CLOCK SET

  MONTH  DAY 

YEAR

     1 0   /   – – 

– – – –

  HOUR  MINUTE 

AM/PM

     – –   :   – – 

 – –

or

1

Press 

[SETUP]

 until the main menu appears.

2

Select “LANGUAGE SELECT”.
Then press 

[

B

]

 to go to next step.

3

Select “ENGLISH”, “FRANCAIS” or 
“ESPAÑOL”. Then press 

[SETUP]

.

LANGUAGE SELECT


B

 ENGLISH 

      [ON]

 FRANCAIS

 ESPAÑOL

             - M E N U -

 
 TIMER 

PROGRAMMING

 SATELLITE 

LINK


AUTO REPEAT      [OFF]

 CLOCK 

SET


B

 LANGUAGE SELECT

SETUP

or

             - M E N U -


B

 TIMER PROGRAMMING

 SATELLITE 

LINK


AUTO REPEAT      [OFF]

 CLOCK 

SET

 LANGUAGE 

SELECT

or

SETUP

E8EB5UD_SD-V296KU_EN_ES_v1.indd   12

E8EB5UD_SD-V296KU_EN_ES_v1.indd   12

2008/07/14   10:36:52

2008/07/14   10:36:52

Содержание SD-V296 - DVD/VCR

Страница 1: ...below Refer to these numbers whenever you communicate with your Toshiba dealer about this product Model number Serial number SD V296KU DVDVIDEOPLAYER VIDEOCASSETTERECORDER DVD Functions Information Español Precautions Setup VCR Functions E8EB5UD_SD V296KU_EN_ES_v1 indd 1 E8EB5UD_SD V296KU_EN_ES_v1 indd 1 2008 07 14 10 36 07 2008 07 14 10 36 07 ...

Страница 2: ...n a particular installation If this equipment does cause harmful interference to radio or television reception which can be determined by turning the equipment off and on the user is encouraged to try to correct the interference by one or more of the following measures 1 Reorient or relocate the receiving antenna 2 Increase the separation between the equipment and receiver 3 Connect the equipment ...

Страница 3: ...e the unit on a bed sofa rug or similar surface too close to drapes curtains or walls or in a confined space such as a bookcase built in cabinet or any other place with poor ventilation The slots and openings are provided to protect the unit from overheating and to help maintain reliable operation 21 Do not use a cracked deformed or repaired disc These discs are easily broken and may cause serious...

Страница 4: ...acrovision Reverse engineering or disassembly is prohibited Moisture condensation may occur inside the unit when it is moved from a cold place to a warm place or after heating a cold room or under conditions of high humidity Do not use this unit at least for 2 hours until its inside gets dry Consumers should note that not all high definition television sets are fully compatible with this product a...

Страница 5: ...hen problems occur PRECAUTIONS Laser Safety 2 IMPORTANT SAFETY INSTRUCTIONS 3 Installation Location 4 Avoid the Hazards of Electrical Shock and Fire 4 Moisture Condensation Warning 4 About Copyright 4 Notice for Progressive Scan Output 4 Auto Power Off and Screen Saver Function DVD Only 4 Supplied Accessories 4 Symbols Used in this Manual 4 Maintenance 5 SETUP Choosing a Disc Cassette Tape 6 Playa...

Страница 6: ... discs 5 You can play back discs which bear the marks above If you use nonstandardized discs this unit may not play them back Even if they are played back the sound or video quality will be compromised 6 You may play back the unfinalized DVD RW R recorded in the video format on our brand s DVD recorder However depending on the recording status of a disc the disc may not be played back at all or no...

Страница 7: ...C indicator VCR only Lights up when a timer recording or OTR One touch Timer Recording has been set Blinks when a timer recording or OTR One touch Timer Recording has been finished or if the unit could not complete the recording due to some error 19 REC indicator VCR only Lights up during a recording OTR One touch Timer Recording or timer recording Blinks when a recording is paused 20 AUDIO input ...

Страница 8: ...p the file list JPEG MODE To set black level on off To set virtual surround on off To program the playing order or play randomly To set virtual surround on off CD To activate the Slide Show mode JPEG OPEN CLOSE To open or close the disc tray To open or close the disc tray To eject the cassette tape from the cassette compartment PAUSE To pause disc playback To advance playback one frame at a time T...

Страница 9: ...You must first select either DVD or VCR operation VCR MODE Press VCR on the remote control Verify that the VCR indicator is lit DVD MODE Press DVD on the remote control Verify that the DVD indicator is lit Selecting DVD or VCR Operation DVD button VCR button DVD indicator VCR DVD button VCR indicator REC PM Appears during slow motion playback Indicates a cassette tape is in the unit Appears when t...

Страница 10: ...UT COMPONENT VIDEO OUT DIGITAL AUDIO OUT COAXIAL AUDIO OUT DVD S VIDEO OUT COMPONENT VIDEO OUT Y CB PB CR PR COMPONENT VIDEO IN COMPONENT VIDEO IN CB CR PB PR or Y Y RCA video cable RCA audio cable S video cable component video cable or If your TV does not have AUDIO VIDEO input jack see the section Connecting to RF Modulator Not Supplied on this page Connections If your TV has AUDIO VIDEO input j...

Страница 11: ...ecoder AV control center Dolby Digital decoder DTS decoder MD deck or DAT deck If using this DVD player to play back a DVD in a Dolby Digital Multi channel surround or DTS surround format the DVD player outputs a Dolby Digital or DTS data stream from its COAXIAL DIGITAL AUDIO OUT jack By hooking up the player to a Dolby Digital or DTS decoder you can enjoy more convincing realistic ambience with p...

Страница 12: ...LINK AUTO REPEAT OFF B CLOCK SET LANGUAGE SELECT CLOCK SET MONTH DAY YEAR 1 0 HOUR MINUTE AM PM CLOCK SET MONTH DAY YEAR 1 0 0 7 HOUR MINUTE AM PM CLOCK SET MONTH DAY YEAR 1 0 0 7 TUE 2 0 0 8 HOUR MINUTE AM PM CLOCK SET MONTH DAY YEAR 1 0 0 7 TUE 2 0 0 8 HOUR MINUTE AM PM 0 5 CLOCK SET MONTH DAY YEAR 1 0 0 7 TUE 2 0 0 8 HOUR MINUTE AM PM 0 5 4 0 CLOCK SET MONTH DAY YEAR 1 0 0 7 TUE 2 0 0 8 HOUR MI...

Страница 13: ...ure on TV screen during playback still mode Press PAUSE F Each time you press the button the picture will be forwarded by one frame If the picture begins to vibrate vertically in the still mode stabilize the picture by using TRACKING K L TRACKING on this unit If the picture is distorted or rolling vertically adjust the vertical hold control on your TV if equipped To reset the cassette tape counter...

Страница 14: ... selected 5 Press STOP C to stop recording 6 Press OPEN CLOSE A to eject the recorded cassette tape Recording To stop recording temporarily pause mode Press PAUSE F During the recording in pause mode 5 C marks appear on the TV screen Each C mark represents 1 minute Press it again to resume recording Pause mode will be automatically canceled after 5 minutes to prevent damage to the cassette tape an...

Страница 15: ...touch timer recording or a timer recording is finished the unit ejects the cassette tape Press T SET on the remote control or C A STOP EJECT on the unit then press VCR to activate the VCR function again Once the unit turns to the timer standby mode no VCR functions are available until T SET is pressed To cancel the timer standby mode press T SET on the remote control or C A STOP EJECT on the unit ...

Страница 16: ...to go to next step 4 Set the desired start hour Then press B to go to next step The hour can be selected from 1 12 with AM or PM When the external tuner signal is stopped recording will be stopped M E N U TIMER PROGRAMMING B SATELLITE LINK AUTO REPEAT OFF CLOCK SET LANGUAGE SELECT SATELLITE LINK 0 1 3 0 PM ON e g In case of the timer recording is programmed in the middle of the satellite link time...

Страница 17: ...nd audio receiver not supplied are set to the correct channel Note When you play a JPEG format disc details on page 19 may appear at the top right on the TV screen when the operation is prohibited by the disc or this unit Some DVD may be played from title 2 or 3 due to specific programs Some discs may not start playback automatically Then press PLAY B to start playback During the playback of a 2 l...

Страница 18: ...m mode PROGRAM or RANDOM will be displayed instead of 2 DISPLAY DISPLAY DISPLAY Slow Forward Reverse Search DV DVD Press g or h repeatedly in the pause mode to select the required forward or reverse speed To continue playback press PLAY B Note Slow forward or reverse speed is different depending on the disc Approximate speed is 1 1 16x 2 1 8x 3 1 2x Set STILL MODE to FIELD in DISPLAY menu if pictu...

Отзывы: