– 112 –
No. Part name
Procedure
Remarks
g
Electrical
part
replacement
(continued)
2. FAN-IPDU P.C. board
1) Following to work of item to 2) of 1 of
g
.
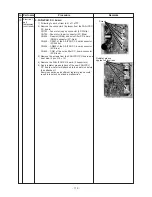
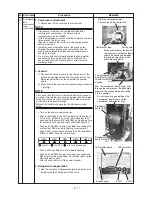
2) Remove the connectors (6 places) from the FAN-IPDU
P.C. board.
CN750 ... Fan motor (upper) connector (3P: White)
CN700 ... Fan motor (lower) connector (3P: Blue)
CN500 ... Reactor (CH68) and noise filter P.C. board
(CN22) connector (4P: Red)
CN502 ... CN101 of the A3-IPDU P.C. board connector
(2P: White)
CN504 ... CN852 of the A3-IPDU P.C. board connector
(5P: Blue)
CN602 ... CN51 of the noise filter P.C. board connector
(2P: Black)
3) Remove the screws from the FAN-IPDU P.C. board and
heat sink. (5 pcs, Ø3 × 14)
4) Remove the FAN-IPDU P.C. board. (3 supporters)
5) Apply radiator grease to back of the new FAN-IPDU
P.C. board where it will attached to the heat sink before
then attached it.
Exercise caution as insufficient radiator grease could
result in too much heat and a malfunction.
Screws
Radiator grease
application locations


