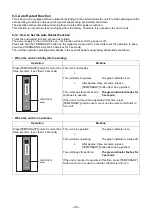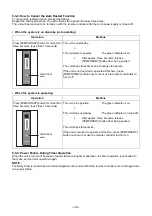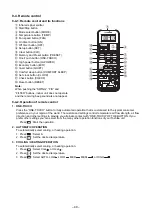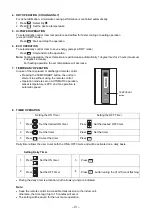
– 52 –
How to Install the Signal Receiving Unit
To prevent electric shocks, embed the wires in the wall and do not expose them. When installing wires on the wall, be sure to cover them with insulating materials.
Note:
• To avoid malfunction of the remote controller, do not assemble or run remote control wiring together with the power cables, and do not enclose them in the
same metal conduit.
• When the power unit induces electrical noise, it is recommended that a noise filter or the like be installed.
Installing into the switch box
1. Insert a flathead screwdriver or similar tool into the groove, and remove the lower case. (Fig. 1)
2. Fix the lower case with M4 x 25 mm screws provided. Do not overly tighten, and use the provided
spacers. If the Signal receiving unit does not fit in the wall, cut spacers to adjust the clearance.
3. Connect the housing of Signal receiving unit with the connector of wires extended from the indoor unit.
(Fig. 2)
4. Reattach the upper case.
Mounting on the ceiling
1. Cut a section out of the ceiling along the provided paper pattern (95 x 51 mm).
2. Pass the wire through the provided mounting bracket and insert the bracket into the installation hole. (Fig. 3)
3. Use bracket parts (A) and (B) to securely grip the ceiling material. (Fig. 4)
4. Connect the housing of Signal receiving unit with the connector of wires extended from the indoor unit.
5. Insert a slotted screwdriver into the opening at the bottom of the remote controller. Remove the lower case
from the signal receiving unit.
6. Adjust the provided spacers so that they are several millimeters larger than the thickness of the ceiling
material. Pass the 2 supplied screws (M4 x 40 mm) through the spacers and tighten them enough to hold the
Signal receiving unit in place.
7. Return parts (A) and (B) through the gap between the ceiling and Signal receiving unit so that they are
contained in the openings. Then tighten the screws. Do not tighten the screws excessively. This may result in
damage or deformation of the case.
Tighten to the point where the Signal receiving unit can be moved slightly by hand. (Fig. 5)
8. Firmly attach the signal receiving unit to the lower case.
Signal receiving
unit
Switch box (Locally procured)
Spacer
Screw M4 x 25 mm
Lower case
Signal receiving unit
Fig.1
Wire housing
Fig.2
Fig.3
Fig.4
Part (A)
Part (B)
Fig.5
Содержание ras-m07g3dv-e
Страница 86: ... 85 13 EXPLODED VIEWS AND PARTS LIST 13 1 Indoor Unit ...
Страница 93: ......

