14
English-14
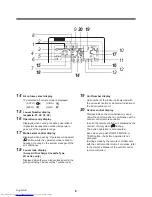
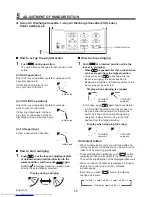
Setup of air direction and swinging
1
Push
SWING/FIX
button during operation.
• [SWING
] is displayed and the air direction
automatically changes upward/downward.
In case when one remote controller controls the
multiple indoor units, each indoor unit can be
selected and its air direction can be set up.
2
Push
SWING/FIX
button again during swinging of
the louver.
• The air outlet louver can be stopped at the
desired position.
3
UNIT LOUVER
• To set up the air direction individually, push
UNIT LOUVER
button to display each indoor unit No. in
a group control. Then set up the air direction to a
displayed indoor unit.
• If there is no display, all the indoor units can be
operated collectively.
• Every pushing
UNIT LOUVER
button, the display
exchanges as shown in the figure.
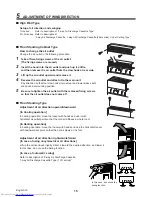
4-way Air Discharge Cassette Type
(2H series only )
How to set louver wind direction individually
1
Select an indoor unit to be set by pushing
UNIT LOUVER
(left side of the button) during operation.
• The indoor unit number changes each time you
push the button.
∗
When no unit number is displayed, all indoor units
are selected.
2
Select a louver you want to adjust change by
pushing
UNIT LOUVER
(right side of the button).
• Each time you push the button, the display on the
left of the remote controller changes as follows:
∗
When no louver number is displayed, all four
louvers are selected.
3
Determine wind direction of the selected
louver by pushing
SWING/FIX
.
• Each time you push the button, the display
changes as follows:
∗
During COOL (DRY) mode, (4) and (5) are not
displayed.
2-way Air Discharge Cassette, 1-way Air
Discharge Cassette Type (1YH series)
1
2
3
SET
TIME
TIMER SET
TEST
FILTER
LL
RESET
TEMP.
CL
FAN
SAVE
A
A
SWING/FIX
VENT
MODE
ON / OFF
UNIT LOUVER
T
Unit select
button
No
display
Louver No.
(1)
(2)
(3)
(7)
(6)
(5)
(4)
04
02
03
01
Refrigerant pipe
Drain pipe
Unit No. 1-2
Unit No. 1-1
Unit No. 1-3
No display
Unit No. 1-4
1, 2
3
SET
TIME
TIMER SET
TEST
FILTER
LL
RESET
TEMP.
CL
FAN
SAVE
A
A
SWING/FIX
VENT
MODE
ON / OFF
UNIT LOUVER
T
Unit No. 1-2
Unit No. 1-1
Unit No. 1-3
No display
Unit No. 1-4
Содержание MMU-AP0071MH
Страница 194: ...193 1 194 2 196 3 199 4 202 5 203 6 208 7 209 8 210 9 214 10 215 HFC R410A R22 China 1 ...
Страница 195: ...194 1 China 2 ...
Страница 196: ...195 1 China 3 ...
Страница 198: ...197 MMU AP0071YH AP0121YH MMU AP0152SH AP0182SH AP0242SH 2 China 5 ...
Страница 199: ...198 MMK AP0071H AP0241H MMK AP0073H AP0243H MMK AP0072H AP0122H China 6 ...
Страница 204: ...203 30 PRE HEAT 5 SWING FIX 4 China 11 ...
Страница 205: ...204 1H SWING 2H China 12 ...
Страница 208: ...207 1 2 1H 2H 3H 2SH 1 2 3 4 5 1YH 5 China 15 ...
Страница 210: ...209 7 1 m 80 China 17 ...
Страница 212: ...211 8 China 19 ...
Страница 213: ...212 1H 2H 3H 2H 3H 1 2 3 4 5 China 20 ...
Страница 214: ...213 8 China 21 ...
Страница 215: ...214 9 10 MiNI SMMS MiNI SMMS 12 5 C 43 C 21 C 32 C 15 C 24 C 80 15 C 15 5 C 15 C 28 C China 22 ...
Страница 216: ...215 10 ON OFF ON China 23 ...


