113
Installation place
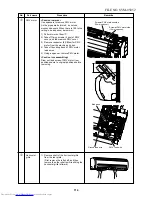
Hooking claws at upper side (4 positions)
Screw
Screw
Push
Push
Claw
9. HOW TO REPLACE MAIN PARTS
9-1. Indoor Unit
No.
Q
Part name
Front panel
Procedure
1) Stop operation of the air conditioner,
and then pull out the power supply plug
from the plug socket.
2) Open the suction grille, and then take off
fixing screws of the front panel (4 pcs.).
3) Push the electric parts box with right
thumb while pulling the both sides of the
front panel.
<Attachment of front panel>
1) Hang the hooking claws of the upper
surface of the front panel (4 positions) to
the rear plate, and then push a position
at the center of the lower part of the
discharge port.
2) Tighten 4 screws.
* When hooking or pushing is insuffi-
cient, dewdrop or abnormal sound may
be caused.
Remarks
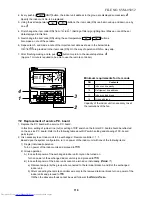
1) Perform work of item
Q
.
2) Take off fixing screws (2 pcs) of PMV
cover, and then remove PMV cover.
3) Remove binding band (2 positions)
fixing the sensor lead wires.
(When mounting electric parts, fix the
sensor lead wires again with bundling
band.
Put bundling band on the positions as
before and fasten wires.)
4) Pull out TC1, TC2, TCJ sensors from
sensor holder of hear exchanger.
(Pay attention to mounting positions of
each sensor when reassembling of
electric parts. Be sure to apply marking,
etc to TC2 and TCJ sensors before
removing because their shapes are
reassembled.)
5) Take off LED base fixing screw (1 pc)
and remove LED base.
6) Remove terminal block cover, and then
remove fan motor connector (5P), louver
motor connector (5P), and PMV motor
connector (6P) from microcomputer
assembly.
7) Take off fixing screws (2 pcs) of electric
parts box, pull out slightly the electric
parts box toward you, and then remove
drain guide.
8) Take off earth screws attached to end
board of the heat exchanger.
9) Pull off the electric parts box toward
you.
<Caution in reassembling>
When mounting the electric parts box to the
main unit, follow the reverse procedure of
removing. Return sensors and lead wires to
the original positions according to the
diagram.
R
PMV cover
Drain guide
Earth screw
Drain guide
Earth screw
Electric parts
hooking claw
Screws
Screw
(Fixing for terminal block cover)
Terminal block cover
LED base
LED base
fixing screw
TCJ sensor
Lead wire
TC2 sensor
P.M.V. motor lead
Bind band
TC1 sensor
Electric parts hooking claw
Fan motor
connector
Louver motor
connector
PMV motor
connector
Fixing screws for
electric parts box
Earth screw
Electric parts
assembly
FILE NO. SVM-05052
Содержание MMK-AP0072H
Страница 125: ...TOSHIBA CARRIER CORPORATION ...


