background image

1

2

3

4

5

6

7

8

9

10

11

12

5-25

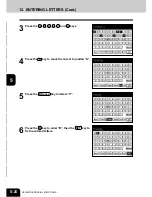
4

Press the  SET  key to fix the entered letters.

3

Press the  S ,  H ,  I ,  B  and  A  keys.

Correcting Entered Letters

Example : Correct “Toshiba” to “TOSHIBA”.

1

Press the  B Space  key to delete “oshiba”.

2

Press the  CapsLock  key to enter the capital letters.

Содержание e-studio 28

Страница 1: ......

Страница 2: ...n FCC NOTICE This equipment has been tested and is in compliance with the limits for a Class A digital device pursuant to Part 15 of the FCC Rules These limits are designed to provide reasonable protection against harmful interference when the equipment is operated in a commercial environment This equipment generates uses and can radiate radio frequency energy and if not installed and used inaccor...

Страница 3: ...e Off Mode Default Time The default time for the Off Mode is 60 minutes Automatic Energy Save The copier consumes less than 178 watts e STUDIO45 139 watts e STUDIO35 during Energy Save Automatic Energy Save Default Time The default time for the Automatic Energy Save is 15 minutes e STUDIO45 35 Copier Printer model Multifunction model Sleep Mode The copier consumes less than 95 watts e STUDIO45 80 ...

Страница 4: ...y you receive will perform at optimal levels High Productivity Genuine Toshiba supplies are created to meet the demands of our competitive world and provide high speed reliable trouble free copies when you need them Stable Image Quality Genuine Toshiba supplies are designed to provide consistently stable image output day after day Copier Kind Genuine Toshiba supplies are designed to keep the copie...

Страница 5: ... fine quality materials and precisely controlled parameters so that Toshiba copiers can continually generate sharp high quality image output Cost Advantage Genuine Toshiba toners mean value They are designed to use only the proper amount of toner enabling the machine to continue to operate until all the toner has been used In this way you get the full value of the toner Environmental Harmony Genui...

Страница 6: ...s a potentially hazardous situation which if not avoided may result in minor or moderate injury partial damage of the equipment or surrounding assets or loss of data Note Indicates a procedure you should follow to ensure the optimal performance of the digital copier and problem free copying Tip Describes information that is useful to know when operating the digital copier Advice Describes an opera...

Страница 7: ...e automatically reads the density of the original to set the ideal copy density The size of the original is read and the appropriate paper size and reproduction ratio are automati cally selected Wide reproduction range from 25 to 400 25 to 200 when the optional reversing automatic document feeder is used Duplex copies or single sided copies can be made from two sided originals Duplex copies can al...

Страница 8: ...with department codes 1 14 Controlling the use of the copier using the optional key copy counters 1 15 2 How to make copies 2 1 1 General copying procedures 2 2 2 Setting originals 2 4 3 Auto job start 2 8 4 Interrupt copying 2 9 5 Stopping the copy operation 2 10 6 Deleting or changing order of pending jobs 2 12 3 Setting of basic copy modes 3 1 1 Paper selection 3 2 Automatic paper selection APS...

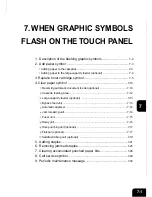
Страница 9: ...ional finishers 6 1 1 Finishing modes and finishers optional 6 2 2 Sort group copying 6 3 3 Staple mode 6 5 4 Alternate stacking mode 6 7 5 Hole punching mode 6 8 6 Magazine sort Saddle stitching mode 6 9 7 When graphic symbols flash on the touch panel 7 1 1 Description of the flashing graphic symbols 7 2 2 Add paper symbol 7 3 Adding paper to the cassettes 7 3 Adding paper to the large capacity f...

Страница 10: ...4 5 6 7 8 9 10 11 12 7 8 Maintenance 8 1 1 Daily inspection 8 2 2 Simple troubleshooting 8 4 9 Specifications Options 9 1 1 e STUDIO45 35 specifications 9 2 2 Specifications of options 9 3 3 Packing list 9 6 ...

Страница 11: ...in plug is used the copier must be grounded for safety Never ground it to a gas pipe a water pipe or any other object not suitable for grounding 3 After a suitable place has been selected for the installation of the e STUDIO45 35 please do not change it Avoid excessive heat dust vibration and direct sunlight Also provide proper ventilation as the copier emits a small amount of ozone Notes 1 The re...

Страница 12: ...e sure to disconnect the power cord plug When you do not intend to use the copier for an extended period of time Be sure to turn OFF the power switch immediately and call for service If an unusual noise is heard from the copier If the outside of the copier becomes unusually hot If any part of this copier is damaged or if it has been dropped If the copier has been exposed to rain or liquid 3 It is ...

Страница 13: ...1 2 3 4 5 6 7 8 9 10 11 12 10 This copier has a forgery prevention function Please ensure that your digital copier is not used for making copies of prohibited items FORGERY PREVENTION FUNCTION ...

Страница 14: ...otal counter 1 8 2 Copy paper 1 9 Acceptable paper types and sizes Handling and storing paper 1 9 Changing the paper size of the cassette Setting the cassette for special uses 1 10 3 Turning ON the power switch 1 13 Turning ON the power switch Auto job start 1 13 Controlling the use of the copier with department codes 1 14 Controlling the use of the copier using the optional key copy counters 1 15...

Страница 15: ...Automatic Duplexer Bypass Guide Original Scale Control Panel Inner Tray Main Power Switch Front Cover Cassettes 1 DESCRIPTION OFTHE DIGITAL COPIER ANDTHE OPTIONAL EQUIPMENT Main Components Operator s Manual Pocket back side Touch Panel Contrast AdjustmentVolume back side of the control panel ...

Страница 16: ... feed pedestal can also be installed instead Ask your service technician for details v v v v v Finisher Page 6 2 Enables the use of the hole punching available when the optional hole punching unit is installed and saddle stitching modes in addition to the sort group and stapling modes There are 2 console types and a hanging type The hanging type can be installed in the e STUDIO35 only b b b b b Ho...

Страница 17: ...e has received data ERROR LED lights when a communication error occurs COPY key Press this key to select the copy function FAX key Press this key to select the fax function MEMORY RX LED This LED lights when the memory contains a received original standing by to be printed MAIN POWER LED This LED shows the AC power supply status When the copier is ready to be used in the energy saving mode it is g...

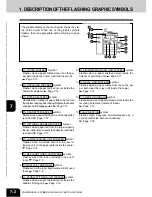
Страница 18: ...key once will stop the copier pressing it twice will clear the copy quantity to the default setting Page 2 10 JOB STATUS key Press this key to see the job list to delete or move jobs to confirm the job status to change the cassette setting or to display the counter Graphic symbols flash when there is no paper in the cas sette the wrong cassette size is set the finisher is full the holder for the h...

Страница 19: ...d paper is used The numbers in parentheses are applicable when the large capacity feeder optional is used Touch keys Area The various function items shown here are touch key select able Press any key lightly with your finger Index keys Used for switching between the Basic Editing and Program menu Function setting area This is where you select or set various functions When the power is turned on th...

Страница 20: ...t have been set The display shown on the right is an example Clearing the Functions Selected If you again press any key that is highlighted the function selected is cleared Also if the copier is left inactive for approx 30 seconds the automatic function clear Page 1 4 works and the settings will be cleared ...

Страница 21: ...s function displays the total number of copies The total counter is a cumulative counter You cannot clear this counter 1 Press the JOB STATUS key on the control panel 2 Press the STATUS key The total number of copies of the copier is displayed Tip If you want the copy FAX list or printer counter to be dis played in the screen on the right consult your service techni cian 1 DESCRIPTION OFTHE DIGITA...

Страница 22: ...sheet feeding 13 lb Bond 110 lb Index tracing paper OHP films labels Cassette Paperfeed pedestal optional Large capac ityfeeder optional Sheet bypass Maximum Feeder Type of paper Paper size capacity Remarks Pay attention to the following points Avoid using paper that is specially treated or paper that was printed on another machine and also avoid performing double copying on the same side of paper...

Страница 23: ...the lower part of the width guide in the direc tion of the arrow to remove it and reinstall the width guide at the desired paper size indicated on the bottom surface of the cassette 3 Push the arrow part right side of the size selection lever to unlock it 5 Push the arrow part left side to lock the size selec tion lever 6 Place paper in the cassette 7 Install the cassette into the copier 4 While p...

Страница 24: ... up For changing the paper size in the cassette follow step 1 to 7 on the previous page 2 Press the JOB STATUS key on the control panel then the CASSETTE key on the touch panel Press the NEXT key to display the screen on the right 8 Press the JOB STATUS key on the control panel then the CASSETTE key on the touch panel 9 Press the cassette key corresponding to that in which the paper size has been ...

Страница 25: ...e cassette key corre sponding to that in which the paper for INSERT 2 has been set and press the INSERT key Clearing the Cassette for Special Uses Press the cassette key corresponding to that which is set for the special use then press the key of the same mode as the cassette If you clear INSERT 1 when both INSERT 1 and INSERT 2 are set the cassette for INSERT 2 changes to INSERT 1 Replace the pap...

Страница 26: ...Screen Wait Warming Up Auto Job Start While the copier is warming up place the original on the glass select the desired copy modes and press the START key The copier starts scanning the originals READY When this message appears copying will automatically start Tip Up to 5 jobs can be stored in the memory Place the originals for the 6th job on the original glass or the reversing automatic docu ment...

Страница 27: ...een shown on the right appears immediately af ter the main power switch is turned on or when the automatic function clear mode is activated 2 Key in a registered department code 5 digit The copier will be ready for copying Tip 5 digit numbers that can be used as department codes are 00001 to 99999 If the following message remains displayed Enter Department Code the access code you have entered may...

Страница 28: ...nged to READY the copier is ready for copying After Copying is Finished After you have finished making copies remove your key copy counter When the optional key copy counter function is available you can only make copies by inserting your key copy counter When you make copies with your key copy counter inserted the number of copies made is recorded or added up in your counter Any number of key cop...

Страница 29: ...1 2 3 4 5 6 7 8 9 10 11 12 1 16 BEFORE MAKING COPIES ...

Страница 30: ...10 11 12 2 1 2 HOW TO MAKE COPIES 1 General copying procedures 2 2 2 Setting originals 2 4 3 Auto job start 2 8 4 Interrupt copying 2 9 5 Stopping the copy operation 2 10 6 Deleting or changing order of pending jobs 2 12 ...

Страница 31: ... in the reversing automatic document feeder optional Page 2 6 The initial default settings of the copier at the time of installa tion are as shown on the right 1 The copy modes that are automatically set when the power is turned on or when the FUNCTION CLEAR key is pressed on the control panel are called the initial default settings 2 This is displayed when the reversing automatic document feeder ...

Страница 32: ...l When using the reversing automatic document feeder op tional Make sure that the continuous feed mode Page 5 2 is selected and set the originals To make multiple sets of copies Key in the copy quantity with the digital keys To correct the input copy quantity press the CLEAR STOP key When paper which is the same size as the original has not been set in the cassette Setting the cassette Page 1 10 B...

Страница 33: ...Some of the origi nals listed under Types of original may not be used depending on pa per quality 100 originals 13 lb 22 lb or stacked height of originals 0 63 or less Regular size Letter format LD LG LT LT R ST ST R COMP Regular size Letter format LD LG LT LT R ST R COMP Sheets Three dimensional objects Books Plain paper thermal paper long originals originals with filing holes 2 3 and 4 holes 13 ...

Страница 34: ...d in the direction shown in the picture If the original is not set in the correct direction copies will not be delivered in the correct page order 2 Lower the original cover or the reversing automatic document feeder optional slowly Do not try to force the original cover or reversing automatic document feeder optional to fully close over a very thick original such as a big book Copies can be made ...

Страница 35: ...ollowing originals should be handled carefully 1 Folded or curled originals should be smoothed out before being used 2 Only originals with the same width can be set at a time Do not mix originals with different widths 3 Originals two of which when pinched between two fingers can not be moved or originals which are surface treated may fail to be separated properly 2 SETTING ORIGINALS Cont When Usin...

Страница 36: ...nal starts being pulled in automatically let go of it 1 After aligning the edges of originals well place them face up and align the slides to the width of the origi nals Maximum number of originals that can be set Page 2 4 If you cannot set all the originals at one time divide them into a few groups Page 5 2 Tip Be sure to set only originals with the same width Copying mixed sized originals Page 5...

Страница 37: ...wing message will appear Auto Start Confirming and Canceling Auto Job Start Confirming auto job start Press the JOB STATUS key on the control panel then the JOB LIST key on the touch panel Canceling the job while waiting for the original to be stored in the memory If you want to cancel copying the original when it has already been set on the glass or the reversing automatic document feeder optiona...

Страница 38: ...ge appears Job interrupted job 1 saved While an original is being scanned the interrupt job will be preset 2 Place the original Page 2 4 Select other copy modes as required 3 Press the START key 4 After you have finished interrupt copying press the INTERRUPT key again The following message appears READY to resume job 1 The previous interrupted copy run will resume Tip Without performing step 4 the...

Страница 39: ... scan ning The original scanning operation will be interrupted 2 If the screen on the right appears press the MEMORY CLEAR key The data that are being scanned will be deleted 2 Press the CLEAR STOP key again to display the printing job status list then press the DELETE key Stopping a Multicopying Operation 1 Press the CLEAR STOP key during the multicopying operation The total copy quantity returns...

Страница 40: ...1 2 3 4 5 6 7 8 9 10 11 12 2 11 3 Press the Delete key 4 The data will be deleted and the multicopying op eration will stop If there are other data waiting to be printed those will start being output ...

Страница 41: ...ta cannot be deleted when the optional facsimile function is installed 1 Press the JOB STATUS key on the control panel then the JOB LIST key on the touch panel Tip The screen on the right shows an example of the display when the optional printer and facsimile functions are installed 2 Select the data you want to delete then press the DELETE key 3 Press the Delete key 4 The data will be deleted Pre...

Страница 42: ...changing order is completed Pressing the JOB STATUS or the FUNCTION CLEAR key on the control panel or the RETURN key on the touch panel causes the basic screen to return 3 Press the MOVE key then press the position where the selected data are to move to The job to be moved will be shifted next to the selected data The data with top priority having been printed or suspended cannot be moved ...

Страница 43: ...1 2 3 4 5 6 7 8 9 10 11 12 2 14 HOW TO MAKE COPIES ...

Страница 44: ...2 Automatic paper selection APS 3 2 Manual paper selection 3 3 Bypass copying 3 4 2 Reduction and enlargement copying 3 6 3 Selecting types of copying 1 sided 2 sided book type 3 9 4 Copy density adjustment 3 15 5 Selecting image quality types of originals text photo text photo 3 17 ...

Страница 45: ...e original automatic paper selection may not work correctly In that case select the paper size manually Page 3 3 This mode can only be used for actual size 100 copying For automatically selectable sizes of originals Page 2 4 If the Automatic Paper Selection mode is not selected press the ZOOM key then press the APS key on the next screen If the following messages are shown proceed as you are told ...

Страница 46: ... types of originals use manual paper selection 1 Set the original s Page 2 4 2 On the basic screen press the cassette icon repre senting the desired paper size Or press the ZOOM key to enter the next screen and press the key of the desired paper size Select other copy modes as required 3 Press the START key Note When sheets of paper are set on the sheet bypass switch to the screen on the right and...

Страница 47: ...azine sort saddle stitching 2 IN 1 4 IN 1 annotation or page numbering However if you specify the size of paper set on the sheet bypass you can select any of the above modes in bypass copying If the paper is long sized pull out the triple paper holder Types of paper that can be used in bypass copying Page 1 9 When Standard Size Paper is Set 3 Select the paper size The screen on the right automatic...

Страница 48: ...ON STANDARD key 4 Key in each dimension length width Key in the length with the digital keys and press the upper SET key Similarly set the value for width 5 Check the input size then press the lower SET key Select other copy modes as required 6 Press the START key When Non Standard Size Paper is Set Set the paper size within the following ranges Length 3 9 x 11 7 100 297 mm Width 5 8 x 17 0 148 43...

Страница 49: ... and tracing paper wholly dark originals or originals with dark borders or irregular sized originals such as newspapers and magazines For these types of originals use the other reduction enlargement modes Using Automatic Magnification Selection AMS 1 Press the ZOOM key on the basic screen 2 Press the AMS key then press the desired COPY SIZE key 3 Set the original s Page 2 4 The built in sensors au...

Страница 50: ...riginal then press the desired COPY SIZE key Using the original size and copy size the correct reproduc tion ratio is computed and displayed on the screen OTHER key Page 5 12 If the desired size of paper is not set in any of the cas settes this message appears Set correct cassette Then install the correct sized cassette or use the sheet bypass Select other copy modes as required 4 Press the START ...

Страница 51: ...desired copy paper size then press ZOOM key You can also select the desired copy paper size on the screen in step 3 3 Press the UP or DOWN key to set the de sired reproduction ratio Each time you press either key the reproduction ratio changes by 1 Holding down the key changes it continu ously You can select 400 100 or 25 at the touch of the 400 100 or 25 key respectively Select other copy modes a...

Страница 52: ...DED BOOK TYPE This function allows you to set the type of originals 1 sided 2 sided or book type and the desired type of copying 1 sided or 2 sided 12 13 15 12 13 15 Original Copy y x c v b c and v require the optional reversing automatic document feeder to be installed ...

Страница 53: ...reen Select other copy modes as required 3 Press the START key 3 SELECTINGTYPES OF COPYING 1 SIDED 2 SIDED BOOK TYPE Cont x x x x x 1 Sided Originals 2 Sided Copies 1 On the basic screen press the key shaded in the figure on the right y y y y y 1 Sided Originals 1 Sided Copies default setting 1 Set the original s Page 2 4 2 Confirm that the 1n n n n n1 mode is selected in the ba sic mode ...

Страница 54: ...s as required 4 Press the START key When Placing an Original on the Glass 5 Place the next original 2nd side and press the START key You can press the YES key and then the START key to do the same operation Repeat the above procedure until all your originals have been scanned 6 When all your originals have been scanned press the FINISHED key Copying begins ...

Страница 55: ...ies The optional reversing automatic document feeder must be in stalled 1 Set the originals Page 2 6 Changing direction of copy images Page 4 24 2 On the basic screen press the key shaded in the figure on the right v v v v v 2 Sided Originals 1 Sided Copies The optional reversing automatic document feeder must be in stalled 1 Set the originals Page 2 6 Changing direction of copy images Page 4 24 3...

Страница 56: ... n2 key 3 Select the book copying type Press the RIGHTnRIGHT key if copying should start at a right hand page and end at a right hand page By the same token you can choose from among the RIGHTnLEFT LEFT nLEFT and LEFTnRIGHT keys b b b b b Book Type Originals 2 Sided Copies 1 On the basic screen press the key shaded in the figure on the right ...

Страница 57: ...e book again and press the START key Repeat the above procedure until all your originals have been scanned 8 After all your originals have been scanned press the FINISHED key Press the COPY FINAL PAGE key if the last origi nal has only one page 4 Select the paper size Select LT size of paper Manual paper selection Page 3 3 5 If you need a binding space select the book mar gin mode from the image s...

Страница 58: ...imum image density In the manual mode you can select the desired level of image density It is recommended that lighter density originals be copied in the manual copy density mode Automatic Copy Density Mode 1 Set the original s Page 2 4 2 Confirm that AUTO is displayed on the basic screen If the automatic density mode is not selected press the MANUAL key then press the AUTO key on the next screen ...

Страница 59: ...either or key to adjust the copy density to the desired level Each time you press the or key your copies will be come lighter or darker respectively When the DENSITY LEVEL key is shown on the lower left of the screen you can adjust the density manually on the basic screen Select other copy modes as required 4 Press the START key 4 COPY DENSITY ADJUSTMENT Cont ...

Страница 60: ...twork only The Text Photo mode is to be selected for originals containing photo and text mixed together 1 Set the original s Page 2 4 2 On the basic screen press the key shaded in the figure on the right 3 Choose the desired image type mode by pressing one of the TEXT PHOTO and TEXT PHOTO keys Select other copy modes as required 4 Press the START key Tip The amount of toner consumed varies dependi...

Страница 61: ...1 2 3 4 5 6 7 8 9 10 11 12 3 18 SETTING OF BASIC COPY MODES ...

Страница 62: ... 5 Image editing 4 7 Trimming Masking 4 7 Mirror image 4 9 Negative Positive reversal 4 10 6 2 IN 1 4 IN 1 copying 4 11 7 Copying with annotation added 4 13 8 Page numbering copying 4 14 9 Magazine sort copying from editing menu 4 16 10 Cover sheet copying 4 18 11 Sheet insertion copying 4 20 12 Document storage 4 22 13 Direction of copy images rotation 4 24 ...

Страница 63: ...is feature a margin for binding is created on each copy You can place a binding margin on either the right or left side of the copy You can also create binding margins on copies of book originals if you use this mode in combination with the Dual Page mode double sided or duplex copying from book originals The default of the binding margin is 7 mm but it can be adjusted to between 0 to 30 mm Provid...

Страница 64: ...ng COPY SIZE key to specify the size of the paper 4 Adjust the width of the margin then press the SET key The default width of the margin is 7 mm To adjust the width press the 0mm or 30mm key and select the desired number then press the SET key In duplex copying margins on the back are created on the other side of those in the front Duplex copying Page 3 10 Select other copy modes as required 5 Pr...

Страница 65: ...ss the EDIT key to enter the editing menu Then press the EDGE ERASE key If the key for the desired function is not shown press the Pre key to switch the screen 3 Adjust the width of the white border then press the SET key The default width of the white border is 5 mm To adjust the width press the 5mm or 20mm key and select the desired number then press the SET key Select other copy modes as requir...

Страница 66: ... is no need to move the original on the glass You can also place a pair of LT sized originals side by side and copy them on separate sheets of paper Only LT sized sheets of paper can be used in this mode 2 Press the 1 SIDE or 2 SIDE key Select the 1 SIDE to make copies of the facing pages on two separate sheets of paper page by page Select the 2 SIDE to make duplex copies of them on one sheet 3 Pr...

Страница 67: ...he screens You can make copies with different reproduction ratios set for the X horizontal and Y vertical direc tions respectively 3 Select the reproduction ratios for the X horizontal and Y vertical directions respectively Using the 25 or 400 keys on the screen select the reproduction ratio for X and press the upper SET key Similarly set the reproduction ratio for Y 4 Press the lower SET key Sele...

Страница 68: ...1 Place an original on the glass to specify areas Set the original face up with the bottom toward you fit its top left corner against the top left corner of the glass and align it with the original scale 2 Using the original scale on the left and the inner top scale read the position of the desired area as follows X1 Distance from the top left to the left edge of the speci fied area X2 Distance fr...

Страница 69: ... in the value for X1 with the digital keys and press the upper SET key Similarly set the values for X2 Y1 and Y2 When X1 X2 Y1 and Y2 have been set the screen auto matically changes to specify the subsequent area Subse quent areas if any can be set using the same procedure 6 Press the lower SET key 7 Set the original s Page 2 4 Select other copy modes as required 8 Press the START key ...

Страница 70: ...ing menu Then press the EDITING key If the key for the desired function is not shown press the Pre key to switch the screen Copies are made with images completely reversed in terms of the right and the left 3 Press the MIRROR key Select other copy modes as required 4 Press the START key Mirror Image ...

Страница 71: ... s Page 2 4 2 Press the EDIT key to enter the editing menu Then press the EDITING key If the key for the desired function is not shown press the Pre key to switch the screen Originals are copied with their white areas black and black areas white 3 Press the NEG POS key Select other copy modes as required 4 Press the START key ...

Страница 72: ...ingle sheet In addition duplex 2 IN 1 4 IN 1 modes are available where four eight originals can be copied to a single sheet of paper This mode cannot be used in combination with reduction enlargement copying Example of 2 IN 1 Example of 4 IN 1 When Using the Reversing Automatic Document Feeder optional 1 Set the originals Page 2 6 2 Press the EDIT key to enter the editing menu Then press the 2IN1 ...

Страница 73: ...ing an Original on the Glass 1 Follow the steps 2 to 5 of When Using the Revers ing Automatic Document Feeder on page 4 11 2 Set the original Page 2 4 and press the START key Set the first page of your originals first 3 When the first page has been scanned set the next page and press the START key You can also press the YES key before pressing the START key to perform the same operation 4 Repeat s...

Страница 74: ...of the date and time to be printed Then press the SET key Select other copy modes as required 4 Press the START key When Placing an Original on the Glass 5 When the first page has been scanned set the next page and press the START key You can also press the YES key before pressing the START key to perform the same operation 6 Repeat step 5 for the second and subsequent origi nals 7 Once the final ...

Страница 75: ... function is not shown press the Next key to switch the screen 3 2 1 3 2 1 Page number printed at the bot tom center on the portrait copy Page number printed at the top right on the landscape copy 3 Select the orientation SHORT EDGE or LONG EDGE and position of the page number to be printed Then press the SET key 4 Key in the start page number with the digital keys and press the SET key If the sta...

Страница 76: ...first page has been scanned set the next page and press the START key You can also press the YES key before pressing the START key to perform the same operation 7 Repeat step 6 for the second and subsequent origi nals 8 Once the final original has been scanned press the FINISHED key ...

Страница 77: ... along their center line If used in combination with the Cover Sheet mode blank covers or copied covers can be added at the top of the copies Page 4 18 In this case nothing is printed on the back of the cover sheet There are two Magazine Sort procedures available For the mode operated from the BASIC menu when the finisher optional is installed see page 6 9 Example of copying a 12 page document 3 A...

Страница 78: ... first page has been scanned set the next page and press the START key You can also press the YES key before pressing the START key to perform the same operation 6 Repeat step 5 for the second and subsequent cop ies 7 Once the final original has been scanned press the FINISHED key ...

Страница 79: ...et of copies There are four Cover Sheet modes available Adding a blank top cover Adding a copied top cover Adding a blank top cover and a blank back cover Adding a copied top cover and a blank back cover Example of adding a blank top cover Example of adding a copied top cover Example of adding a blank top and a back cover Example of adding a copied top and a blank back cover 3 1 2 3 2 1 3 1 2 3 2 ...

Страница 80: ...Setting cassette for cover sheet special uses Page 1 11 Setting the cover sheet on the bypass guide Page 3 4 5 Press the BASIC key to enter the basic menu and select the cassette icon representing the correct size and paper direction on the sheet bypass Cassette for cover sheet 6 Press the START key Tip When TOP COPIED or TOP COPIED BACK BLANK is selected even if you make copies in the 2 SIDED ORI...

Страница 81: ...xample of inserting a copied sheet at the speci fied page Tip To make Sheet Insertion copies you have to set two cassettes or one cassette and the large capacity feeder in the same paper size and direction one for special insertion sheets and the other for normal sheets of copy paper 3 3 1 2 2 1 4 2 1 3 4 2 1 3 1 Set the original s Page 2 6 2 Place sheets of paper in the cassette for sheet in sert...

Страница 82: ...uent pages repeat step 5 Up to 15 pages can be specified To have different sheets inserted than Sheet 1 select SHEET2 and similarly key in the pages where you want the sheets inserted then press the upper SET key Press the CLEAR STOP key to correct the Insert page number 6 After you have finished specifying the insertion pages press the lower SET key 7 Press the BASIC key to return to the basic me...

Страница 83: ...ations Up to 400 original sheets can be stored in each location Note Total Document Storage capacity is determined by the size of the documents y y y y y Storing Documents in the MEMORIZE Mode 1 Set the original s Page 2 4 2 Press the EDIT key to enter the editing menu Then press the DOCUMENT STORAGE key If the key for the desired function is not shown press the Next key to switch the screen 3 Pre...

Страница 84: ... letters Page 5 24 To delete a memorized job select the ID from the list on the display and press the DELETE key Then press the Delete key on the next screen x x x x x Making Copies in the PRINT Mode 1 Press the EDIT key to enter the editing menu Then press the DOCUMENT STORAGE key If the key for the desired function is not shown press the Next key to switch the screen 2 Press the PRINT key 3 Sele...

Страница 85: ...ies mode or dual page mode you can select the direction of images as shown below AUTO PORTRAIT PORTRAIT PORTRAIT LANDSCAPE LANDSCAPE Originals or AUTO PORTRAIT or AUTO PORTRAIT or AUTO LANDSCAPE or Duplexed copying from 1 sided originals Depending on the combination of the orientation of the originals placed and the selection of one of the IMAGE DIRECTION AUTO IMAGE DIRECTION PORTRAIT or IMAGE DIR...

Страница 86: ...IT or IMAGE DIRECTION LANDSCAPE key Select other copy modes as required 4 Press the START key When Placing an Original on the Glass 1 Follow the steps 2 to 4 of When Using the Revers ing Automatic Document Feeder 2 Set the original Page 2 4 and press the START key Set the first page of your originals first 3 When the first page has been scanned set the next page and press the START key You can als...

Страница 87: ...1 2 3 4 5 6 7 8 9 10 11 12 4 26 USING THE EDITING FUNCTIONS 5 When the final original has finished being scanned press the FINISHED key 13 DIRECTION OF COPY IMAGES ROTATION Cont ...

Страница 88: ...iginals 5 4 3 Job memory copying 5 5 4 Copying on special types of paper 5 8 5 Weekly timer 5 10 6 Setting the other paper sizes other key 5 12 7 Setting the date and time 5 13 8 Setting automatic energy saving mode 5 14 9 Setting automatic shutoff mode 5 15 10 Switching between languages 5 16 11 Department codes 5 17 12 Entering letters 5 24 ...

Страница 89: ...inal s Page 2 6 Maximum number of originals that can be set Page 2 4 2 Press the PROGRAM key to enter the program menu and press the ADF key If the key for the desired function is not shown press the Pre key to switch the display 3 Press the ADF key Select other copy modes as required 4 Press the START key Tip When the number of originals is too large to be set at one time you can divide the origi...

Страница 90: ...ess the SADF key Select other copy modes as required 3 Set the original s Page 2 6 The original is automatically pulled in and the screen changes as shown on the right If there are more originals set them in the same way The same operation is carried out whether or not you press the YES key 4 After all originals have been fed through the revers ing automatic document feeder press the FINISHED key ...

Страница 91: ...ot shown press the Pre key to switch the screen When using the optional reversing automatic document feeder different sized originals can be copied at the same time in this copying mode if their widths are the same Do not set originals whose widths are different Bypass copying is not possible 3 Press the SET key 4 Select either the Automatic Paper Selection or Au tomatic Magnification Ratio mode a...

Страница 92: ...tch the screen 3 Press the MEMORY key 4 Press the MEMORY 1 MEMORY 2 MEMORY 3 or MEMORY 4 key The copy modes are stored in MEMORY 1 MEMORY 2 MEMORY 3 or MEMORY 4 The stored copy modes remain unchanged until different copy modes are entered They are retained even after the power switch is turned off You can store and recall a combination of frequently used copy modes at any time Up to four such comb...

Страница 93: ...o enter the program menu Then press the JOB MEMORY key If the key for the desired function is not shown press the PRE key to switch the screen 4 Press the Memory Number key where the desired combination of copy modes are stored 5 Press the START key Copies will be made in the recalled copy modes 3 Press the RECALL key Memory numbers where copy modes are already stored are shown in shaded pattern ...

Страница 94: ...3 4 5 6 7 8 9 10 11 12 5 7 Confirming Stored Copy Modes To confirm the copy modes stored in the MEMORY key perform steps 2 to 4 on page 5 6 then press the SETTINGS key The screen on the right is an example ...

Страница 95: ... press the Pre key to switch back to the previous screen When making copies using thick sheets of paper or transparency OHP film sheets use this mode for improved toner image fusibility Be sure to set thick paper and transparency OHP films on the sheet bypass To output the transparency OHP films on the inner tray install the guide for it Page 5 9 4 Press the THICK PAPER or TRANSPARENCY key Select ...

Страница 96: ...rency OHP films on the inner tray install the guide for it on the inner tray If the optional finisher is installed this operaion is not required since the films exit on the finisher tray 1 Remove the guide which is used for the cover 2 Fitting the pit and the projection of the guide place the guide ...

Страница 97: ...ng the built in weekly timer you can have the copier automatically turn ON and OFF at specified times When the main power switch is turned off or if used in combinatin with the Automatic Shutoff mode the weekly timer does not work 3 Set ON OFF times for each day of the week Use the SUN and SAT keys to switch between the days of the week Key in numbers using the digital keys After entering each num...

Страница 98: ...mally by the power switch Canceling the Use of the WeeklyTimer 1 Press the PROGRAM key to enter the program menu Press the WEEKLYTIMER key to remove the shading pattern Tip The ON OFF times of the weekly timer are retained until they are changed When the weekly timer is resumed the previ ous settings will again become effective ...

Страница 99: ... basic menu then press the ZOOM key 1 Set the original s Page 2 4 2 Place paper on the bypass tray and adjust the slides to the size of the paper Page 3 4 3 Press the PROGRAM key to enter the program menu Then press the OTHER KEY key If the key for the desired function is not shown press the Pre key to switch the screen 6 Press one of the ORIGINAL SIZE keys correspond ing to the size of the origin...

Страница 100: ...our format and minutes with the digital keys in this order from the left hand column Press the key to move to the next entry column Ex To enter 2000 November 0 0 1 1 Numbers corresponding to the days of week Number 1 2 3 4 5 6 7 Sun Mon Tue Wed Thu Fri Sat 3 Check that the settings are all correct If any of the settings are incorrect press the key to return and correct it 4 Press the SET key Day o...

Страница 101: ...ivated The setting procedure finishes and the display returns to the program menu screen If the automatic power saving mode is set the copier will automatically go into the power saving mode if left inactive for a pre determined period of time default setting 15 minutes If you do not want to use the automatic power saving mode consult your dealer or service technician Clearing the Automatic Energy...

Страница 102: ...me of the function when the copier is used by itself If the optional printer and or facsimile funciton is installed the mode name becomes the Sleep mode However the setting proce dures for both modes are the same Setting the Automatic Shutoff Mode 1 Press the PROGRAM key to enter the program menu Then press the AUTO SHUT OFF key If the key for the desired function is not shown press the Next key t...

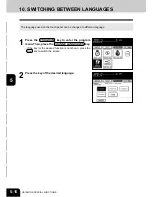
Страница 103: ...S The language used on the touch panel can be changed to different language 1 Press the PROGRAM key to enter the program menu Then press the CHANGE LANGUAGES key If the key for the desired function is not shown press the Next key to switch the screen 2 Press the key of the desired language ...

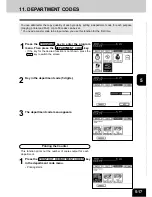
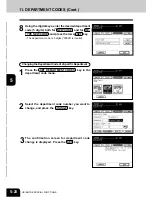
Страница 104: ...unction for the first time 1 Press the PROGRAM key to enter the program menu Then press the DEPARTMENT CODE key If the key for the desired function is not shown press the Next key to switch the screen 3 The department code menu appears Printing the Counter This function prints out the number of copies output for each department 1 Press the PRINT OUT DEPARTMENT CODES key in the department code menu...

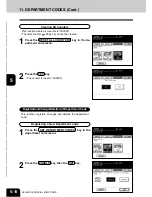
Страница 105: ...nnot be cleared 1 Press the RESET ALL COUNTERS key in the de partment code menu 2 Press the YES key The counter is reset to 000000 Registration Change Deletion of Department Code This function registers changes and deletes the department code Registering a New Department Code 1 Press the SET DEPARTMENT CODES key in the department code menu 2 Press the ENABLE key then the SET key ...

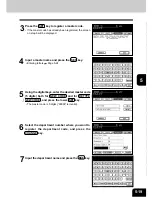
Страница 106: ...ame and press the SET key Entering letters Page 5 24 6 Select the department number where you want to register the department code and press the CHANGE key 5 Using the digital keys enter the desired master code 5 digits both for NEW CODE and for RETYPE NEW CODE and press the lower SET key The master code is 5 digits 00000 is invalid 7 Input the department name and press the SET key ...

Страница 107: ...umber you want to change and press the CHANGE key ChangingtheDepartmentCodeofa Specific Department 1 Press the SET DEPARTMENT CODES key in the department code menu 11 DEPARTMENT CODES Cont 8 Using the digital keys enter the desired department code 5 digits both for NEW CODE and for RE TYPE NEW CODE and press the lower SET key The department code is 5 digits 00000 is invalid ...

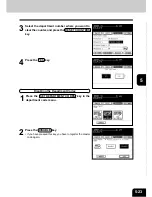
Страница 108: ...ecurrentdepartmentcode for CURRENT CODE andthecodeyouwanttoregister both for NEW CODE and for RETYPE NEW CODE and press the lower SET key The department code is 5 digits 00000 is invalid 2 Press the ENABLE key then the SET key Deleting a Department from the Department Codes 1 Press the SET DEPARTMENT CODES key in the department code menu ...

Страница 109: ...learing a Specific Department Counter 1 Press the SET DEPARTMENT CODES key in the department code menu 2 Press the ENABLE key then the SET key 3 Select the department number you want to delete and press the DELETE key 4 Press the YES key 11 DEPARTMENT CODES Cont ...

Страница 110: ...u want to clear the counter and press the RESET COUNTERS key 4 Press the YES key 2 Press the DISABLE key If you have pressed this key you have to register the master code again Disabling the Department Codes 1 Press the SET DEPARTMENT CODES key in the department code menu ...

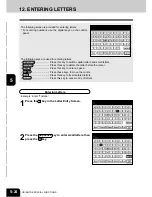
Страница 111: ...psLock Press this key to switch capital letters and small letters B Space Press this key to delete the letter before the cursor Space Press this key to enter a space Press these keys to move the cursor SET Press this key to fix all entered letters Cancel Press this key to cancel entry of letters Entering Letters Example Enter Toshiba 1 Press the T key in the Letter Entry Screen 2 Press the CapsLoc...

Страница 112: ...4 Press the SET key to fix the entered letters 3 Press the S H I B and A keys Correcting Entered Letters Example Correct Toshiba to TOSHIBA 1 Press the B Space key to delete oshiba 2 Press the CapsLock key to enter the capital letters ...

Страница 113: ...NG THE SPECIAL FUNCTIONS 4 Press the key to move the cursor to under A 3 Press the O S H I V and A keys 5 Press the B Space key to delete V 6 Press the B key to enter B then the SET key to fix the entered letters 12 ENTERING LETTERS Cont ...

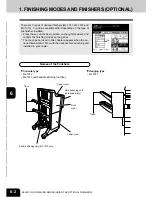
Страница 114: ...LECTING FINISHING MODES USING THE OPTIONAL FINISHERS 1 Finishing modes and finishers optional 6 2 2 Sort group copying 6 3 3 Staple mode 6 5 4 Alternate stacking mode 6 7 5 Hole punching mode 6 8 6 Magazine sort Saddle stitching mode 6 9 ...

Страница 115: ...led Press the key on the basic screen on the right shaded and confirm the finishing modes on the panel The touch panel used in this chapter appears when the op tional finisher MJ 1013 with the optional hole punching unit installed in your copier Names of the Finishers Trays Console type MJ 1012 MJ 1013 with saddle stitching function Hanging type MJ 1011 Hole punching unit sold separately Upper cov...

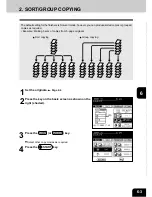
Страница 116: ...mple Making 5 sets of copies from 5 page originals 4 4 4 4 4 3 3 3 3 3 5 5 5 5 5 5 4 3 2 1 2 2 2 2 2 1 1 1 1 1 5 4 3 2 1 5 4 3 2 1 5 4 3 2 1 5 4 3 2 1 5 4 3 2 1 5 4 3 2 1 Sort copying Group copying 1 Set the originals Page 2 4 2 Press the key on the basic screen as shown on the right shaded 3 Press the SORT or GROUP key Select other copy modes as required 4 Press the START key ...

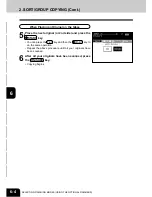
Страница 117: ...Glass 5 Place the next original or 2nd side and press the START key You can press the YES key and then the START key to do the same operation Repeat the above procedure until all your originals have been scanned 6 After all your originals have been scanned press the FINISHED key Copying begins 2 SORT GROUP COPYING Cont ...

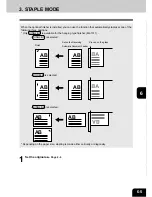
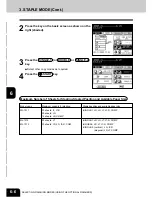
Страница 118: ...ly staples at one of the following three positions Only SINGLE 1 is available for the hanging type finisher MJ 1011 SINGLE 1 is selected Finish Set on the Reversing AutomaticDocumentFeeder Placed on the glass DOUBLE is selected SINGLE 2 is selected Depending on the paper size stapling is made either vertically or diagonally AB AB A B AB AB A B AB AB AB AB ...

Страница 119: ...pacity for stapling 30 sheets LT LT R 20 sheets LG 15 sheets LD COMP 50 sheets LT 30 sheets LD LG LT R COM Stapled position and available paper size SINGLE 1 LD LG LT LT R COMP SINGLE 1 LD LG LT LT R COMP DOUBLE LD LT LT R COMP SINGLE 2 vertical LG LT R diagonal LD LT COMP 3 STAPLE MODE Cont Maximum Number of Sheets for Stapling Stapled Position and Available Paper Size 2 Press the key on the basi...

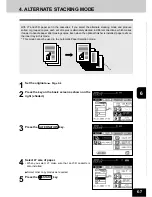
Страница 120: ...y modes as required 5 Press the START key 4 ALTERNATE STACKING MODE With LT and LT R paper set in the cassettes if you select the alternate stacking mode and produce sorted or grouped copies each set of copies is alternately stacked in different directions which makes it easier to handle paper after making copies Even when the optional finisher is installed paper exits on the inner tray in this mo...

Страница 121: ...ot shown press the Next key to switch the screen Select other copy modes as required 4 Press the START key Tip Number of punch holes and available paper sizes Since the number of punch holes and the distance between the holes vary depending on countries purchase a punching unit that meets your requirements For details consult your service technician Japan and most of Europe MJ 6001E North America ...

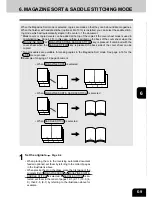
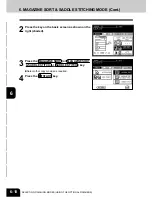
Страница 122: ...he SADDLE STITCH key is pressed the back side of the cover sheet can be copied Two procedures are available for making copies in the Magazine Sort mode See page 4 16 for the EDIT menu process Example of copying a 12 page document When MAGAZINE SORT is selected 12 3 2 1 11 2 9 4 7 6 5 8 3 10 1 12 7 6 7 6 12 3 2 1 When MAGAZINE SORT SADDLE STITCH is selected When SADDLE STITCH is selected 1 Set the ...

Страница 123: ...THE OPTIONAL FINISHERS 3 Press the MAGAZINE SORT or MAGAZINE SORT SADDLE STITCH or SADDLE STITCH key Select other copy modes as required 4 Press the START key 6 MAGAZINE SORT SADDLE STITCHING MODE Cont 2 Press the key on the basic screen as shown on the right shaded ...

Страница 124: ...paper symbol 7 10 Reversing automatic document feeder optional 7 10 Cassette feeding area 7 12 Large capacity feeder optional 7 13 Bypass feed unit 7 13 Automatic duplexer 7 14 Jam releasing unit 7 14 Fuser unit 7 15 Relay unit 7 16 Hole punching unit optional 7 17 Finisher optional 7 17 Saddle stitching unit optional 7 19 5 Adding staples 7 21 6 Removing jammed staples 7 25 7 Clearing accumulated...

Страница 125: ...r fed from the large capacity feeder optional or a selected cassette optional is misfed Page 7 13 JAM RELEASING UNIT MISFEED symbol Flashes when a misfeed occurs in the jam re leasing unit on the paper path inside the copier Page 7 14 REPLACE TONER CARTRIDGE symbol Flashes when the toner cartridge runs out of toner Page 7 5 REPLACE TONER BAG symbol Flashes when the toner bag becomes full of used t...

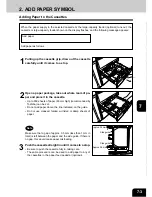
Страница 126: ... per and place it in the cassette Up to 550 sheets of paper 60 mm high recommended by Toshiba can be set Do not add paper above the line indicated on the guide Do not use creased folded wrinkled or damp sheets of paper Side guide Side guide Note Make sure that a gap of approx 0 5 mm less than 1 mm in total is left between the paper and the side guide If there is no gap this would cause paper misfe...

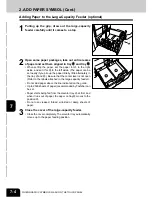
Страница 127: ...side The paper can be set neatly if you pile up the paper little by little alternately in the tray A and B Be sure that the center lever is not open Refer to the labels attached in the large capacity feeder Do not add paper above the line indicated on the guide Up to 2500 sheets of paper recommended by Toshiba can be set Paper starts being fed from the elevator tray A at first and when it runs out...

Страница 128: ...AGE AGITER AVANT EMPLOI ORIGINAL GENUINE TOSHIBA TONER 1 1 Kanda Nishiki cho Chiyoda ku Tokyo 101 8442 Japan PHONE 81 3 3438 6854 MADE IN JAPAN FABRIQUE AU JAPON When the toner cartridge runs out of toner the REPLACE TONER CARTRIDGE symbol flashes and the following message appears Add toner Then replace both the toner cartridge and the toner bag at the same time 1 Open the front cover 3 REPLACE TO...

Страница 129: ...older to ward you Cartridge 3 REPLACETONER CARTRIDGE SYMBOL Cont B A Removing theToner Bag 2 Move the toner bag in the direction of the arrow and release it from part A A A A A 3 Holding part B B B B B with your one hand pull the toner bag toward you to pull it out of its holder Put the lid on the toner bag and return it to your service technician ...

Страница 130: ...ng a New Toner Cartridge 7 Shake the new toner cartridge well to loosen the con tents 5 Rotate the cartridge so that the arrow on its side appears in the position shown on the right 6 Pull the cartridge out carefully Note Please return the used toner cartridges and toner bags to your service technician Cartridge ...

Страница 131: ...ition shown on the right in sert the cartridge completely 10Return the cartridge holder back to its original po sition Tip The amount of toner consumed varies depending on the origi nals and the image quality mode When the REPLACE TONER BAG symbol flashes When the toner bag becomes full of used toner the REPLACE TONER BAG symbol flashes and this message ap pears Dispose of used toner Replace the t...

Страница 132: ...ge of originals printing ratio of the original and density of original background 2 Size and density of originals 3 The existence of solid black when making copies when a book is copied and the original cover is partially opened 4 Temperature and humidity in the room when making copies 5 Copy density and image quality mode As indicated in the figure below the life of the toner cartridge varies dep...

Страница 133: ...rection of the arrow and remove any misfed originals When a paper misfeed occurs in the copier the CLEAR PA PER symbol flashes in the positions where paper is misfed If any of flashes the following message will appear Misfeed in copier If any of flashes the following message will appear Misfeed in finisher Remove the misfed paper by referring to the diagram shown on the right 1 Push the button on ...

Страница 134: ...ift the blue handle 4 Rotate the blue knob on your side to remove any misfed originals 5 Lift the original feeding tray By rotating the knob in the direction in the opposite direc tion of previous illustration you can also remove misfed origi nals from the side shown ...

Страница 135: ...EN GRAPHIC SYMBOLS FLASH ON THE TOUCH PANEL 4 CLEAR PAPER SYMBOL Cont A 8 Remove any misfed originals Paper Misfeed in the Cassette Feeding Area 1 Open the cover A A A A A 7 Move the blue knob toward the front 2 Remove any misfed paper ...

Страница 136: ...d paper Paper Misfeed on the Bypass Feed Unit 1 Pull out misfed paper on the bypass guide Reset the sheets of paper on the bypass guide Tip Paper Misfeed in the Paper Feed Pedestal optional Open the cover as shown on the right and remove any misfed paper If the paper is jammed in the upper cassette open the cover A and remove it A ...

Страница 137: ...own the two fuser pressure release le vers 2 Holding the jam releasing unit open it Paper Misfeed in the Automatic Duplexer 1 Make sure that the bypass guide is opened Then hold the handle of the automatic duplexer to lift and open it 2 Lifting the blue handle indicated with an arrow re move any misfed paper After having removed the paper be sure to close the both sides of the automatic duplexer f...

Страница 138: ...sfed paper After having removed the paper be sure to close the both sides of the jam releasing unit cover firmly Paper Misfeed in the Fuser Unit 1 Making sure that the bypass guide the automatic duplexer and the jam releasing unit are opened open the fuser unit cover 2 Remove any misfed paper inside the fuser unit ...

Страница 139: ...per inside the relay unit Paper Misfeeds in the Relay Unit 1 Holding the cover handle of the relay unit open it If paper is misfed at the inner part of the relay unit remove it pushing down the blue lever Remove the misfed paper from the fuser unit side if it is easier 4 CLEAR PAPER SYMBOL Cont Lever ...

Страница 140: ...nchers are up allowing the pa per shown in the figure to be removed Paper Misfeed in the Finisher optional When using the console type 1 Raise the hole punching unit optional Paper Misfeed in the Hole Punching Unit optional 1 While pressing the button indicated with an arrow pull out the finisher slowly away from the copier 2 Open the cover of the hole punching unit ...

Страница 141: ... using the Hanging type 1 By pulling the lever move the finisher carefully away from the copier 4 Remove any misfed paper in the paper exit area 3 Lifting knob y y y y y or knobs y y y y y and x x x x x remove any misfed paper 2 Open the upper finisher cover 4 CLEAR PAPER SYMBOL Cont ...

Страница 142: ...out any misfed paper 3 Remove any misfed paper in the paper exit area Paper Misfeed in the Saddle Stitching Unit optional 1 Pressing the button shown with the arrow move the finisher away from the copier 2 Open the saddle stitcher cover and remove any misfed paper ...

Страница 143: ...he lower cover of the finisher 4 Turn the right hand knob counterclockwise 5 Pushing the left hand knob turn it clockwise 6 Remove any paper misfed on the exit side of the saddle stitcher 7 Open the exit cover of the saddle stitcher and re move any misfed paper 4 CLEAR PAPER SYMBOL Cont ...

Страница 144: ... following message appears Set staple cartridge Add staples to the cartridge according to the procedure below Console Type Finisher 1 Open the front finisher cover 2 Lower the blue lever in the stapler and slide out the staple cartridge 3 Remove the empty staple case upward from the staple cartridge ...

Страница 145: ...ard Do not remove the seal holding the staples before the staple case is set in the cartridge 5 Pull out the seal holding the staples straight 6 Return the staple cartridge to its original position Insert the cartridge until it is caught by the claw and fixed with a click sound Note If the following message remains displayed repeat the above procedure from steps 1 to 6 Set staple cartridge ...

Страница 146: ...es with new ones 5 Return the saddle stitch holder and the saddle stitching unit to their respective original positions 6 Make sure that the finisher is attached to the copier firmly and that either of LD LG or LT R size of pa per is set in the copier If any of the above paper sizes is not set test stapling can not be performed Set either of LD LG or LT R size of paper 7 Close the lower finisher c...

Страница 147: ...from the copier 2 Holding the sides of the staple cartridge slide it out 3 Turn the staple cartridge upside down and perform steps 3 to 5 of the procedure for adding staples to the Console Type Finisher Page 7 21 4 Turn the staple cartridge to its normal position and push it back into the stapler Insert the cartridge until it is caught by the claw and fixed with a click sound Note If the following...

Страница 148: ...ler If the message is shown staples have been jammed Remove them as described below A A Console Type Finisher 1 Perform steps 1 and 2 of the procedure for 5 ADD ING STAPLES Console Type Finisher Page 7 21 2 Holding the knob lower part A A A A A 3 Remove any jammed staples using your fingertip or something sharp 4 Holding the knob return part A A A A A to its original posi tion ...

Страница 149: ... until it is caught by the claw and fixed with a click sound 6 Close the front finisher cover 3 While pushing down on lever y y y y y pull up knob x x x x x 4 Remove any jammed staples and then return knob x x x x x to its original position Stapler Saddle Stitching Unit 1 Perform steps 1 to 3 of the procedure for 5 ADD ING STAPLES Saddle Stitching Unit Page 7 23 2 Remove the empty staple case ...

Страница 150: ...er cover Hanging Type Finisher 1 Perform steps 1 and 2 of the procedure for 5 ADD ING STAPLES Hanging Type Finisher Page 7 24 2 Perform steps 2 to 4 of the procedure for 6 REMOV ING JAMMED STAPLES Console Type Finisher Page 7 25 3 Return the staple cartridge to its original position Insert the cartridge until it is caught by the claw and fixed with a click sound 4 Attach the finisher to the copier...

Страница 151: ...tain level the following message appears Please Dispose of Hole Punch Dust Dispose of the paper bits as described below Inside the Finisher 1 Open the cover of the hole punching unit 2 Holding the black handle slide out the case con taining the paper bits and dispose of them prop erly 3 Return the waste case to its original position 4 Close the cover of the hole punching unit ...

Страница 152: ... asking for ser vice Note Since heaters are used to fix toner images to the copy paper a safety circuit is incorporated in this copier After you turn on the main power switch press the POWER key on the control panel when the copier is in the auto shutoff mode if a certain temperature is not attained within a certain period of time the safety circuit assumes that something abnormal has happened cau...

Страница 153: ... THE TOUCH PANEL 9 PERIODIC MAINTENANCE MESSAGE When the following message has appeared on the display panel Time for periodic maintenance This indicates that assistance from a qualified service technician is required Call your service techni cian for assistance ...

Страница 154: ...1 2 3 4 5 6 7 8 9 10 11 12 8 1 8 MAINTENANCE 1 Daily inspection 8 2 2 Simple troubleshooting 8 4 ...

Страница 155: ...y quality the following cleanings are recom mended preferably once a week When cleaning be careful not to scratch the parts that are cleaned Cleaning the Original Glass If the original glass of the copier is dirty the stains may be cop ied Clean the original glass with a cloth moistened with small amount of water or cleaning liquid then wipe a dry cloth over the glass Cleaning the Original Cover I...

Страница 156: ...ront and then push it back to the inside carefully and com pletely Repeat this 2 or 3 times Note Make sure that the charger knob is pushed in fully inside 3 Close the front cover Cleaning the Reversing Automatic Document Feeder optional If the scanning area transport belt is dirty it may cause the original jam or dirty copies A dirty Mylar may also create dirty copies Clean the transport belt with...

Страница 157: ...ems to be checked Is the power cord plug firmly in serted in the outlet Is the front cover firmly closed Countermeasure Insert the power cord plug firmly Close the covers properly Reference page Page 1 2 7 5 8 3 Display does not change when keys or icons are pressed Press the START PRINTER NETWORK COPY or FAX key on the control panel to clear the mode It takes a while until the copier becomes read...

Страница 158: ... transport belt of the op tional reversing automatic docu ment feeder dirty Is the image density set prop erly Copy images are blurred Place the original firmly on the glass and close the original cover Replace with new paper Page 1 2 Page 1 9 Does the entire original lie prop erly on the surface of the glass Is the copy paper moist Images are partially missing Select the same size of copy paper a...

Страница 159: ...1 2 3 4 5 6 7 8 9 10 11 12 8 6 MAINTENANCE ...

Страница 160: ...1 2 3 4 5 6 7 8 9 10 11 12 9 1 9 SPECIFICATIONS OPTIONS 1 e STUDIO45 35 specifications 9 2 2 Specifications of options 9 3 3 Packing list 9 6 ...

Страница 161: ...8 17 0 Width Warm up Time Approx 30 seconds First Copy Time Approx 3 9 seconds Multiple Copying Up to 999 copies digital key entry Actual size 100 0 5 Original size LD LG LT ST Reproduction Ratio Paper size LD LG LT ST COMP 25 400 in 1 increments 50 200 when using the reversing automatic document feeder Cassette 550 sheets Paper Supply Sheet bypass 100 sheets Large capacity feeder 2500 sheets Tone...

Страница 162: ...nsions 21 9 W 19 7 D 6 5 H Weight 30 0 lb Paper Feed Pedestal Large capacity Feeder Model Name KD 1009 Paper Feed Pedestal KD 1010 Large capacity feeder Type Console Type Number of Cassettes One Acceptable Paper Size LD LG LT LT R ST R COMP LT Acceptable Paper Weight 17 22 lb Maximum Capacity 550 sheets 2500 sheets Height approx 2 36 Height approx 5 39 2 Power Source Supplied from the copier Dimen...

Страница 163: ...ing capacity is determined by the loading height in each mode Tray No ST R LT LD LG LT R COMP 1 147 1000 147 1000 74 500 2 147 1000 147 1000 74 500 1 147 1000 74 500 2 147 1000 74 500 Mixed paper loaded 1 2 Whichever of 4 33 750 sheets or 50 cop ies is reached first Whichever of 2 91 500 sheets or 50 cop ies is reached first Mixed paper not loaded 1 2 Whichever of 2 91 500 sheets or 50 cop ies is ...

Страница 164: ...T R LT LT R LG LD COMP 1 30 200 30 200 20 140 15 100 2 99 700 99 700 70 490 49 350 1 30 200 20 140 15 100 2 99 700 70 490 49 350 1 Whicheverof 50 copiesor 170sheetsisreachedfirst Whichever of 15 copies or 110sheetsisreachedfirst Whichever of 15 copies or 80 sheets is reached first 2 Whicheverof 50 copiesor 600sheetsisreachedfirst Whicheverof 50 copiesor 400sheetsisreachedfirst Whicheverof 50 copie...

Страница 165: ...1 2 3 4 5 6 7 8 9 10 11 12 9 6 SPECIFICATIONS OPTIONS 3 PACKING LIST Operator s Manual Warranty Sheet Packing List Unpacking Instructions Set up Instructions Operator s Manual Pocket ...

Страница 166: ......
Отзывы: