background image

39

HM67 (E/F) Web 213:276

Chapter 6: Using the TV’s features

4

Press 

b

 to highlight 

History List

, and then press 

C

 or 

c


to select the setting you prefer: either 

Power Off Clear 

(On)

On

, or 

Off

.

Note: 

When 

History List

 is set to 

On

 and the 

Power-On


Mode

 (

-

page 35) is in 

Fast

 mode, the channels and 

inputs stored in the list will be saved every power on/off 
cycle. When 

History List

 is set to 

Power Off Clear (On)

the channels and inputs stored in the list will be cleared 
with every power on/off cycle of the TV.

5

Press 

b

 to highlight 

ANT List

, and then press 

C

 or 

c

 to 

select 

On

 or 

Off

.

6

Press 

b

 to highlight 

Inputs List

, and then press 

C

 or 

c


to select 

On

 or 

Off

.

7

Press 

b

 to highlight 

Favorites List

, then press 

C

 or 

c

 to 

select 

On

 or 

Off

.

8

To save your entries, highlight 

Done

 and press 

T

.

To return to factory defaults, highlight 

Reset

 and 

press 

T

.

To open the Channel Browser

:

Press 

3


C

 or 

#


c

 on the remote control.

Press 

3


C

 to surf backward through the previously tuned 32 

channels in the History list, the channels in the ANT channel 
list, the inputs in the Inputs list, or the favorite channels/
inputs in Favorites list.

Press 

#


c

 to surf forward through the channel History, the 

ANT channel list, the Inputs list, or the favorite channels/
inputs in Favorites list.

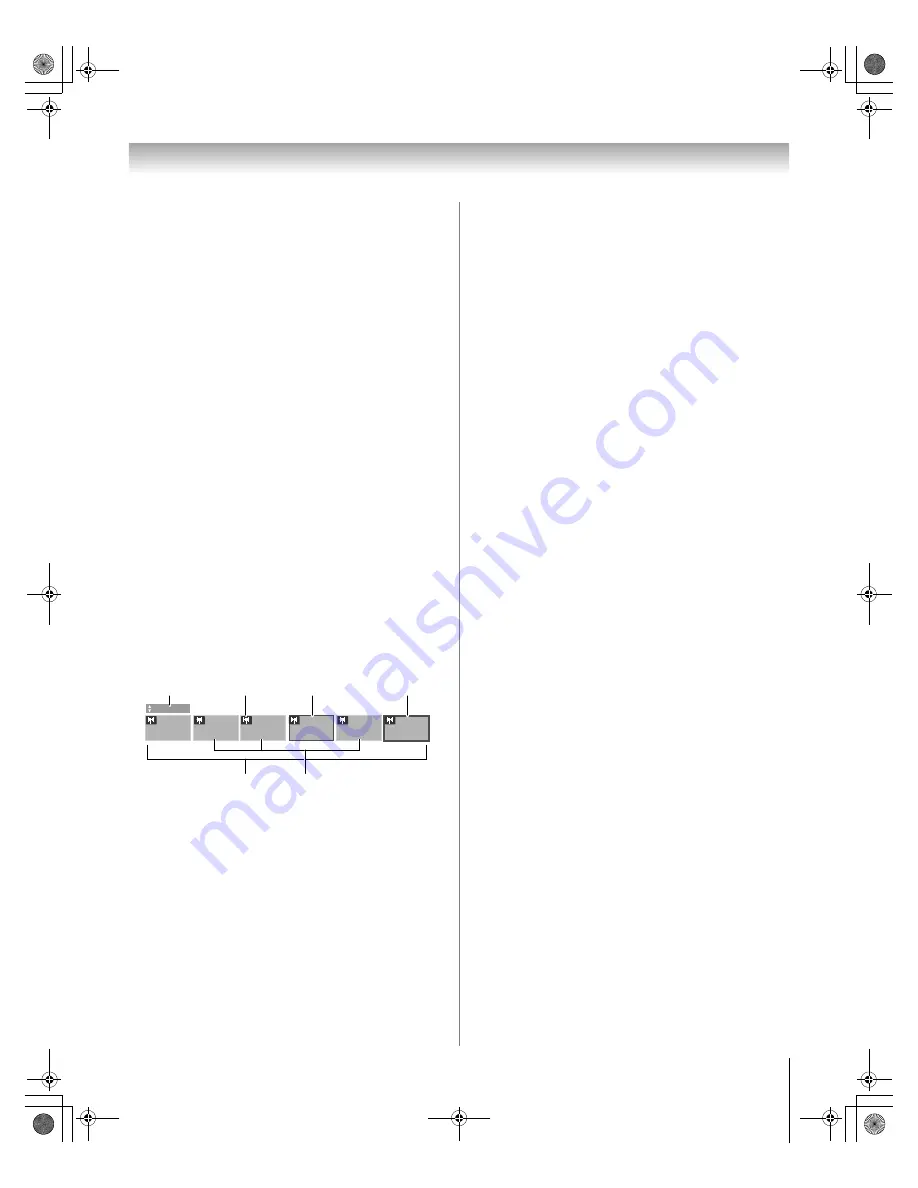
Elements of the Channel Browser

1

Current list (

History

ANT

Inputs

, or 

Favorites

)

2

Input type

3

Channel or input currently being viewed

4

Channel or input that is currently highlighted in the 
browser

5

Channels stored in the History List

6

Channel labels

To toggle among the available lists:

After opening the Channel Browser

, press 

B

 or 

b

 to toggle 

among 

History

ANT

Inputs

, and 

Favorites

.

Note: 

The Channel Browser

 opens in 

History List 

by default. 

Once another list has been selected, the Channel Browser


will open in the last selected list.

If all lists are turned off, pressing 

C

#


c

, or 

n

 will 

not display the Channel Browser

. If 

Favorites List

 is 

turned off, 

n

 will have no effect.

Pressing 

n

 will bring up the Channel Browser


Favorites list regardless of the last selected list in the 
Channel Browser

.

To tune to a channel or input in Browse mode:

1

While watching TV, press 

3


C

 or 

#


c

 to open the 

Channel Browser

 and surf back to a previous item or 

surf forward to the next item in the list.
In 

Browse

 mode, when you stop on an item in the 

Channel Browser

, it will be highlighted and the TV will 

automatically tune to the channel or input.

2

Press 

O

 to close the Channel Browser

.

To tune to a channel or input in Select mode:

1

While watching TV, press 

3


C

 or 

#


c

 to open the 

Channel Browser

 and surf back to a previous item or 

forward to the next item in the list.
In 

Select

 mode, when you stop on an item in the Channel 

Browser

, it will be highlighted but you must press 

T

 to 

tune the TV to the highlighted item.

2

Press 

T

 to tune the TV to the highlighted item.

3

Press 

O

 to close the Channel Browser

.

Adding and clearing channels and inputs in the 
History List

Adding channels and inputs to the History List:

As a channel or input is tuned, the Channel Browser

 adds it 

to the History List and displays it on the “right side” of the 
Channel Browser

. Previously tuned channels/inputs are 

“shifted” to the left, eventually moving off the left side. Press 

3


C

 to surf backward through the previously tuned channels/

inputs. Any channel or input that is tuned repeatedly will not 
be repeated in the History List, but instead is moved to the end 
of the list on the right side of the Channel Browser

.

The Channel Browser

 will store the following channels:

All channels that are tuned using the numeric buttons on the 
remote control.

All channels that are tuned using 

<

 or 

,

 on the remote 

control.

Note:

 Whenever an item is selected that cannot be tuned (for 

various reasons), the TV will automatically tune to the 
previously viewed channel or input.

88

History

10

3

2

11

8

TVLAND

ABCHD

WEATHER

5

1

2

4

3

6

(continued)

09C06.fm  Page 39  Thursday, March 29, 2007  4:21 PM

Содержание 50HM67 - 50" Rear Projection TV

Страница 1: ...e page 10 Note If the TV is powered off and then quickly on again when the lamp unit is hot it may take several minutes for the picture to appear on screen This is a property of DLP TV lamp technology and is NOT a sign of malfunction For details see IMPORTANT NOTICE ABOUT HOT LAMP RESTART on page 6 Note To display a High Definition picture the TV must be receiving a High Definition signal such as ...

Страница 2: ...r toy that a curious child may reach for a Remember that children can become excited while watching a program and can potentially push or pull a TV over a Share our safety message about this hidden hazard of the home with your family and friends Thank you Safety Precautions WARNING TO REDUCE THE RISK OF FIRE OR ELECTRIC SHOCK DO NOT EXPOSE THIS APPLIANCE TO RAIN OR MOISTURE The lightning flash wit...

Страница 3: ...k or fire To prevent personal injury never handle the damaged television ALWAYS contact a service technician to inspect the TV any time it has been damaged or dropped 15 CAUTION To reduce the risk of electric shock do not use the polarized plug with an extension cord receptacle or other outlet unless the blades can be inserted completely to prevent blade exposure To prevent electric shock match wi...

Страница 4: ...turn off the TV for 6 to 7 hours to allow the condensation to evaporate 34 For added protection of your TV from lightning and power surges always unplug the power cord and disconnect the antenna from the TV if you leave the TV unattended or unused for long periods of time 35 During normal use the TV may make occasional snapping or popping sounds This is normal especially when the unit is being tur...

Страница 5: ...h the limits for a Class B digital device pursuant to Part 15 of the FCC rules These limits are designed to provide reasonable protection against harmful interference in a residential installation This equipment generates uses and can radiate radio frequency energy and if not installed and used in accordance with the instructions may cause harmful interference to radio communications However there...

Страница 6: ...Power On Mode feature to stop the fans as soon as the TV is powered off See Setting the Power On Mode feature page 35 8 The yellow and blue LED lights at the bottom center of the TV front indicate your TV s current status If either light flashes see LED indications page 62 9 Every time the TV power cord is plugged in the yellow LED will blink until the TV enters standby mode plugged in but not pow...

Страница 7: ...the video input sources 37 Tuning channels 38 Tuning channels using the Channel Browser 38 Tuning to the next programmed channel 40 Tuning to a specific channel programmed or unprogrammed 40 Switching between two channels using Channel Return 40 Switching between two channels using SurfLock 40 Selecting the picture size 41 Scrolling the TheaterWide picture TheaterWide 2 and 3 only 42 Using the aut...

Страница 8: ...le component 63 When to replace the lamp unit 63 How to replace the lamp unit 64 Disposing of the used lamp unit 65 Specifications 66 Limited United States Warranty for DLP Television Models 67 Limited Canadian Warranty for Toshiba Brand DLP Television Models 68 Index 71 03TOC fm Page 8 Thursday March 29 2007 1 51 PM ...

Страница 9: ...inates the need for a separate digital converter set top box in most cases Three HDMI digital high definition multimedia interfaces 1080p input support page 19 Two sets of ColorStream HD high resolution component video inputs page 16 SRS WOW audio technologies page 59 Digital Audio Out optical audio connection with Dolby Digital optical output format page 48 CableClear digital picture noise reduct...

Страница 10: ...o your TV 4 BEFORE connecting cables or devices to the TV learn the functions of the TV s connections and controls pages 11 12 5 Connect your other electronic device s to the TV pages 13 21 6 Install the batteries in the remote control page 22 7 See Learning about the remote control page 23 for an overview of the buttons on the remote control 8 Program the remote control to operate your other devi...

Страница 11: ... buttons change the channel programmed channels only page 32 5 VOLUME These buttons adjust the volume level 6 INPUT Repeatedly press to change the source you are viewing ANT VIDEO 1 VIDEO 2 ColorStream HD1 ColorStream HD2 HDMI 1 HDMI 2 HDMI 3 PC 7 MENU ENTER Press to access the menu system pages 29 30 When a menu is on screen the MENU button on the TV s control panel functions as the ENTER button ...

Страница 12: ...e or uncompressed digital video from a DVI device Also see item 3 HDMI connection is necessary to receive 1080p signals 5 ANT Antenna input that supports analog NTSC and digital ATSC off air antenna signals and analog and digital Cable TV QAM signals 6 Fixed Audio OUT Analog audio outputs for connecting an audio amplifier 7 IR OUT For controlling infrared remote controlled devices through the TV Y...

Страница 13: ...performance than a standard composite video or S video cable HDMI cable HDMI High Definition Multimedia Interface cable is for use with devices with an HDMI output An HDMI cable delivers digital audio and video in its native format This cable carries both video and audio information therefore separate audio cables are not required for a complete HDMI device connection page 19 and page 21 Note HDMI...

Страница 14: ...able If you have a mono VCR connect L MONO on the TV to your VCR s audio out terminal using the white audio cable only To view the antenna or Cable signal Select the ANT video input source on the TV To view the VCR Turn ON the VCR Select the VIDEO 1 video input source on the TV To select the video input source press INPUT on the remote control page 23 To program the TV remote control to operate ot...

Страница 15: ... Cable box you may not be able to use the remote control to program or access certain features on the TV To view basic and premium Cable channels Turn OFF the VCR Select the ANT video input source on the TV Tune the TV to channel 3 or 4 whichever channel the Cable box output is set to Use the Cable box controls to change channels To view the VCR Turn ON the VCR Select the VIDEO 2 video input sourc...

Страница 16: ...ssive 480p 720p and Interlaced 480i 1080i scan systems A 1080i signal will provide the best picture performance 1080p is not supported If your DVD player or satellite receiver does not have component video connect a standard A V cable to VIDEO 2 on the side panel If your DVD player has HDMI video see page 19 To view antenna or Cable channels Select the ANT video input source on the TV To view the ...

Страница 17: ...minal To control the device s Point either the device s remote control or the TV remote control that you previously programmed to operate the device Chapter 3 toward the front of the TV and press the button for the desired function The signal passes from the remote control through the TV to the device via the IR blaster cable Note If you use the device s remote control to operate the device you al...

Страница 18: ... S video cable plus the audio cables To view the camcorder video Select the VIDEO 2 video input source on the TV To select the video input source press INPUT on the remote control page 23 To program the TV remote control to operate other devices see Chapter 3 VIDEO AUDIO OUT L R VIDEO 2 inputs on TV right side panel Camcorder 50HM67_EN book Page 18 Thursday March 29 2007 11 28 AM ...

Страница 19: ...t source press INPUT on the remote control page 23 To program the TV remote control to operate other devices see Chapter 3 To connect a DVI device you will need one HDMI to DVI adapter cable HDMI type A connector per DVI device For proper operation the length of an HDMI to DVI adapter cable should not exceed 9 8 ft 3m The recommended length is 6 6 ft 2m one pair of standard analog audio cables per...

Страница 20: ...eating a high noise level that may damage speakers or headphones THIS DAMAGE IS NOT COVERED BY YOUR WARRANTY The DIGITAL AUDIO OUT terminal may not output some digital audio sources because of copy restrictions Manufactured under license from Dolby Laboratories Dolby and the double D symbol are registered trademarks of Dolby Laboratories Connecting an audio system This connection allows you to use...

Страница 21: ...and the specifications of the PC on which you are playing the DVD Video some scenes may be skipped or you may not be able to pause during multi angle scenes To connect a PC to the HDMI terminal on the TV When connecting a PC to the HDMI terminal on the TV use an HDMI to DVI adapter cable and analog audio cables If connecting a PC with an HDMI terminal use an HDMI cable type A connector Separate an...

Страница 22: ...ion Never throw batteries into a fire Note Be sure to use AAA size batteries Dispose of batteries in a designated disposal area Batteries should always be disposed of with the environment in mind Always dispose of batteries in accordance with applicable laws and regulations If the remote control does not operate correctly or if the operating range becomes reduced replace batteries with new ones Wh...

Страница 23: ...annels page 40 or to edit the Favorites List page 38 6 INPUT selects the video input source page 37 7 CH Bb cycles through programmed channels when no menu is on screen page 32 8 VOL adjusts the volume level 9 FAV BROWSER accesses the Favorites List in the Channel Brower page 38 10 RECALL displays TV status information page 55 11 CH RTN returns to the last viewed channel or source page 40 12 MUTE ...

Страница 24: ... Displays the channel guide in the CABLE SAT mode SET UP Accesses a DVD s setup menu in the AUX mode 7 INFO Displays TV status information on screen 8 BbC c Press to navigate DVD menus may not work on some DVD players 9 ENTER Required by some satellite receivers and DVD players to activate certain functions 10 DVD CLEAR Press to reset the title and chapter number 11 PLAY Begins playback of a tape ...

Страница 25: ...s TV SET UP GUIDE Guide SAT Guide Setup VOL Volume up down s TV s TV s TV s TV CHBb Channel up down Channel up down Channel up down Channel up down RECALL RECALL s TV s TV s TV s TV CH RTN DVD RTN Previous channel DVD previous menu DVD Return INFO Info Info Display ENTER Enter Select Enter Enter Bb Menu up down Menu up down Menu up down C 3 Menu left Channel Browser Menu left Menu left c Menu righ...

Страница 26: ...emote control at it and press p See notes below If the correct code was entered the device will turn off If the device does not respond repeat steps 1 4 using another code If the device does not respond to another code you will need to use the remote control that came with the device 5 Remember to set the MODE SELECT switch back to TV to control the TV 6 For future reference write down the code s ...

Страница 27: ...us 058 Pansat 036 052 Primestar 015 042 Proscan 008 009 013 Radio Shack 022 023 030 RCA 008 009 013 016 Realistic 030 Samsung 059 Sony 014 055 Star Choice 057 106 Star Trak 025 026 037 054 STS 024 Toshiba 000 001 002 003 004 005 006 007 020 031 056 Uniden 021 028 030 032 035 039 043 045 047 058 Zenith 027 TV VCR Combo Action 078 GE 059 062 Goldstar 065 Panasonic 065 Precision 078 Quasar 065 Realis...

Страница 28: ...72 Panasonic 036 045 046 057 061 072 079 Pentax 012 024 025 035 042 053 063 Pentex Research 014 Philco 026 027 063 Philips 026 031 044 057 Pioneer 006 024 043 055 Portland 012 013 015 Proscan 001 002 048 Proton 061 Quasar 045 Radio Shack 010 031 065 Radio Shack Realistic 007 009 010 016 018 020 021 022 031 049 Radix 010 RCA 001 002 003 009 024 025 029 035 040 042 045 048 055 056 063 071 083 Realis...

Страница 29: ...udio Setup menu 47 CC Closed Caption Selector S Launches the temporary CC Selector 46 Base CC Mode S Off CC1 CC2 CC3 CC4 T1 T2 T3 T4 45 Digital CC Settings S Opens the Digital CC Setup menu 45 Input Labeling S Opens the Input Labeling menu 37 Channel Labeling S Opens the Channel Labeling menu 33 Menu Language S English French Spanish 31 Channel Browser Setup S Opens the Channel Browser Setup menu ...

Страница 30: ...n menu system Press Y to open the menu system When a menu is open use the up down left right arrow buttons BbC c on the remote control or TV control panel to move in the corresponding direction in the menu Press T to save your menu settings or select a highlighted item A highlighted menu item appears in a different color in the menu All menus close automatically if you do not make a selection with...

Страница 31: ... press T 3 A new set of Installation menu icons will appear as shown below Open the Terrestrial menu highlight Input Configuration and press T 4 Press C or c to select the input source Cable or Antenna for the ANT input on the TV 5 To save your new settings highlight Done and press T To revert to your original settings highlight Cancel and press T English Français Español Input Labeling Menu Langu...

Страница 32: ...rocess again unless your Cable TV service lineup changes significantly To program channels automatically 1 Configure the antenna input source if you have not already done so page 31 2 Press Y and open the Setup menu 3 Highlight Installation and press T 4 A new set of Installation menu icons will appear as shown below Open the Terrestrial menu highlight Channel Program to bring up the Start and pre...

Страница 33: ...channel labels logos for various channels ABC CBS etc will be programmed into the TV You will be able to view and assign these logos from the Channel Labeling window If the desired channel label is not provided in the list you will be able to manually enter edit labels using the software keyboard To assign channel labels 1 Press Y and open the Preferences menu 2 Highlight Channel Labeling and pres...

Страница 34: ...dow Setting the HDMI audio mode To set the HDMI audio mode 1 Press Y and open the Audio menu 2 Highlight Audio Setup and press T 3 Press B or b to select HDMI 1 Audio and then press C or c to select the HDMI 1 audio mode Auto Digital or Analog Auto is the recommended mode See Connecting an HDMI or DVI device to the HDMI input page 19 Note Because the PC and HDMI 1 inputs share the same set of anal...

Страница 35: ...stallation menu icons will appear as shown below Open the Terrestrial menu highlight Signal Meter and press T 4 Press BbC c to select the antenna input and digital channel whose signal you want to check Note The physical digital channel number listed in the Signal Meter screen may not correspond to a virtual TV channel number Contact your local broadcasters to obtain the RF channel numbers for you...

Страница 36: ...pear 3 Open the System Status menu highlight System Information and press T 4 Press C c to scroll through the menu bar to select Factory Defaults 5 Enter your PIN code or 0000 if no PIN code has been set 6 Highlight Yes and press T The TV will turn off automatically after a few seconds After the TV turns off unplug the TV power cord and then plug it in again to complete the reset process To cancel...

Страница 37: ...ing to the type of device you connected to each source from the following preset list of labels default label Audio Receiver Cable Compact Disc DTV DVD Game Console HD DVD Laser Disk Satellite DSS VCR Video Recorder Hide to hide an unused input in the Input Selection screen Note If you select PC in the Input Selection screen you can choose only or Hide as the label To label the video input sources...

Страница 38: ...m the Channel Browser History List illustrated on the next page Surf via Browse mode to immediately tune channels as you highlight them in the Channel Browser or Select mode to surf over channels in the Channel Browser before you select one to tune Quickly change inputs from the Inputs List Favorites Browser The Favorites Browser allows you to quickly set up a favorite channels inputs list that is...

Страница 39: ...ill not display the Channel Browser If Favorites List is turned off n will have no effect Pressing n will bring up the Channel Browser Favorites list regardless of the last selected list in the Channel Browser To tune to a channel or input in Browse mode 1 While watching TV press 3 C or c to open the Channel Browser and surf back to a previous item or surf forward to the next item in the list In B...

Страница 40: ...e control Switching between two channels using Channel Return The Channel Return feature allows you to switch between two channels without entering an actual channel number each time 1 Select the first channel you want to view 2 Select a second channel using the Channel Number buttons and the dash button if selecting a digital channel 3 Press R on the remote control The previous channel will displ...

Страница 41: ...ottom edges of the picture including subtitles or captions may be hidden To view the hidden edges either scroll the picture TheaterWide 2 and 3 only or try viewing the program in Full or Natural picture size Natural picture size The image is displayed close to its originally formatted proportion Some program formats will display with sidebars and or bars at the top and bottom TheaterWide 1 picture...

Страница 42: ...ture TheaterWide 2 and 3 only You can set separate scroll settings for the TheaterWide 2 and TheaterWide 3 modes for each input To set the scroll settings 1 Press Y and open the Video menu 2 Highlight Theater Settings and press T 3 In the Picture Size field select either TheaterWide 2 or TheaterWide 3 you cannot scroll in any other mode 4 Press b to highlight the Picture Scroll field 5 Press C or ...

Страница 43: ...processed from a DVD player connected to the VIDEO 1 VIDEO 2 ColorStream HD 1 ColorStream HD 2 component video or HDMI inputs on the TV smoother motion can be obtained by setting the Cinema Mode to Film To set the Cinema Mode to Film 1 Press Y and open the Video menu 2 Highlight Theater Settings and press T 3 In the Cinema Mode field select Film 4 To save the new settings highlight Done and press ...

Страница 44: ...or c to adjust the setting as described in the table above 4 To save the new settings highlight Done and press T You can use any of the picture modes Selecting the picture mode above left as a starting point for adjusting the picture settings To revert back to the base mode that you began adjusting the picture settings from highlight Reset and press T The picture qualities you adjusted are automat...

Страница 45: ...annot set the Caption Text and Background as the same color To customize the closed captions 1 Press Y and open the Preferences menu 2 Highlight Digital CC Settings and press T 3 Press B or b to highlight the characteristic you want to change and then press C or c to select the format for that characteristic see table below 4 To save the new settings highlight Done and press T To revert to the fac...

Страница 46: ...mode is set to Off when you select MUTE mode the closed caption feature is automatically activated To mute the audio without automatically activating the closed caption feature use Z to set the volume to 0 See Using the closed caption mode page 45 for more information on closed caption modes Using the digital audio selector You can use the Digital Audio Selector to conveniently switch between audi...

Страница 47: ...fer it For example a station might broadcast another language as a second audio program If you have SAP on you will see the current program on the screen but hear the other language instead of the program s normal audio If you have SAP on and the station you are watching is not broadcasting a second audio program the station s normal audio will be output However occasionally there is no sound at a...

Страница 48: ...mat field select either Dolby Digital or PCM depending on your device 4 To save the new settings highlight Done and press T To revert to the factory defaults highlight Reset and press T Using the Dolby Digital Dynamic Range Control feature This dynamic range control feature causes the ATSC dynamic range to be further compressed allowing you to switch from ATSC to analog broadcasts at the same dyna...

Страница 49: ... cannot remember your PIN code While the PIN code entering screen is displayed press E four times within five seconds The PIN code will be cleared and you can enter a new PIN code Changing your PIN code 1 Press Y and highlight the Locks menu icon 2 Press b to display the PIN code entering screen 3 Enter your four digit PIN code and press T 4 Press b to highlight New PIN Code and press T 5 Press th...

Страница 50: ...your four digit PIN code and press T 4 Press b to highlight Enable Rating Blocking 5 Press c and b to select On and press T 6 Press b to highlight Edit Rating Limits and press T The Edit Rating Limits screen appears 7 Highlight Alt RS and press T The Edit Alternate Ratings screen will appear Note The Alt RS button will only be available if an additional rating system is currently available It may ...

Страница 51: ... viewed by adults and therefore may be unsuitable for children under 17 L Crude or indecent language S Explicit sexual activity V Graphic violence TV 14 Parents Strongly Cautioned This program contains some material that many parents would find unsuitable for children under 14 years of age D Intensely suggestive dialog L Strong coarse language S Intense sexual situations V Intense violence TV PG P...

Страница 52: ...1 VIDEO 2 ColorStream HD 1 ColorStream HD 2 HDMI 1 HDMI 2 HDMI 3 and PC and channels 3 and 4 You will not be able to view the input sources or channels until you unlock the inputs To lock unlock the video inputs 1 Press Y and highlight the Locks menu icon 2 Press b to display the PIN code entering screen 3 Enter your four digit PIN code and press T 4 Press b to highlight Input Lock and press c 5 P...

Страница 53: ...rference readjust the Clock Phase and Sampling Clock To adjust the PC settings 1 Repeatedly press to select PC input mode Selecting the video input source to view page 37 2 Press Y and open the Setup menu 3 Highlight PC Settings and press T Note If a PC is not connected or there is no pc input signal this feature will be grayed out in the Setup menu 4 Press B or b to highlight the item you want to...

Страница 54: ...180 minutes To set the sleep timer using the remote control Press on the remote control to set the length of time until the TV turns off Repeatedly press to increase the time in 10 minute increments or press B or b to increase or decrease the time in 10 minute increments to a maximum of 180 minutes To set the sleep timer using the on screen menus 1 Press Y and open the Setup menu 2 Highlight Sleep...

Страница 55: ...hannels if applicable Title Duration Detailed description Note The location of the banner can be moved to the top or bottom of the screen by pressing B or b while the RECALL or INFO display is on screen The last position will be stored to memory Understanding the auto power off feature The TV will automatically turn itself off after approximately 15 minutes if it is tuned to a vacant channel or a ...

Страница 56: ...press T 4 In the Static Gamma field press C or c to adjust the static gamma The adjustment range is within 5 from center If the setting is moved in the minus direction the detail of black colors will be decreased If the setting is moved in the plus direction the detail of black colors will be increased 5 To save the new settings highlight Done and press T To revert the factory defaults highlight R...

Страница 57: ...sired such as in a bright room Note The Lamp Mode field will be grayed out for a while after the TV is turned on To select the lamp mode 1 Press Y and open the Video menu 2 Highlight Picture Settings and press T 3 Highlight Advanced Picture Settings and press T 4 In the Lamp Mode field select either High Bright or Low Power 5 To save the new settings highlight Done and press T To revert to the fac...

Страница 58: ...Middle and High will reduce the noise in varying degrees from lowest to highest respectively 4 To save the new settings highlight Done and press T To revert to the factory defaults highlight Reset and press T Using MPEG noise reduction The MPEG noise reduction feature allows you to reduce visible interference caused by MPEG compression Choices for MPEG noise reduction are Off Low Middle and High O...

Страница 59: ...ombination of SRS Labs audio technologies SRS 3D SRS Focus and SRS TruBass that creates a thrilling surround sound experience with deep rich bass from stereo sound sources Your TV s audio will sound fuller richer and wider To adjust the WOW settings 1 Put the TV in STEREO mode Selecting stereo SAP broadcasts on page 47 2 Press Y and open the Audio menu 3 Highlight Advanced Audio Settings and press...

Страница 60: ... reduce visible interference in the TV picture page 58 Video Input Selection problems If the Input Selection window does not appear when you press on the remote control or TV press a second time which will change to the next video input source and display the Input Selection window Cannot view external signals or channel 3 or 4 If you cannot view signals from external devices connected to VIDEO 1 ...

Страница 61: ...el tuning problems Make sure the remote control is set to the correct device mode page 23 The channel may have been erased from the channel memory by the Channel Add Delete feature Add the channel to the channel memory page 32 The channel may be blocked by the Channels Block feature Unblock the channel page 51 If you are unable to tune digital channels check the antenna configuration page 31 If yo...

Страница 62: ...solid Red blinks The lamp is not working properly after the eighth automatic restart see item 3 Turn the TV OFF and then ON again If the problem persists contact TACP Consumer Solutions at 1 800 631 3811 in the U S or TCL Customer Service at 1 800 268 3404 in Canada Lamp not working 6 Yellow is ON solid The lamp unit door is not seated properly Turn OFF the TV and unplug the power cord Review Lamp...

Страница 63: ... darkens and or colors fade if the screen lamp does not light LED indication 4 page 62 or if you hear a loud noise and the picture goes black which may indicate a lamp rupture LED indication 4 page 62 To obtain a replacement lamp unit Always replace the lamp unit with the model currently recommended by Toshiba For more information please contact us at the telephone numbers or websites listed above...

Страница 64: ...SHOCK TO REDUCE THE RISK OF ELECTRIC SHOCK NEVER REMOVE TV COVERS EXCEPT AS SPECIFIED HEREIN REFER ALL SERVICING NOT SPECIFIED IN THIS MANUAL TO QUALIFIED SERVICE PERSONNEL Failure to follow this WARNING may result in death or serious injury WARNING Eye damage may result from directly viewing the light produced by this lamp Always turn off the TV and unplug the power cord before opening the lamp u...

Страница 65: ...f children and pets Dispose of the used lamp unit by the approved method for your area CLEANING THE LAMP UNIT GLASS If you accidentally touch the lamp unit glass or otherwise get it dirty wipe it with a lint free lens cleaning cloth such as a cloth for cleaning camera lenses or eyeglasses NOTE Make sure the lamp unit and screws are installed securely otherwise the TV may not turn on and the lamp l...

Страница 66: ... 75 ohm PR 0 7 V p p 75 ohm PB 0 7 V p p 75 ohm Suggested formats 1080i 720p 480p 480i AUDIO 150 mV rms 22 k ohm or greater HDMI INPUT HDMI compliant type A connector HDCP compliant E EDID compliant Suggested formats 1080p 24 60Hz 1080i 60Hz 720p 60Hz 480p 60Hz 480i 60Hz VGA HDMI Audio 2 channel L PCM 32 44 1 48 kHz sampling frequency 16 20 24 bits per sample FIXED AUDIO OUTPUT 150 mv rms 30 modul...

Страница 67: ...roof of purchase 2 All warranty servicing of this DLP Television must be performed by an Authorized TACP Service Station 3 The warranties from TACP are effective only if this DLP Television is purchased and operated in the Continental U S A or Puerto Rico 4 Labor service charges for set installation setup adjustment of customer controls and installation or repair of antenna systems are not covered...

Страница 68: ...m the date of shipment to the rental firm whichever comes first Your Responsibility THE ABOVE WARRANTIES ARE SUBJECT TO THE FOLLOWING CONDITIONS 1 You must provide your bill of sale or other proof of purchase 2 All warranty servicing of this Television must be performed by an ASP 3 The warranties from TCL are effective only if the Television is i purchased as new and unopened from TCL or from TCL ...

Страница 69: ...in the manner as agreed to between you and TCL Failing such agreement the arbitration will be conducted by one arbitrator pursuant to the laws and rules relating to arbitration generally in force in the jurisdiction in which you reside at the time that the Dispute arises To the extent not precluded by law no claim dispute controversy or disagreement of any other person may be joined or combined wi...

Страница 70: ...R IMPLIED WARRANTIES INCLUDING BUT NOT LIMITED TO THE IMPLIED WARRANTIES OF MERCHANTABILITY AND FITNESS FOR A PARTICULAR PURPOSE ARE DISCLAIMED IN NO EVENT SHALL THE OpenSSL PROJECT OR CONTRIBUTORS BE LIABLE FOR ANY DIRECT INDIRECT INCIDENTAL SPECIAL EXEMPLARY OR CONSEQUENTIAL DAMAGES INCLUDING BUT NOT LIMITED TO PROCUREMENT OF SUBSTITUTE GOODS OR SERVICES LOSS OF USE DATA OR PROFITS OR BUSINESS I...

Страница 71: ...deo input 37 Lamp mode 57 Lamp unit replacement 63 Language selection 31 Last mode memory feature 55 LED indications 11 62 LOCKS menu Channels blocking 51 Enable rating blocking 50 New PIN code 49 Panel lock 53 Unlocking programs temporarily 52 Video inputs locking 52 Locks menu 49 M MPEG noise reduction 58 MTS feature 47 MUTE button 46 O Optical audio cable 13 Optical audio output format 48 P PC ...

Страница 72: ...HM67 E F Web 213 276 72 Notes 50HM67_EN book Page 72 Thursday March 29 2007 11 28 AM ...

Страница 73: ...HM67 E F Web 213 276 73 Notes 50HM67_EN book Page 73 Thursday March 29 2007 11 28 AM ...

Страница 74: ...a America Consumer Products L L C DLP and the DLP logo are registered trademarks of Texas Instruments MANUFACTURED BY HEAD OFFICE 191 McNABB STREET MARKHAM ONTARIO L3R 8H2 CANADA TEL 905 470 5400 SERVICE CENTERS TORONTO 191 McNABB STREET MARKHAM ONTARIO L3R 8H2 CANADA TEL 905 470 5400 MONTREAL 18050 TRANS CANADA KIRKLAND QUEBEC H9J 4A1 CANADA TEL 514 390 7766 VANCOUVER 13551 COMMERCE PARKWAY SUITE...

Отзывы: