Toshiba 39L4300 Series Скачать руководство пользователя страница 29

29

Using the TV’s features

• 

 L-PCM: Linear-Pulse Code Modulation

• 

 Supported Audio format: L-PCM, Dolby Digital 
sample rate 32/44.1/48 kHz

 Connecting an HDMI device

One HDMI cable (type A connector)

For proper operation, it is recommended that you 
use a short HDMI cable.
HDMI cable transfers both video and audio.

VIDE O

AUDIO

L

R

IN

OUT

HD MI OU T

TV back view

HDMI device

TV side view

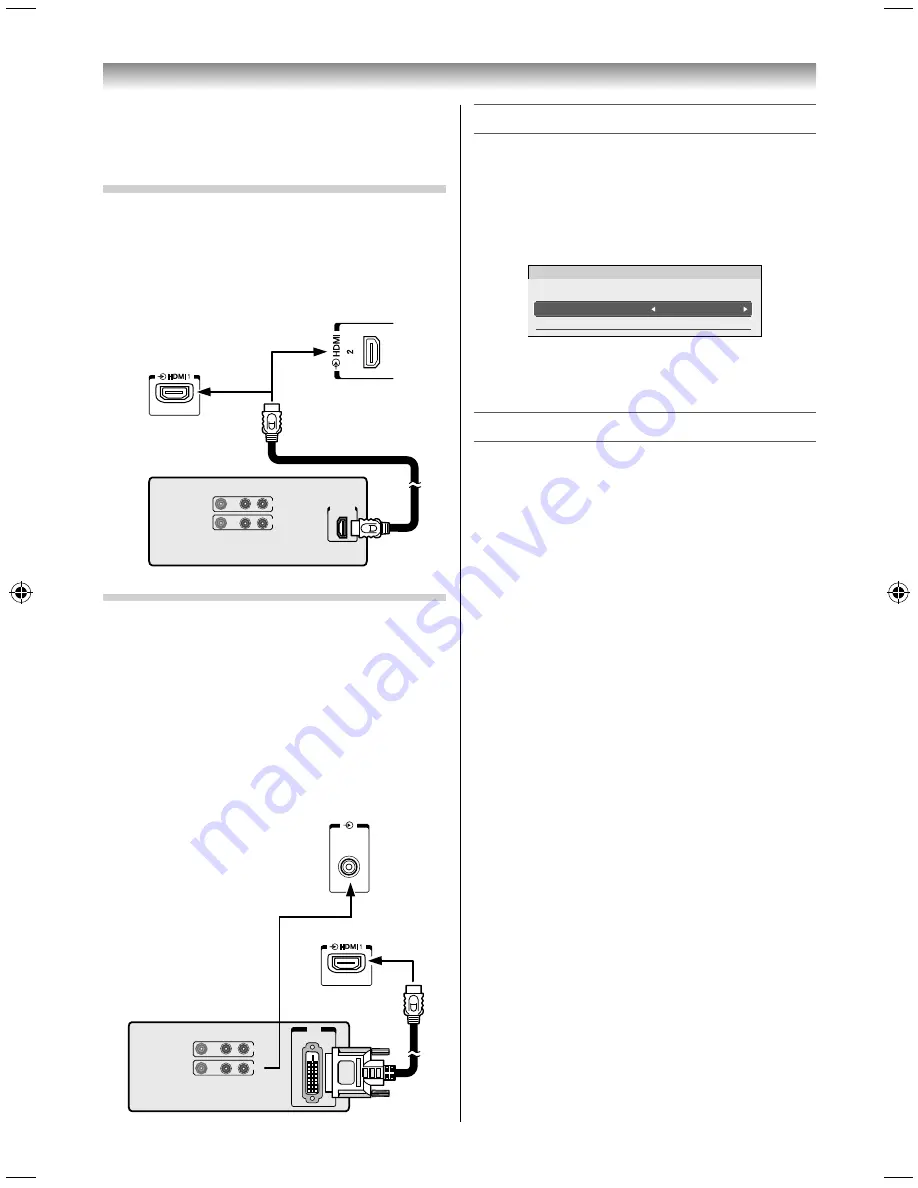
 Connecting a DVI device

One HDMI (type A connector)-to-DVI adapter cable 
and audio cables.

HDMI (type A connector)-to-DVI adapter cable

For proper operation, the length of an HDMI-to-
DVI adapter cable should not exceed 3 m. The 
recommended length is 2 m.

Standard analogue audio cables

An HDMI-to-DVI adapter cable transfers only video. 
Separate analogue audio cables are required.

PC/HDMI 1

(AUDIO)

VIDEO

AUDIO

L

R

IN

OUT

DVI

OUT

DVI device

TV back view

Selecting the PC/HDMI 1 Audio mode

You can select PC audio or HDMI audio when using 
this function.

From the 

PREFERENCES

 menu and press 

 or 

 to select 

AV Connection

Press 

OK

 to display the 

AV Connection

 menu.

PC

Digital

AV Connection

Input Labelling

PC/HDMI 1 Audio

HDMI 1 Audio

Press 

 or 

 to select 

PC/HDMI 1 Audio

 and 

press 

 or 

 to select 

PC

 or 

HDMI1

.

 Setting the HDMI 1 Audio mode

You can select sound of an HDMI or DVI device 
connected to the HDMI input terminals from three 
modes:

Auto

Digital

 or 

Analogue

.

NOTE:

This function is available only when the 

PC/HDMI 1 

Audio

 mode is set to HDMI1.

From the 

AV Connection

 menu, press 

 or 


to select 

HDMI 1 Audio

.

Press 

 or 

 to select 

Auto

Digital

 or 

Analogue

.

3950L4300Series̲En.indd   29

3950L4300Series̲En.indd   29

2013/10/09   15:23:59

2013/10/09   15:23:59

Содержание 39L4300 Series

Страница 1: ...serial number on the back of the TV Record these numbers in the spaces provided below Refer to them whenever you call upon your TOSHIBA dealer regarding this product Model number Serial number 39L4300 Series 50L4300 Series 2013 TOSHIBA CORPORATION All Rights Reserved VX1A00288700 TD J ...

Страница 2: ...elp you use the exciting features of your new TV Instructions in this manual are based on using the remote control You also can use the controls on the TV if they have the same name as those referred to on the remote control Please read all safety and operating instructions in this manual carefully and keep this manual for future reference LED TV means LCD Panel with LED Backlight Using the Androi...

Страница 3: ...Leave the bottom of the unit protruding over the edge of the surface and assemble as indicated NOTE Extreme care should always be used when attaching the pedestal stand to avoid damage to the LCD panel 1 4 3 2 Warning Ensure the power cable is not pinched when attaching the pedestal stand as this could cause an electric shock M5 2 M4 4 M4 4 39L4300 Series 39L4300 Series 50L4300 Series 50L4300 Seri...

Страница 4: ...240V AC 50 60Hz Never use the TV outside the specified voltage range It may cause a fire or an electric shock About the fuse In a three pin earthing type the fuse fitted in this plug is approved by ASTA or BSI to BS1362 It should only be replaced by a correctly rated and approved type and the fuse cover must be refitted 5 Never insert or remove the power plug with wet hands This may cause an elect...

Страница 5: ...the disconnect device therefore the disconnect device shall remain readily operable 5 Never pull on the power cord when removing the plug from the wall outlet Always hold the plug firmly when removing it If the power cord is yanked the cord may become damaged and a fire or an electric shock may occur Introduction Gettingstarted 6 Never cut break modify twist bunch up or bent the cord or apply exce...

Страница 6: ...ompounds such as insecticide on the cabinet and LCD screen This may cause a discolouration or damage the cabinet and LCD screen 3 About afterimage If a still picture is displayed an afterimage may remain on the screen however it will disappear This is not a sign of malfunction 4 Some pixels of the screen do not light up The LCD display panel is manufactured using an extremely high level of precisi...

Страница 7: ...battery compartment Easy remote control Introduction Gettingstarted TV remote control Cautions Dispose of batteries in a designated disposal area Batteries must not be exposed to excessive heat such as sunshine fire or the like Attention should be drawn to the environmental aspects of battery disposal Never mix battery types or combine used batteries with new ones NOTE If the remote control does n...

Страница 8: ... to be used with the TOSHIBA Dual Band WLAN Adaptor in order to access a wireless network page 37 You can connect a keyboard or mouse to the USB port If you are using a wireless mouse only you cannot enter text Use also a keyboard 6 o HDMI 2 input terminals High Definition Multimedia Interface input receives digital audio and uncompressed digital video from an HDMI device page 28 7 RESET Press thi...

Страница 9: ... 17 14 11 8 4 5 18 10 12 1 Power on Standby The TV broadcast or external input appears 2 Input source selection TV VIDEO or COMPONENT HDMI PC 3 Picture Size 4 Subtitle on off 5 Stereo Bilingual selection 6 Number buttons 0 9 7 To display the Channel List 8 Teletext on Superimpose Teletext off 9 Volume These buttons adjust the volume level 10 To display on screen information Initial Index function ...

Страница 10: ...revious menu 5 To access the Home 6 To access the Menu Introduction Gettingstarted Using the pointing key Move the pointer Tilt the pointing key to move the screen pointer in the tilted direction Pointing key Select Confirm Press the pointing key to confirm the selection Hold and move Press hold and then tilt the pointing key to hold and move the selected item ...

Страница 11: ...ncheck the box Confirm the time zone date and time Select and change the items if necessary Set the owner Select to skip this step Set this later on if necessary Complete the Android setup When Setup complete appears select Finish to confirm When the Android setup is complete the Country setup screen appears Country Country Next Singapore Proceed to the TV initial setup NOTE If you press the 1 but...

Страница 12: ...n item then press or to select the item as shown below Manual Tuning Pos 1 B G A 0 1 C On A C G I J H D E F B A Position selection B System Sound page 54 C Colour System page 54 A Automatic factory set P PAL S SECAM N4 NTSC 4 43 MHz N3 NTSC 3 58 MHz If the colour of a certain channel is abnormal the automatic colour system selection A may have malfunctioned or sound system selection is wrong In su...

Страница 13: ...e first space then press or blank space 2 Repeat step 1 to enter the rest of the characters If you would like a blank space in the label name you must choose a blank space from the list of characters Press OK to store your settings Introduction Gettingstarted NOTE The Quick Setup Location Auto Tuning Manual Tuning menu can also be display at any time from the SETUP menu When you preset the channel...

Страница 14: ...Application and switch to the TV broadcast or external input while on the home screen perform either of the following Select the icon and confirm Select 1 on the home screen and confirm NOTE If BACK on the TV remote control is pressed twice the TV Application closes You can enjoy visual or audio content applications and TV broadcasts or external input by starting TV Application Home screen Turning...

Страница 15: ...et 0 0 APPLICATIONS Media Player On Timer 00 00 Sleep Timer System Settings PREFERENCES Auto 1 On Teletext Teletext Language Display Settings AV Connection Energy Saving Settings Blue Screen PICTURE SOUND APPLICATIONS PREFERENCES SETUP SETUP Singapore Home Country Auto Tuning Manual Tuning Quick Setup Location System Information Reset TV NOTE In the video input mode o1 o2 and HDMI Auto Tuning Manu...

Страница 16: ...y and then press OK SETUP Home Auto Tuning Manual Tuning Quick Setup Location System Information Reset TV Singapore Country 3 Press OK 4 Press or to select the desired country and then press OK Changing the position 1 Enter the desired position number using the Number buttons on the remote control For positions below 10 use 0 and the required number e g for position 1 2 You can also change the pos...

Страница 17: ... Super Live This setting will enlarge a 4 3 image to fit the screen by stretching the image horizontally and vertically holding better proportions at the centre of the image Some distortion may occur Cinema When watching all sides panel format films video tapes this setting will eliminate or reduce the black bars on all the sides of the screen by zooming in and selecting the image without distorti...

Страница 18: ...or bars at the top and bottom e g VGA input source Normal Sets the size to full screen without changing the aspect ratio when watching a video stored on a USB device Zoom Sets the size to full screen keeping the 21 9 circularity ratio when watching a video stored on a USB device NOTE Using the special functions to change the size of the displayed image e g changing the height width ratio for the p...

Страница 19: ...ifferent Picture Mode for each input Activating the picture preferences You can customise current Picture Mode settings as desired For example while selecting Dynamic if you change the following items such as Backlight Contrast Brightness Colour Tint Sharpness and the Picture Settings items your new setting are saved for Dynamic Picture Mode 1 From the Picture Settings menu press or to select eith...

Страница 20: ...K On Auto Auto Noise Reduction Auto Clean MPEG NR DNR 2 Select Auto Clean and then press or to select On or Off Off mode MPEG NR menu and DNR menu are available MPEG NR mode Low Middle High or Off DNR Digital Noise Reduction mode Low Middle High or Off Resetting the Picture Settings This feature resets the Picture Settings to the factory settings NOTE If no picture settings have been changed Reset...

Страница 21: ...problem 1 When a monaural programme is received e Mono appears Resetting the Base Colour Adjustment The reset function adjusts the base colour adjustment to the factory settings 1 From the Base Colour Adjustment menu press or to select Reset 2 Press OK 3 A confirmation message will appear Press or to select Yes and then press OK Using the Active Backlight Control In order to improve screen visibil...

Страница 22: ...s installed on a wall or a TV stand 1 From the SOUND menu press or to select TV Mounting 2 Press or to select Wall or Stand 2 Press s to select a monaural mode that is easy to hear e Mono 1 and e Mono 2 appear cyclically to the screen NOTE On some cases the reception of stereo bilingual broadcasts may not be possible after switching on the e Mono 2 mode Adjusting the sound Balance 1 From the SOUND...

Страница 23: ...the TV turns on Time Until Power On Set the amount of time from now until the TV turns on using the Number buttons maximum of 12 hours 4 When all the details have been entered select Done and press OK to start the timer To cancel the OnTimer 1 From the On Timer menu select Enable On Timer 2 Press or to select Off and then select Done and press OK Setting the SleepTimer The Sleep Timer is especiall...

Страница 24: ... or to until Blue Screen is selected 2 Press or to select On or Off NOTE Some external inputs may not mute the sound Activating the 4 3 Stretch When 4 3 stretch is activated this function will switch 4 3 format programmes into a full screen picture 1 From the Display Settings menu press or to select 4 3 Stretch 2 Press or to select On or Off NOTE This feature is not available when Auto Format is s...

Страница 25: ...for other video inputs Channel List 1 Press LIST The Channel List will appear Channel List 2 3 4 5 6 7 8 1 2 Press or to select a channel and then press OK Teletext This TV has a multi page Teletext memory which takes a few moments to load and it offers two ways of viewing Teletext Auto and List which are explained below Setting up theTeletext mode To select a language forTeletext The language 1 4...

Страница 26: ... on the remote control to while the teletext screen is displayed to display subtitles While the subtitles are displayed press SUBTITLE again to change the setting UsingtheTV sfeatures Using Auto mode There are two Modes Auto will display FASTEXT if available List will display your four favorite pages In either mode as an alternative to the coloured buttons you can access a page by entering a 3 dig...

Страница 27: ...Auto mode Press to access the index page The one displayed is dependant on the broadcaster In List mode Press to return to the 100 page or initial page To reveal concealed text Some pages cover topics such as quizzes and jokes To discover the solutions press To hold a wanted page This function is included as it is part of the broadcast teletext system but you will not need it as this TV allows you...

Страница 28: ...ng HDMI use the analogue audio cables to connect the TV and the HDMI device and select Analogue in HDMI 1 Audio of the AV Connection menu page 29 This TV is able to connect with HDMI devices But it is possible that some HDMI devices may not operate properly with this TV Connecting HDMI or DVI devices The HDMI input on your TV receives digital audio and uncompressed digital video from an HDMI and u...

Страница 29: ...DMI to DVI adapter cable transfers only video Separate analogue audio cables are required PC HDMI 1 AUDIO VIDEO AUDIO L R IN OUT DVI OUT DVI device TV back view Selecting the PC HDMI 1 Audio mode You can select PC audio or HDMI audio when using this function 1 From the PREFERENCES menu and press or to select AV Connection 2 Press OK to display the AV Connection menu PC Digital AV Connection Input ...

Страница 30: ... use an adapter for computers with DOS V compatible mini D sub 15 pin terminal A bar may appear in the upper lower right or left side of the screen or parts of the picture may be obscured depending on some signals This is not the malfunction If the edges of the picture are stretched readjust the picture position adjustments in the PC Settings menu Depending on the specification of the PC you are p...

Страница 31: ...ay a clear picture 1 From the PC Settings menu press or to select Clock Phase 2 Press or to obtain a clear picture Adjusting the Sampling Clock If the Sampling Clock does not match with the dot clock frequency of the PC blurred picture detail will occur or screen width will change or drift patterns in vertical lines may be apparent This function enables you to adjust it and optimize the picture 1 ...

Страница 32: ...ns are aligned on the desktop area of the home screen The desktop area of the home screen cannot be changed The other desktop areas can be customized The status bar Google search desktop position screen slide button dock bar logout button and User Name are outside the desktop area and are always displayed even when you move to another desktop area 5 Screen slide button You move to the desktop area...

Страница 33: ...key The desktop position indicator also changes with the desktop area Alternatively follow the procedure below 1 At any position in the desktop area press and hold the pointing key and then tilt it to the left or right The desktop area in the direction in which the pointing key was tilted is displayed Status bar The notification icon that appears when there is a notification is displayed on the le...

Страница 34: ...e login screen appears When is displayed on the screen pressing MENU redisplays the home screen Notes on using the Android features To use the Android features effectively an Internet connection is required In addition to use all the features on the TV it is recommended that you use a TOSHIBA Dual Band WLAN Adaptor and connect via wireless LAN Connecting a network page 36 Some features require an ...

Страница 35: ...the pointing key to the left or right to display the desktop to place the application or widget on 5 Move the application or widget to any position and release the pointing key It is placed in the specified position Moving shortcut icons or widgets 1 Select a shortcut icon or widget to move and press hold and tilt the pointing key in your preferred direction 2 Release the pointing key in any posit...

Страница 36: ...aken place Connecting will appear on screen After the Screen Mirroring connection is complete the TV screen will mirror the content shown on the tablet smartphone or PC NOTE When the Screen Mirroring software is active other applications may not be usable When Screen Mirroring is used you cannot connect to the Internet using the TV To exit Screen Mirroring Exit using your tablet smartphone or PC o...

Страница 37: ...rk connection If you should experience any such problem immediately turn off either your Bluetooth or Wireless LAN device Actual performance can vary including lower wireless network capacity data throughput rate range and coverage Performance depends on many factors conditions and variables including distance from the access point volume of network traffic building materials and construction oper...

Страница 38: ...ication Encryption and Security Key all to be inputted manually Easy Setup using PBC Push Button Configuration 1 Select the Settings icon on the home screen and press the pointing key The Settings screen appears 2 Select Wi Fi and press the pointing key to change the value from OFF to ON 3 Select on the upper right and press the pointing key 4 Following the on screen instructions push the appropri...

Страница 39: ...hts of third parties The effect of Audio Source Filtering depends on the contents If the content is mono it may not have enough effect Audio Source Filtering may amplify the noise that is included in the contetnt The volume may wobble when you enable Audio Source Filtering Audio Source Filtering takes a few seconds to exert after enabling it changing content jump and changing volume Audio Source F...

Страница 40: ...New and then press the pointing key you can register a new Google account Date time Set the date and time To display the setup screen select Date time and then press the pointing key Set them up if necessary Accessibility Set the accessibility To display the setup screen select Accessibility and then press the pointing key Set it up if necessary Panel Lock Set Panel Lock page 24 Panel Lock disable...

Страница 41: ...external input are output Media Player If you select Media Player and then press the pointing key the top screen of Media Player is displayed page 42 Updating the system Use TOSHIBA Service Station to update the system 1 Display the APPS screen page 34 2 Select and start TOSHIBA Service Station 3 Follow the on screen instructions Using theTV remote control to operate The following buttons on the T...

Страница 42: ...correct in some cases File system FAT16 and FAT32 You must obtain any required permission from copyright owners to download or use copyrighted content TOSHIBA cannot and does not grant such permission Starting Media Player Starting Media Player while you are watchingTV 1 Press QUICK to open the Quick Menu 2 Press or to select Media Player and press OK The top screen of the Media Player appears Alt...

Страница 43: ...Photos Music or Videos icon and press the pointing key The device selection screen appears 3 Select a device and press the pointing key Exiting Media Player When the top screen of Media Player is displayed or you are operating Media Player perform the following Using theTV remote control 1 Press QUICK to open the Quick Menu 2 Press or to select TV Application or System Settings If you select TV Ap...

Страница 44: ...lected photo will be displayed Press to view the next photo Press to view the previous photo Press to rotate the image 90 clockwise Press to rotate the image 90 counterclockwise Press to display file status information Slide Show This view allows you to watch a slide show of your photos In this mode only files located in the selected directory will be played 1 To start slideshow press OK in the Si...

Страница 45: ...x mov Date xxxxx xxxx xxxxx xxxxx USB xxxxxxxx xxxx xxxx ccc abc xxxx ccc abc xxxx ccc abc xxxx ccc abc xxxx ccc abc xxxx ccc abc xxxx ccc abc xxxx ccc abc xxxx ccc abc 00 20 00 03 00 00 03 00 00 03 00 00 03 00 00 03 00 00 03 00 00 03 00 00 03 00 00 03 00 00 1 Press or to select a file or folder PU Pu buttons can be used to page up down the List View when there are more files than will fit onto on...

Страница 46: ...rTV to a DivX account This TV allows you to play back files purchased or rented from DivX Video On Demand VOD services When you purchase or rent DivX VOD files on the internet you will be asked to enter a registration code 1 On the top screen of Media Player press or to select Setup and press OK 2 Press or to select DivX VOD and press OK 3 Press or to highlight DivX VOD Registration and press OK 4...

Страница 47: ...ernativeTimelines MultiTitle DivX Plus HD files may contain up to 100 titles You can change the title It contains same video file by pressing the RED button When the RED button is pressed it will display the title change window at the bottom on the screen same as Subtitle or Audio change window The title is changed cyclically each time the RED button is pressed Playback will start from start time ...

Страница 48: ...ring playback you can adjust the SOUND menu functions from the Quick Menu During playback Press W to pause To resume normal playback press c play PAUSE may not be available depending on the contents To play in fast reverse or fast forward directions press CC or cc during playback Each time you press CC or cc the playback speed will change Press z to skip to the next track Press Z to skip to the be...

Страница 49: ...select a file and then press the pointing key playback starts If you select a folder and then press the pointing key the next layer appears To go back to the upper layer press During playback If you move the pointing key the operation buttons appear on the screen NOTE The operation buttons are displayed for a few seconds and automatically disappear if no operation is performed Z z Works the same a...

Страница 50: ...m number of files 4096 per folder Maximum viewable resolution 1920x1080 Some files may not be played Audio MPEG 1 2 Layer2 MPEG 1 2 Layer3 Dolby Digital AC 3 L PCM ADPCM WMA7 8 9 Std MPEG 2 PS mpg mpeg dat Video MPEG 1 Video MPEG 2 Video Audio MPEG 1 2 Layer2 MPEG 1 2 Layer3 Dolby Digital AC 3 L PCM MPEG 2 TS ts trp tp m2ts Video MPEG 1 Video MPEG 2 Video H 264 MPEG 4 AVC VC 1 WMV9 Audio MPEG 1 2 ...

Страница 51: ... xdiv Video MPEG 2 Video MPEG 4 part2 H 264 MPEG 4 AVC Xvid Audio MPEG 1 2 Layer2 MPEG 1 2 Layer3 Dolby Digital AC 3 MPEG 2 4 LC AAC RealMedia rm rmvb Video RealVideo 8 9 10 Audio RA COOK Flash Video FLV1 flv Video Sorenson H 263 FLV1 H 264 MPEG 4 AVC Audio MPEG 1 2 Layer3 MPEG 2 4 LC AAC 3GPP 3gp Video MPEG 4 part2 H 264 MPEG 4 AVC Audio MPEG 4 LC AAC Music MP3 mp3 MPEG 1 2 Layer3 Maximum number ...

Страница 52: ...53 727 25 C54 735 25 C55 743 25 C56 751 25 C57 759 25 C58 767 25 C59 775 25 C60 783 25 C61 791 25 C62 799 25 C63 807 25 C64 815 25 C65 823 25 C66 831 25 C67 839 25 C68 847 25 C69 855 25 C70 863 25 S mode OSD RF Frequency MHz S1 105 25 S2 112 25 S3 119 25 S4 126 25 S5 133 25 S6 140 25 S7 147 25 S8 154 25 OSD RF Frequency MHz S9 161 25 S10 168 25 S11 231 25 S13 238 25 S14 245 25 S15 252 25 S16 259 2...

Страница 53: ...et Teletext problems Check the aerial connections Good performance of text depends on a good strong broadcast signal Some pixels of the screen do not light up The LCD display panel is manufactured using an extremely high level of precision technology however sometimes some pixels of the screen may be missing picture elements or have luminous spots This is not a sign of a malfunction The picture br...

Страница 54: ... VCRs to playback NTSC recorded video tapes through PAL TV equipment Specifications LEDTV Model 39L4300 Series 50L4300 Series Power source 110V 240V AC 50 60Hz Power consumption 39 107 W 0 6 W standby 50 150 W 0 6 W standby Dimensions 39 891 mm W 590 mm H 200 mm D 50 1136 mm W 743 mm H 230 mm D Mass Weight 39 8 5 kg 50 18 0 kg TV system Aerial input Channel coverage PAL B G CCIR VHF 2 12 UHF 21 69...

Страница 55: ...Input type A 19 pin A V Digital HDMI Lip Sync USB port 1 3 Media Player Interface version USB 2 0 USB class Mass Storage File system FAT16 and FAT32 LAN port RJ 45 Operating condition Temperature 0 C 35 C Humidity 20 80 No moisture condensation Supplied accessories 39L4300 Series Owner s manual 1 Remote control 2 Batteries 2 TOSHIBA Dual Band WLAN Adapter WLM 40U Clip 1 page 4 Screw 1 page 4 Pedes...

Страница 56: ...TP WWW MPEGLA COM MPEG Layer 3 audio coding technology licensed from Fraunhofer LLS and Thomson THIS PRODUCT IS LICENSED UNDER THE VC 1 PATENT PORTFOLIO LICENSE FOR THE PERSONAL AND NON COMMERCIAL USE OF A CONSUMER TO i ENCODE VIDEO IN COMPLIANCE WITH THE VC 1 STANDARD VC 1 VIDEO AND OR ii DECODE VC 1 VIDEO THAT WAS ENCODED BY A CONSUMER ENGAGED IN A PERSONAL AND NON COMMERCIAL ACTIVITY AND OR WAS...

Страница 57: ...ommercial transportation nuclear facilities or systems or any other applications where product failure could lead to injury to persons End User License Agreement IMPORTANT THIS END USER LICENSE AGREEMENT EULA IS A LEGAL AGREEMENT BETWEEN YOU AND TOSHIBA CAREFULLY READ THIS EULA USE OF ANY TOSHIBA AND THIRD PARTY SOFTWARE OR ANY RELATED DOCUMENTATION PREINSTALLED ON OR SHIPPED WITH A TOSHIBA HARDWA...

Страница 58: ... IS WITH YOU NEITHER TOSHIBA NOR ITS LICENSORS WARRANT THAT THE FUNCTIONS CONTAINED IN THE SOFTWARE WILL MEET YOUR REQUIREMENTS OR THAT THE OPERATION OF THE SOFTWARE WILL BE UNINTERRUPTED OR ERROR FREE NO ORAL OR WRITTEN INFORMATION OR ADVICE GIVEN BY TOSHIBA OR A TOSHIBA AUTHORIZED REPRESENTATIVE SHALL CREATE A WARRANTY OR IN ANY WAY INCREASE THE SCOPE OF THIS WARRANTY SOME JURISDICTIONS DO NOT A...

Страница 59: ...there is any discrepancy between the terms and conditions of the applicable open source license agreement and the EULA the terms and conditions of the applicable open source license agreement prevail with respect to the applicable open source software Until the date that is three years after you acquire the Software you may obtain a copy of the source code corresponding to the binaries for GPL lic...

Страница 60: ......

Отзывы: