background image

– 8 –

Note:

If you watch black and white programmes when 
the 

Colour System

 mode is set to 

Auto

, colour 

noise may appear on the screen. In this case 
select the appropriate 

Colour System

 (For the 

system of each country or region, refer to pages 
9, 21).

Switching off the TV

1

 Press 

 on the remote control or 

!

 on the 

TV left side panel to switch to the standby 
mode.

Notes:

• When the TV will not be used for a long period 

of time, such as during vacation or travel, 
remove the power plug from the wall outlet.

• The TV will automatically turn itself off after 

approximately 15 minutes if it is tuned to a 
vacant channel or a station that completes its 
broadcast for the day. This function does not 
work in external input or Blue screen Off mode. 
The TV will automatically turn itself off after 
approximately 2 hours if you do not operate 
the TV after turned on by on timer function.

• If power is cut off while you are viewing the TV, 

the Last Mode Memory function turns on the 
TV automatically when power is applied again. 
If power is going to be off for a long time and 
you are going to be away from your TV, unplug 
the power cord to prevent the TV from turning 
on in your absence.

Tuning the TV for the fi rst time

Before switching on the TV, put your decoder 
and media recorder to standby, if they are 
connected, and ensure that the aerial is 
connected. To setup the TV, use the buttons on 
the remote control as detailed on page 9.

1

 Press the 

 button. The 

Quick Setup


screen will appear. This screen will appear 
the fi rst time that the TV is switched on.

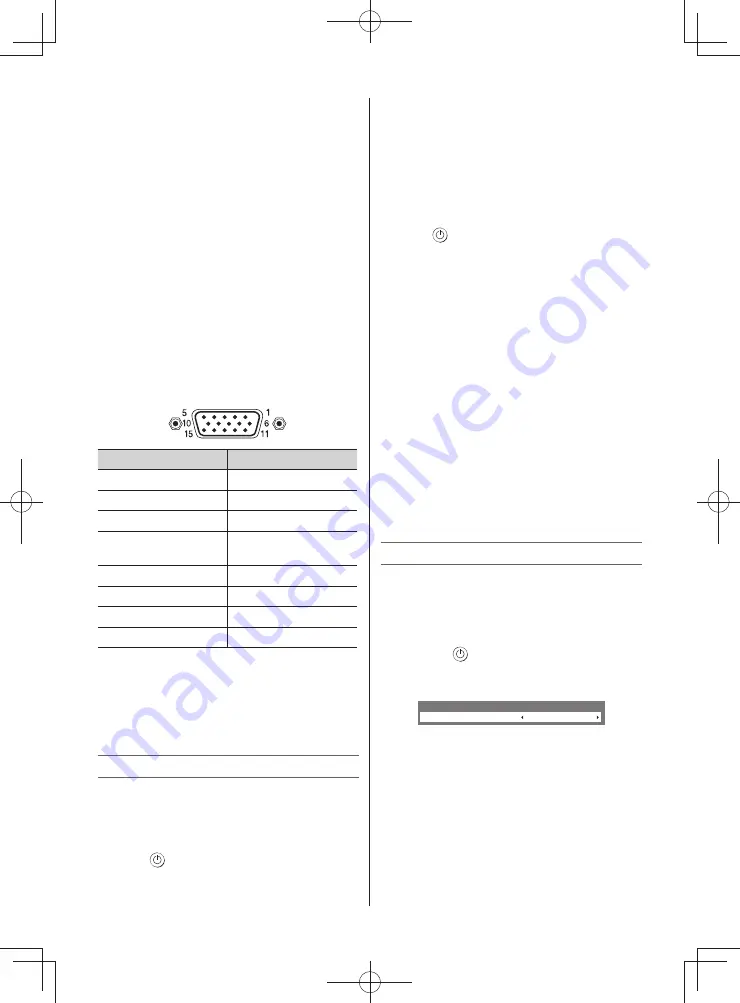
Quick Setup

Language

English

2

 Press 


or 

 to select the menu language 

(English, Chinese (CS), Malay, Thai, Vietnamese, 
Russian, Arabic, Persian or French).

3

 Press 

Q

, to display the 

Location

 menu.

Press 


or 

 to select 

Store

 or 

Home

. For 

normal home use, select 

Home

.

You can select either 

Home

 or 

Store

 mode. 

Home

 is recommended for normal home 

use. Select 

Store

 when using a TV for 

displaying in a shop, etc.

Notes:

• Some PC models cannot be connected to this TV.
• If connecting a certain PC model that signal is 

particular, the PC signal may not be detected 
correctly.

• There is no need to use an adapter for 

computers with DOS/V compatible mini D-sub 
15 pin terminal.

• A bar may appear in the upper, lower, right or 

left side of the screen, or parts of the picture 
may be obscured depending on some signals. 
This is not the malfunction.

• If the edges of the picture are stretched, 

readjust the picture position adjustments in the 

PC Settings

 menu.

• Depending on the specifi cation of the PC you 

are playing the DVD-Video on, and the DVD’s 
title, some scenes may be skipped, or you may 
not be able to pause during multi-angle scenes.

Signal names for mini D-sub 15 pin connector

Pin assignment for RGB/PC terminal

Pin No.

Signal name

Pin No.

Signal name

1

R

9

NC

2

G

10

Ground

3

B

11

NC

4

NC (not 
connected)

12

NC

5

NC

13

H-sync

6

Ground

14

V-sync

7

Ground

15

NC

8

Ground

• Most of the picture/sound controls and 

functions are available. However features not 
available will be greyed out.

Turning the TV on

Switching on the TV

Connect the power cord to a wall outlet, the 

!

 power indicator lights in red (standby mode).

1

 Press 

 on the remote control or 

!

 on the 

TV left side panel, the 

!

 power indicator 

lights in green.

2432PB2Series̲En.indd   8

2432PB2Series̲En.indd   8

2011/09/28   9:40:31

2011/09/28   9:40:31

Содержание 24PB2 Series

Страница 1: ...ble as indicated Note Extreme care should always be used when attaching the pedestal stand to avoid damage to the LCD panel Take care not to scratch the stand when turning the Allen key Warning Ensure the power cable is not pinched when attaching the pedestal stand as this could cause an electric shock Welcome to Toshiba Thank you for purchasing this Toshiba LCD Colour TV This manual will help you...

Страница 2: ...end and wall outlet end Make sure to hold the plug when unplugging the AC power cord Never use other cord except for supplied AC power cord and never use the supplied power cord for any other purpose 5 Never insert or remove the power plug with wet hands This may cause an electric shock Contents Connecting an aerial 5 Exploring your new TV 5 TV panel and remote controls 5 TV back panel connections...

Страница 3: ...n melt plastic and lead to fires 2 The apparatus shall not be exposed to dripping or splashing and that no objects filled with liquids such as vases shall be placed on the apparatus When liquids are spilled or small items are dropped inside the TV this may cause a fire or an electric shock If small objects drop inside the TV turn off the TV and remove the power plug from the outlet immediately and ...

Страница 4: ...e the LCD screen facing to the sun the LCD screen will be damaged Be aware of locating the TV close to a window or outdoors Never press the LCD screen strongly or scratch it and never put anything on it These actions will damage the LCD screen 2 About cabinet and LCD screen Never spray volatile compounds such as insecticide on the cabinet and LCD screen This may cause a discolouration or damage th...

Страница 5: ... polarities of the battery to the marks inside the battery compartment Cautions Dispose of batteries in a designated disposal area Batteries must not be exposed to excessive heat such as sunshine fire or the like Attention should be drawn to the environmental aspects of battery disposal Never mix battery types or combine used batteries with new ones Notes If the remote control does not operate cor...

Страница 6: ...tion Initial Index function for Teletext 20 This button turns the sound off on 21 To exit menu 22 To access the Quick Menu 23 Teletext on Superimpose Teletext off 24 Teletext control buttons Four coloured buttons Red Green Yellow Blue 25 To reveal concealed text 26 To select a page while viewing a normal picture To select the time display 27 To hold a wanted page 28 To enlarge the teletext display...

Страница 7: ...ct with HDMI devices But it is possible that some HDMI devices may not operate properly with this TV Connecting HDMI or DVI devices The HDMI input on your TV receives digital audio and uncompressed digital video from an HDMI and uncompressed digital video from a DVI device This input is designed to accept HDCP programme material in digital from CEA 861 D compliant consumer electronic devices such ...

Страница 8: ... Language English 2 Press or to select the menu language English Chinese CS Malay Thai Vietnamese Russian Arabic Persian or French 3 Press Q to display the Location menu Press or to select Store or Home For normal home use select Home You can select either Home or Store mode Home is recommended for normal home use Select Store when using a TV for displaying in a shop etc Notes Some PC models canno...

Страница 9: ...ct the item as shown below Manual Tuning Position 0 1 B G A 0 On A C E G H F D B A Position selection B System Sound page 21 C Colour System page 21 A Automatic factory set P PAL S SECAM 4 NTSC 4 43 MHz 3 NTSC 3 58 MHz If the colour of a certain channel is abnormal the automatic colour system selection A may have malfunctioned or sound system selection is wrong In such a case select another colour...

Страница 10: ... 18 Bass Boost page 15 Signal Booster page 9 When using Media Player Photo View Interval Time page 19 Repeat page 19 Learning about the menu system We suggest you familiarize yourself with the display charts before using the menu system Press MENU to display menu then press or to select main menu headings Press or to select an item Press or to select or adjust setting Press Q to display the next m...

Страница 11: ...ons Ex To swap channel ABCD Prog 1 for channel MNOP Prog 4 1 From the SETUP menu press or to select Manual Tuning menu and then press Q 2 Press or to select the channel ABCD then press 1 A B C D E F G H I J K L M N O P Manual Tuning Pos Label 2 3 4 5 3 Press to select the new position 4 then press 4 Press to select the channel MNOP then press 5 Press to select the new position 1 then press 6 Confi...

Страница 12: ... holding better proportions at the centre of the image Some distortion may occur Cinema When watching all sides panel format films video tapes this setting will eliminate or reduce the black bars on all the sides of the screen by zooming in and selecting the image without distortion Subtitle When subtitles are included on a letterbox format broadcast this setting will raise the picture so that the...

Страница 13: ... item Picture Mode Notes If using Eco Mode 1 or Eco Mode 2 will be changed the dark screen and you will be able to reduce power consumption The Eco Mode 2 is effect better than the Eco Mode 1 The Backlight mode is not available in the Eco Mode 1 or the Eco Mode 2 Game mode is available in external input mode other than aerial input When you select Game mode suitable widescreen formats will be sele...

Страница 14: ...klight Control Activating Auto Brightness Sensor When the Auto Brightness Sensor is activated it will automatically optimise the backlighting levels to suit ambient light conditions Use the menu PICTURE Use the item Auto Brightness Sensor Sound adjustment Setting the MTS Multi channel TV Sound Auto mode The MTS Auto mode automatically recognize stereo bilingual programmes depending on the broadcas...

Страница 15: ...XIT to exit the menu Set the Standby mode by pressing on the remote control The TV will automatically turn itself off after approximately 2 hours if you do not operate the TV after turned on by on timer function Using the Auto Format When the TV receives a true HDMI signal picture and the Auto Format is On it will automatically be displayed in HDMI signal format irrespective of the TV s previous s...

Страница 16: ...be cancelled Sub pages Once in this chosen page if there are sub pages they will automatically load into memory without changing the one you are reading If there are many sub pages it will take a long time for them all to load and this will depend on the speed with which the broadcaster transmits them To access the sub pages in memory press or to view them Using Subtitles 1 Press on the remote con...

Страница 17: ...u to control the display of sub pages To enlarge the teletext display size Press once to enlarge the top half of the page press again to enlarge the bottom half of the page Press again to revert to the normal size To select a page while viewing a normal picture When in teletext mode if a page selection is made and then is pressed a normal picture will be displayed The TV will indicate when the pag...

Страница 18: ...u highlight Media Player and press Q Media Player Photo Auto Start On 2 Press or to highlight Auto Start 3 Press or to select On 4 Insert a USB device into the USB terminal on the left side of the TV 5 A confirmation message will appear Highlight Yes and then press Q 6 Press or to select Photo and then press Q The list window of files will appear 7 Press or to select the USB device if the selectio...

Страница 19: ...lockwise press to rotate the image 90 degrees counterclockwise To return to the list window Press RETURN during Single View mode or Slide Show mode To display file status information 1 Press The following information will be displayed at the bottom of the screen File number Total number of files only for files stored in the same directory Photo title Date and time taken File size Slide Show icon i...

Страница 20: ... in the screen In this case switch off the TV then switch on it again to cure the condition The cold cathode fluorescent lamp used for the back light on this TV has longevity When the brightness of the screen comes down or the flickers of the screen are caused or some parts of the screen do not light up it may reach the end of its life Contact a service technician Some pixels of the screen do not ...

Страница 21: ...Dimensions 24 605 W 478 H 169 D mm 32 785 W 586 H 196 D mm Mass Weight 24 5 5 kg 32 8 5 kg TV system Aerial input Channel coverage PAL B G CCIR VHF 2 12 UHF 21 69 CATV X Z 2 S1 S41 PAL I UK VHF UHF 21 69 CATV PAL D K CHINA VHF 1 12 UHF 13 57 CATV Z1 Z38 SECAM B G CCIR VHF 2 12 UHF 21 69 CATV X Z 2 S1 S41 SECAM D K OIRT VHF 1 12 UHF 21 69 CATV X1 X19 NTSC M US VHF 2 13 UHF 14 69 CATV A6 A1 A W AA Z...

Страница 22: ... File format DCF ver 1 1 Support file system FAT16 and FAT32 Operating condition Temperature 0 C 35 C Humidity 20 80 No moisture condensation Supplied accessories Owner s manual 1 Power cord 1 Remote control 1 Batteries 2 Screw 1 page 2 not supplied on 24 models Predestal stand 1 Screw 4 stand type page front cover Design and specifications are subject to change without notice Never service or rem...

Страница 23: ... 23 2432PB2Series En indd 23 2432PB2Series En indd 23 2011 09 28 9 40 37 2011 09 28 9 40 37 ...

Страница 24: ... 24 2432PB2Series En indd 24 2432PB2Series En indd 24 2011 09 28 9 40 38 2011 09 28 9 40 38 ...

Отзывы: