


16
Stereo reception with the built-in analogue tuner
The built-in Tuner can detect and
receive NICAM stereo broadcasts
automatically.
Note:
In case of bad reception, the stereo
sound also can be disturbed.
•
NICAM stereo sound reception:
1
Select NICAM, then press
ENTER
.
Press or to select AUTO or OFF.
Select OFF if you do not want to
receive NICAM sound.
NI
CA
M
A
UT
O
BASS 2
5
TRE
BL
E
2
5
BALA
N
C
E
0
S
URR
O
UND
OFF
A
UT
O
H
DMI
1 A
UDI
O
H
DMI
2
Press
EXIT
to return to the normal screen.
The following types of broadcast are possible with
NICAM transmissions
‘NICAM ST’ illuminates for approx.
4 seconds when a NICAM STEREO
broadcast signal is received.
‘NICAM M1’ illuminates for approx.
4 seconds when a NICAM MONO A
broadcast signal is received.
‘NICAM M1/M2’ illuminates for
approx. 4 seconds when a NICAM
MONO A and MONO B broadcast
signal is received.
This will be displayed for approx.
4 seconds if a NICAM signal is
received when the ‘NICAM OFF’
option is selected.
Stereo reception in Germany
‘STEREO’ illuminates for approx. 4
seconds when a STEREO broadcast
signal is received.
When 2-channel sound reception is available, you can
select your preferred audio with the AUDIO SELECT
button.
Each time you press
AUDIO SELECT
, the sound channel will
switch to the alternative channel available.
NICAM 2-channel sound reception (not available in
Germany)
N I C A M
M 1
/ M 2
N I C A M M 1 /
M 2
2-channel sound reception in Germany
S O U N D
1
/ 2
S O U N D 1
/
2
N I C A M M 1
N I C A M O F F
N I C A M
M 1
/ M 2
N I C A M S T
S T E R E O
52R0131A_ENG.indd 16
3/13/09 3:21:10 PM
17
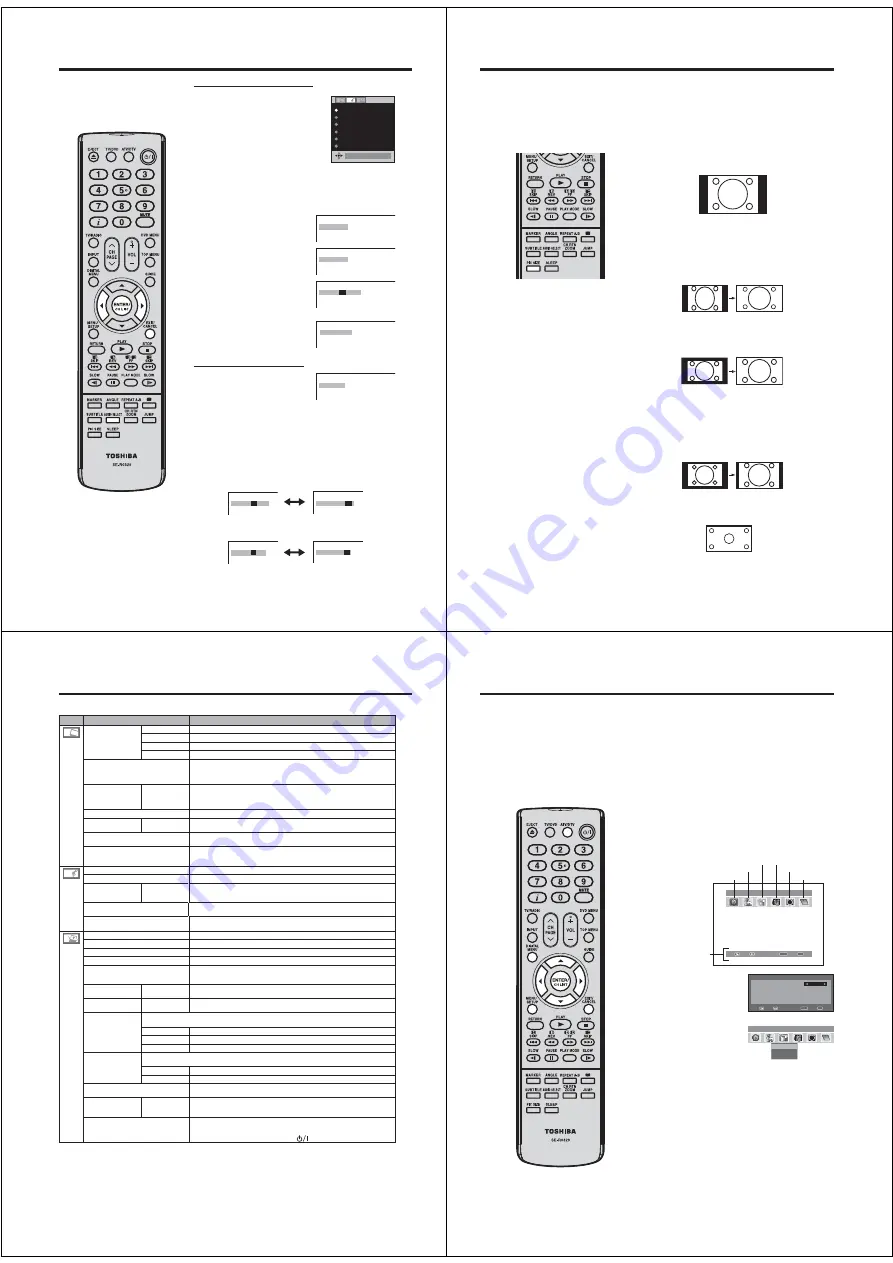
Manual format setting
Pressing
PIC SIZE
repeatedly scrolls through the following
options.
4:3
This mode shows a 4:3 picture in its original size and shape with
vertical bands on the left and right side.
16:9
This mode is used with 16:9 signals from a Digital decoder, DVD
player or other external source. This uniformly stretches a 4:3
image horizontally to fill the screen (For example, a 16:9 image
is often stored “anamorphically” on a DVD, where the 16:9
image is stored as a horizontally compressed 4:3 image - this
mode restores the image to its correct 16:9 proportions).
CINEMA:
This mode is used to zoom-in on (expand) 4:3 ‘letterbox’ format
pictures (with black bars at the top and bottom) so that they fill
more of the screen.
Note:
• In the CINEMA mode, part of the picture may be slightly cut
off due to the expansion. However, it is possible to scroll the
picture up or down to view the top or bottom part of the picture
(see page 18).
14:9
This enlarges a 4:3 picture to the 14:9 format.
REAL (HDMI mode only)
The picture is displayed with original size.
Picture format
AUTO
Press
PIC SIZE
repeatedly until AUTO
appears.
The broadcaster may transmit a Wide Screen Signalling (WSS) signal which can determine the correct
picture width and set it automatically when the AUTO setting is used. If you want to change this setting, you
can select from the formats listed below.
(16:9)
(CINEMA)
(14:9)
Notes:
When the PICTURE SIZE is set
to AUTO, the aspect ratio will
automatically change according
to the Wide Screen Signalling
(WSS) signal, if it is available. This
may be either transmitted by the
broadcasting TV channel, or via a
recording from a VCR etc. Any WSS
signal received will only be effective
in the AUTO mode - however, some
DVD players / Digital Decoders etc.
will automatically switch the aspect
ratio via the SCART input (Pin 8
switching), even if AUTO is not
selected.
In any case if you want to change
to a different aspect ratio to the one
selected automatically, you can
change it by pressing
PIC SIZE
.
In PC mode, the PICTURE SIZE
feature is available only for 16:9 or
4:3 format.
In HDMI or COMPONENT mode of
scanning rate: 720p and 1080i, the
PICTURE SIZE feature is available
only for 16:9 or REAL (HDMI only)
format.
Using the special functions to change
the size of the displayed image (i.e.
changing the height/width ratio) for
the purposes of public display or
commercial gain may infringe on
copyright laws.
•
•
•
•
52R0131A_ENG.indd 17
3/13/09 3:21:11 PM
18
Other convenience functions
You can change the default settings to convenience use.
Icon
Selected Items
Setup hint
PICTURE
PREFERENCE
SPORTS
Bright and dynamic picture (factory-set)
STANDARD
Standard picture quality (factory-set)
MOVIE
Movie-like picture setting (factory-set)
MEMORY
Your personal preferences
BRIGHTNESS / CONTRAST / COLOUR /
TINT(NTSC) / SHARPNESS
You can adjust the picture to your preference.
The “TINT(NTSC)” option can be selected if an NTSC 3.58MHz or NTSC 4.43MHz
signal is input through one of the AV sockets, and NTSC or AUTO has been
selected for the AV COLOUR option.
DNR*
1
(26DV615DG)
OFF / LO W /
MEDIUM / HIGH
Sometimes it is not possible to input a high-quality HD signal. The actual signal
input is too small and noisy, e.g. a video film in letterbox format, or a noisy analogue
cable TV signal. DNR can slightly reduce interferences caused by the faulty input
signal.
COLOUR TEMPERATURE
Bluish (COOL) / Neutral (MEDIUM) / Reddish (WARM)
BLUE BACK
ON / OFF
You can set the TV to automatically change to a blue screen and mute the sound if
the signal is weak or absent.
BACKLIGHT
You can use the Back light feature to adjust the screen brightness for improved
picture clarity.
RESET
Select “RESET” to reset PICTURE PREFERENCE, BRIGHTNESS, CONTRAST,
COLOUR, TINT(NTSC), SHARPNESS, COLOUR TEMPERATURE and
BACKLIGHT to the factory preset values.
NICAM
See page 16.
BASS / TREBLE / BALANCE
You can adjust the sound quality to your preference.
SURROUND
(26DV615DG)
ON / OFF
The SURROUND feature processes the audio signal to expand the listening field
wider and deeper to create a ‘pseudo surround-sound’ from the TV’s speakers. The
feature works with stereo signals from TV broadcast or AV input.
HDMI AUDIO (19/22DV615/616DG)/
HDMI1 AUDIO (26DV615DG)
See page 54.
RESET
Select “RESET” to reset BASS, TREBLE and BALANCE to the factory preset
values.
AUTO TUNING
See page 12.
MANUAL TUNING
See page 13.
CH ALLOCATION
See page 12.
LANGUAGE
See page 11.
VERTICAL POSITION
When the CINEMA mode is selected (see page 17), you can adjust the vertical
picture position. Press or to adjust the vertical position of the picture by up to
+10 and downwards by up to -10.
AUTO 4:3 DEFAULT
*
2
4:3 / 16:9
This option selects the default way that a 4:3 signal is shown - either as normal
“4:3” or expanded in the “16:9” mode, according to your preferences.
SLEEP TIMER
0~120 min(every
10 minutes)
You can set SLEEP TIMER to automatically turn off the TV. To cancel the SLEEP
TIMER, set to “0”.
AV1 INPUT/
AV2 INPUT
(26DV615DG)
Selecting the “AV1 INPUT” or “AV2 INPUT” type - this ensures that the TV processes the
input signal correctly. Press or to select AV, S-VIDEO or RGB.
AV
Composite signal (e.g. from a video recorder).
S-VIDEO
S-Video signal (e.g. from DVD player with S-Video output).
RGB
RGB signal (e.g. from DVD player with RGB output).
AV1 OUTPUT
(19/22DV615/616DG)
This determines whether the AV1 outputs the signal from the internal tuner or whatever input is shown
on the screen.
TV
Outputs the last channel position selected.
MONITOR
The picture displayed on TV-screen.
AV COLOUR
*
3
The AV Colour setting only applies when viewing devices connected to the AV
inputs.
REC SCREEN
STATUS
ON / OFF
This function is used in conjunction with the Timer function that is included as part
of the Digital EPG. It determines whether the TV screen switches on or not when a
programmed Timer setting begins - see page 30 for further details.
RESET TV SETTING
Press
ENTER
to enter the RESET TV SETTING screen.
Press or to select “YES”, then press
ENTER
.
Reset the TV function will now begin, and this unit will automatically turn off. As the
power is not automatically turned on, press
to watch TV.
Note:
*1
In HDMI or COMPONENT (except 480i/576i) mode, the DNR option cannot be selected.
*1
The interferences from the input are suppressed most if HIGH is set. This could result in side-effects such as loss of sharpness and
smearing.
*2
AUTO 4:3 DEFAULT is available only for AUTO picture size setting.
*2
In COMPONENT mode, AUTO 4:3 DEFAULT is available only for 480i/576i mode.
*3
PAL is the colour system used in Germany. NTSC 3.58 is used in the USA, PAL 60 used in Germany handled video recorders, which
play NTSC video tape recording.
If the picture shows horizontal stripes, set to AUTO.
52R0131A_ENG.indd 18
3/14/09 3:12:51 PM
19
When the set is in the digital mode, you can access the main menu by pressing DIGTAL MENU on
the remote control. This main menu contains several options,
- Language Setup
- Channel Organizer
- Installation
- System Configuration
- Technical Information
- Common Interface
The main menu is the gateway for all the other ‘sub’ menus. You can navigate between the different
options in the main menu by pressing
or
.
The DIGITAL MENU button will also function like an ‘EXIT’ button, i.e. when any menu is active,
pressing the DIGITAL MENU button will return to the previous stage.
Guide to using the Digital Menu system
Preparation:
Press
ATV/DTV
to select the digital TV mode.
1
Press
DIGITAL MENU
to display the Main menu.
Press or to select desired options. (Example: selecting
the Language Setup option.)
ABC
CH
1
CH
2
CH
3
Texd
CI
i
ABC
i
Navigate
Enter
Exit
p
u
t
e
S
e
g
a
u
g
n
a
L
u
n
e
m
n
i
a
M
Channel Organizer
Technical Information
Common Interface
Installation
System Configuration
Guide of the
available buttons
Language Setup
2
Press
ENTER
.
The selected menu will
appear.
Some of the options have a
sub menu.
Press or to select
desired sub menu, then press
ENTER
.
(Example: sub menu in the
Installation option.)
Language Setup
Menu Language
English
Pref. Audio Language
English
Pref. Subtitle Language
English
Pref. Digital Service Language
English
Navigate
Enter
Exit
Manual Scan
Auto Scan
Carrier Setup
n
o
i
t
a
l
l
a
t
s
n
I
u
n
e
m
n
i
a
M
ABC
CH
1
CH
2
CH
3
Texd
CI
i
ABC
i
3
When you have finished making adjustments, press
EXIT
to
return to the normal screen.
Note:
In analogue TV mode,
DIGITAL MENU
will not work. Please
press
ATV/DTV
to select digital TV mode to display the
digital menu.
However, it is possible to use the
MENU
in the digital TV
mode.
The analogue menu includes some general settings for this
TV that apply to both modes, and it will be displayed over
the digital TV screen.
52R0131A_ENG.indd 19
3/13/09 3:21:12 PM


