


8
30
30
Remote Control
Install the batteries
Use batteries type UM4/R03 (AAA-Size).
Do not use old or weak batteries. The remote control may not work properly with a weak voltage from such
batteries. Replace exhausted batteries with new ones. Never try to recharge normal batteries - this could
cause an explosion.
Note:
Exhausted batteries can leak corrosive electrolyte, which may cause damage to the remote control -
therefore remove exhausted batteries immediately.
1
Open the battery
compartment.
2
Install the batteries as shown
below, ensuring the correct
polarity.
3
Close the battery
compartment.
The remote control handset will not work properly in the following cases:
If bright sunlight directly beams onto the unit front.
If an obstacle is placed between the unit and the
handset.
Z
Z
Z
Z
Z
Z
If the batteries have not been installed according to
their polarities.
If the batteries are weak.
Distance of Remote Control Operation
Point the remote control
directly at the remote sensor.
Transmitter window
Maximum distance approx. 5m
Remote sensor
52R0131A_ENG.indd 8
3/13/09 3:21:02 PM
9
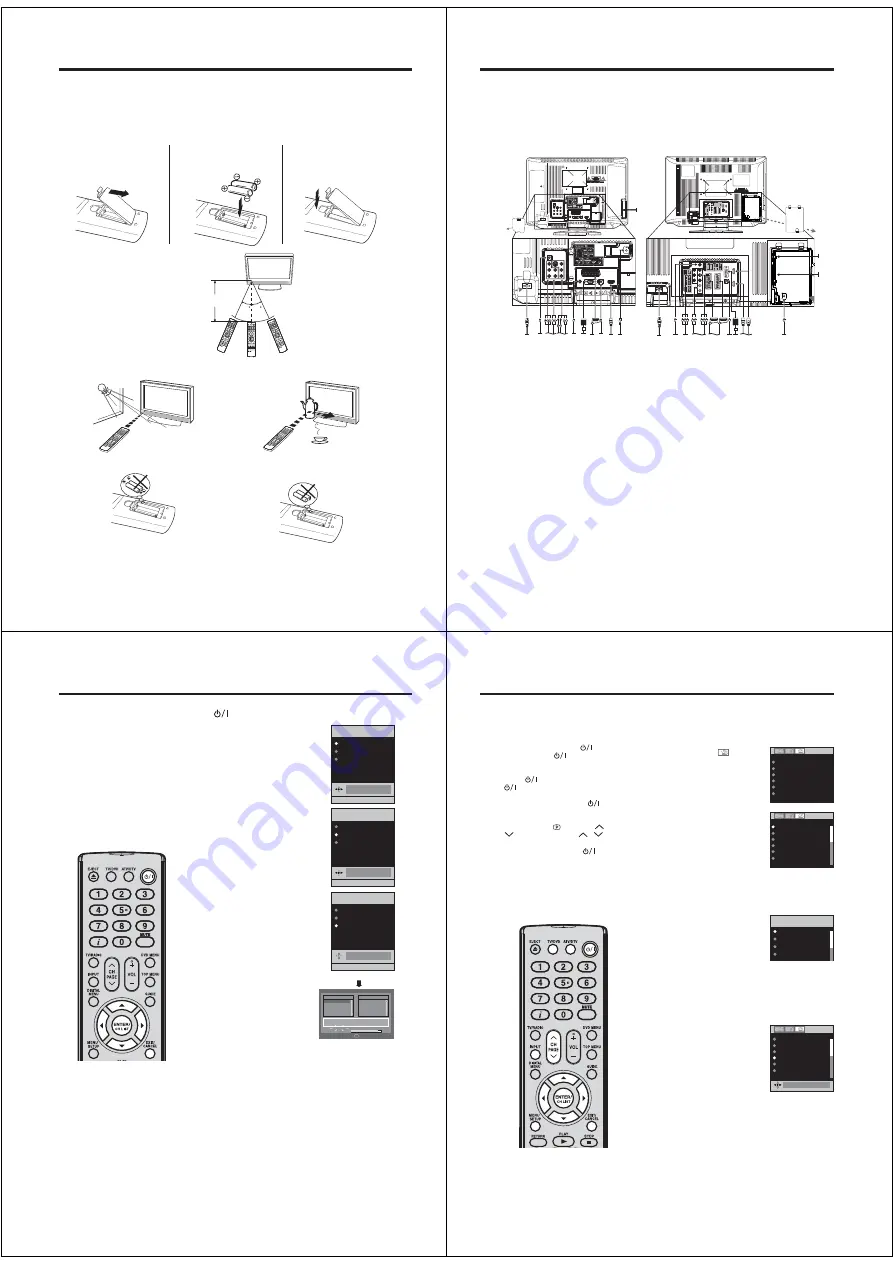
Aerial connection
Note:
Before you connect other appliances:
To avoid potentially damaging your set, make sure all items are switched off and disconnected from the
mains power when you make the connections.
Arrange the desired connection.
When you have finished making the connections, reconnect the mains power to the unit and switch it
back on.
Connect your aerial as shown below. Connections to other equipment is explained further on
pages 53~57. If you have problems with reception, consult a specialist of aerial.
•
•
•
(A) Power supply:
Connect the supplied power cable to an AC 220-240V/50Hz mains power supply only - do
not attempt to connect it to any other type of supply. Never try to repair a damaged AC power cord with
isolation-tape - this should be repaired by a specialist or rep laced. Do not let your pet loose near the cable.
Animals biting into the cable could receive a fatal electric shock, and could cause a hazard to others.
(B) HEADPHONE jack:
Plug headphones with a mini plug (3.5 mm) into this jack.
(C) COMPONENT input:
See page 57.
(D) AV2 input:
Input for analogue A/V-Signal (Composite or S-Video). See page 56.
(E) Digital audio output:
Digital output for CD/DVD & DVB-T (see page 56).
(F) PC MONITOR input (PC):
See page 53.
(G) Scart socket (AV1):
For the connection of scart cable. See pages 55~56.
(H) PC/HDMI AUDIO input:
See pages 53, 54.
(I)
HDMI input :
See page 54.
(J)
Aerial input socket:
Connect the outdoor aerial to the aerial input socket as shown.
(K) C.I. slot:
The Common Interface allows you to insert CAM (Conditional Access Module) and a suitable
Smart Card to give you access to additional Pay-TV services. (See page 26) Before inserting the
module, make sure to turn off the main power and then insert the module all the way into the slot until it
is flushed with the side panel buttons.
(L) Bracket holes:
Fix a wall mounting bracket (not supplied) here.
(M) INPUT cover:
When you access the input jacks, remove this cover (except 22DV615DG/22DV616DG).
(N) AV3 input:
Input for analogue A/V-Signal (Composite). See page 56.
(O) Scart socket (AV1/AV2):
For the connection of scart cable. See pages 55~56.
(P) HDMI1/HDMI2 input :
See page 54.
ANT.
ANT.
Illustration of 19DV615DG/19DV616DG/22DV615DG/22DV616DG
(A) (B) (C) (D) (E) (F)(G)(H) (I) (J)
(K)
(L)
Illustration of 26DV615DG
(A) (E) (N) (C) (O) (H)(F)(P) (J)
(B)
(L)
(K)
(M)
(M)
52R0131A_ENG.indd 9
3/13/09 3:21:03 PM
10
Auto setup
Your unit has an Automatic
installation which makes installation
in your unit easy. When you turn
on the unit for the first time, the
Automatic installation routine is
activated. Using this routine, you
can select the on-screen language
and automatically search for and
store all the receivable analogue
and digital (DVB) channels.
The Automatic station presetting
feature is for the set’s built-in tuner
only. If you have a device such as
a digital decoder (eg. Satellite or
Digital Terrestrial) connected (see
page 55), you would need to tune it
in separately according to its own
instructions.
Preparation:
Press
on the unit.
1
AUTO INSTALLATION menu will
appear.
Press or to select LANGUAGE,
then press
ENTER
. Press or to
select desired language.
Then press
ENTER
.
LANGUAGE
ENGLISH
COUNTRY
GERMANY
AUTO TUNING
AUTO INSTALLATION
ENGLISH
EXIT : END
MENU: RETURN
2
Press or to select COUNTRY,
then press
ENTER
.
Press or to select your country.
Then press
ENTER
.
LANGUAGE
ENGLISH
COUNTRY
GERMANY
AUTO TUNING
AUTO INSTALLATION
EXIT
:
END
MENU:
RETURN
GERMANY
3
Press or to select AUTO
TUNING, then press
ENTER
.
The confirmation screen will be
displayed. Press
ENTER
to start
automatic tuning.
Your TV will now automatically tune
in all available channels.
Your TV will tune the analogue
channels first, then tune the digital
channels.
Note:
Please be patient - the Auto
Tuning process can take
several minutes to complete.
When the programme on the
screen stops changing and the
sound comes on, the search
process is complete.
•
LANGUAGE
ENGLISH
COUNTRY
AUTO TUNING
AUTO INSTALLATION
EXIT
:
END
MENU:
RETURN
10 %
AUTO TUNING
GERMANY
(ANALOGUE)
Auto Scan
TV
Progress
Searching...
Carrier
:1
Frequency (kHz)
:562000
:003
DVB-T 16QAM
Radio
070
BBC Radio 1
:001
001
BBC ONE
002
BBC TWO
007
BBC THREE
Exit
(DIGITAL)
Note:
To cancel the Auto Tuning, press
EXIT
during the process.
If on the “AUTO INSTALLATION
COUNTRY” screen “UK” is selected,
“Change No.” and “Move To” cannot
be used in UK (see page 23).
THE AUTOMATIC TUNING PROCESS
WILL ONLY START BY ITSELF THE
FIRST TIME YOU SWITCH THE SET
ON. HOWEVER YOU CAN RESTART
THIS PROCESS VIA THE MENU
SYSTEM (see page 12 for analogue
channels, and page 20 for digital
channels).
•
•
52R0131A_ENG.indd 10
3/13/09 3:21:04 PM
11
Quick guide for ANALOG MENU operation/Selecting the
video input source/On-screen Language Selection
Make sure the aerial connection and
power supply are connected as per
the description on previous page.
Preparations:
Turn on the unit with the
button
on the unit. The
(Power)
indicator
will light up in green.
To change the unit to standby mode,
press
on the remote control.
(Power) indicator will change
from green to red. To turn on the unit
from standby mode, press
on the
remote control again.
In standby mode, you can also turn
the unit on with
(Channel)
or
on the unit or
PAGE
/
on
the remote control.
To turn off the unit press
button
on the unit - to completely switch
it off, disconnect the mains power
supply.
Press
TV/DVD
to select the TV mode.
Press
ATV/DTV
to select the
analogue TV mode.
•
•
•
Quick guide for ANALOG MENU operation
Call ANALOG MENU and for example: Select AUTO TUNING.
1
Press
INPUT
.
Select ATV. Press
MENU
.
2
Press or to select
.
A
UT
O
TUNIN
G
M
A
NU
AL
TUNIN
G
CH ALLOCA
TI
O
N
LA
N
G
U
AG
E
EN
GL
I
SH
V
ERTI
CAL POS
ITI
O
N
0
4
:
3
A
UT
O 4
:
3
DE
FA
U
L
T
3
Press or to select AUTO
TUNING, then press
ENTER
to
enter the AUTO TUNING menu.
... on the following pages the MENU
can be called in the same way as
here.
A
UT
O
TUNIN
G
M
A
NU
AL
TUNIN
G
CH ALLOCA
TI
O
N
LA
N
G
U
AG
E
EN
GL
I
SH
V
ERTI
CAL POS
ITI
O
N
0
4
:
3
A
UT
O 4
:
3
DE
FA
U
L
T
4
Press
EXIT
to return to the normal screen.
Selecting the video input source
Press
INPUT
to view a signal from
another device connected to your TV,
such as a VCR or DVD player. You can
select each input source depending on
which input jacks you used to connect
your devices.
To select the video input source, press
/. Then press
ENTER
within 6 seconds.
You can return to ATV mode by pressing a numbered button
even if you switched to external input mode from DTV mode.
On-screen Language Selection
1
Select LANGUAGE (unless you
have already selected when the set
was first switched on).
Then press
ENTER
.
EN
GL
I
SH
A
UT
O
TUNIN
G
M
A
NU
AL
TUNIN
G
CH ALLOCA
TI
O
N
LA
N
G
U
AG
E
EN
GL
I
SH
V
ERTI
CAL POS
ITI
O
N
0
4
:
3
A
UT
O 4
:
3
DE
FA
U
L
T
2
Press or to select the desired language.
3
Press
EXIT
to return to the normal screen.
•
Note:
If no buttons are pressed for more
than approx. 60 seconds, the MENU
disappears automatically.
•
A
T
V
AV1
DT
V
AV2
IN
P
UT
S
E
L
E
C
T
52R0131A_ENG.indd 11
3/13/09 3:21:05 PM


