background image

BEFORE YOU BEGIN

BEFORE YOU BEGIN

Update PathPilot

If you haven't yet done so, you must update your controller to the latest version of PathPilot.

1. From the PathPilot interface, on the

Status

tab, select

Update

.

Installation Procedure

If your 24R router serial number is between

RA10001

and

RA10096

, you must install the Z-axis brake. Some

machines within that serial number range require an additional installation of a Z-axis brake cable.

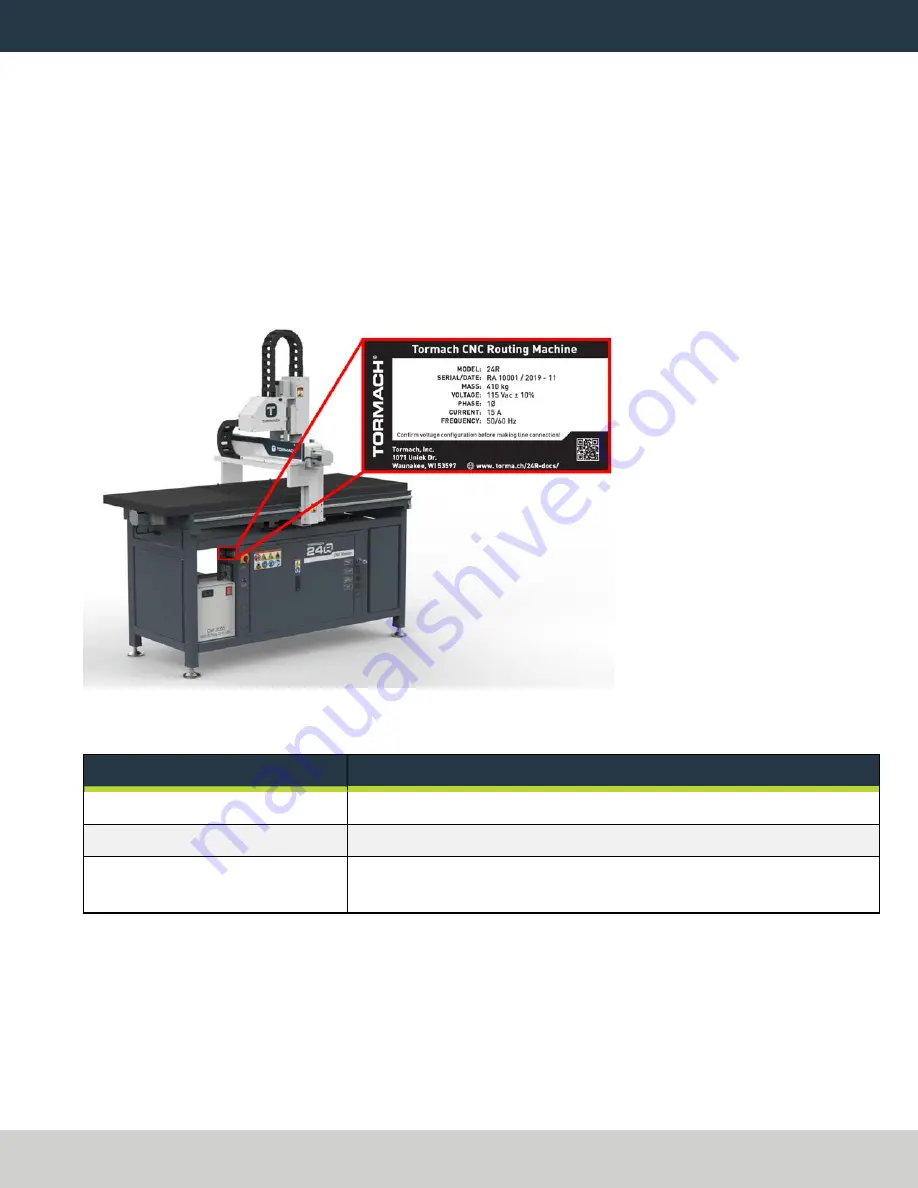
1. Find your machine's serial number plate on the side of the electrical cabinet.

Figure 1: Serial number plate.

2. Use the following table to determine which procedure to start with, depending on your specific machine.

Serial Number

Go to...

RA10001 through RA10084

"Update Wire 487 From the Machine Control Board" (page 4)

RA10085 through RA10096

"Remove the Existing Z-Axis Motor" (page 10)

RA10097 or higher

The Z-axis brake is pre-installed at the factory, and you don't need to
follow any procedures in this document.

Page 3

©Tormach® 2022
Specifications subject to change without notice.

tormach.com

TD10801: Installation Guide: 24R Z-Axis Brake Retrofit Kit (0722A)

Содержание 51136

Страница 1: ...Page 1 Specifications subject to change without notice Tormach 2022 TECHNICAL DOCUMENT Version 0722A INSTALLATION GUIDE 24R Z AXIS BRAKE RETROFIT KIT ...

Страница 2: ...MATION Product 24R Z Axis Brake Retrofit Kit PN 51136 Quantity Description 1 24R Z Axis Brake Cable Assembly PN 51138 1 Z Axis Motor with Z Brake PN 51133 Note If any items are missing we can help Create a support ticket with Tormach Technical Support at tormach atlassian net servicedesk for guidance on how to proceed REQUIRED TOOLS This procedure requires the following tools Collect them before y...

Страница 3: ...d your machine s serial number plate on the side of the electrical cabinet Figure 1 Serial number plate 2 Use the following table to determine which procedure to start with depending on your specific machine Serial Number Go to RA10001 through RA10084 Update Wire 487 From the Machine Control Board page 4 RA10085 through RA10096 Remove the Existing Z Axis Motor page 10 RA10097 or higher The Z axis ...

Страница 4: ...s about 24 in in the positive direction 4 Jog the Z axis down to the end of travel 5 Remove any cutting tools from the spindle WARNING Electrical Shock Hazard You must power off the machine before making any electrical connections If you don t there s a risk of electrocution or shock 6 Power off the machine and the PathPilot controller a Push in the machine s red Emergency Stop button which remove...

Страница 5: ...vers and trace wire 487 and wire 488 back to the terminal block strip 10 Disconnect wire 488 from the terminal block with a small flat blade screwdriver Discard the wire 11 Connect the loose end of wire 487 to the 24 Vdc by inserting it into the open port of the terminal block connected to wire 404 Figure 2 Wire 487 connected to the open port of wire 404 Page 5 Tormach 2022 Specifications subject ...

Страница 6: ...e the M8 screws securing the vacuum table to the machine with a 6 mm hex wrench Set the screws aside 2 From the end of the machine slide the vacuum table off of the casting 3 From the back of the gantry remove the screws securing the lid to the rear of the Z axis cover with a 3 mm hex wrench Set the cover and screws aside Figure 3 Z axis cover 4 Remove the five M5 screws on the cable tray cover on...

Страница 7: ...ng the brake cable through the X axis energy chain and then down the side of the gantry 10 Replace the energy chain covers that you set side earlier by sliding them back into place and snapping both the top and the bottom to secure them 11 Route the cable down the side of the gantry through the cable tray on the bottom of the gantry and then into the Y axis energy chain closest to the electrical c...

Страница 8: ...e hole on the top of the electrical cabinet 14 Replace any energy chain covers that you set aside earlier 15 Route the cable through the hole in the top left of the electrical cabinet and then through the wire troughs Page 8 Tormach 2022 Specifications subject to change without notice tormach com TD10801 Installation Guide 24R Z Axis Brake Retrofit Kit 0722A ...

Страница 9: ... the J10 connector on the machine control board 3 Route wire 510 toward the top of the 24 Vdc power supply 4 Find the security pin on the bottom of the power supply and release it with a small flat blade screwdriver You can tsen lift the power supply off of the DIN rail to make the wire connections Page 9 Tormach 2022 Specifications subject to change without notice tormach com TD10801 Installation...

Страница 10: ...u must power off the machine before making any electrical connections If you don t there s a risk of electrocution or shock 2 Power off the machine and the PathPilot controller a Push in the machine s red Emergency Stop button which removes power to motion control b From the PathPilot interface select Exit c Turn the Main Disconnect switch to OFF on the side of the electrical cabinet d Remove the ...

Страница 11: ...power connector 4 From the Z axis motor remove the four M6 screws securing it in place with a 4 mm hex wrench Set the screws aside Figure 9 Existing Z axis motor secured to the machine Page 11 Tormach 2022 Specifications subject to change without notice tormach com TD10801 Installation Guide 24R Z Axis Brake Retrofit Kit 0722A ...

Страница 12: ...ft wood board under the spindle head Slowly lift the board up to move the spindle head up and rotate the coupler Put a shim under the board to keep it in place while you loosen the screw securing the coupler to the Z axis motor shaft with a 4 mm hex wrench 7 Lift and remove the Z axis motor and discard it Page 12 Tormach 2022 Specifications subject to change without notice tormach com TD10801 Inst...

Страница 13: ...ment Z axis motor installed onto the machine 3 Tighten the coupler onto the shaft of the motor with a 4 mm hex wrench 4 Verify that the Z axis brake s manual override lever is slid to the left in the engaged position If it s not slide the lever to engage the brake 5 Secure the Z axis motor to the motor mount with the four M6 screws from the previous step Page 13 Tormach 2022 Specifications subject...

Страница 14: ... cable to the Z axis motor s brake connector in the rear Z axis cover Figure 13 Connecting the Z axis brake cable to the Z axis motor s brake connector 8 Re install the following items with the parts that you set aside earlier l Vacuum table l Rear Z axis cover Page 14 Tormach 2022 Specifications subject to change without notice tormach com TD10801 Installation Guide 24R Z Axis Brake Retrofit Kit ...

Страница 15: ...ne if the blue LED is already illuminated l If the blue LED is OFF continue to the next step l If the blue LED is ON power off the machine and go to Troubleshooting page 16 Problem The Emergency Stop button doesn t work 3 Press the Reset button 4 From the PathPilot interface bring the machine out of reset 5 On the keyboard press the Page Up key to raise the spindle head off of the wooden block 6 F...

Страница 16: ...ical Schematics page 17 Problem The Emergency Stop button doesn t work Probability How To Steps High 1 Verify that any of the following symptoms occur l The blue Reset LED is always on even when the Emergency Stop button is pressed in l The green LEDs on the axis drives are always on even when the Emergency Stop button is pressed in l The green LED on the K1 relay is always on even when the Emerge...

Страница 17: ...CS ELECTRICAL SCHEMATICS 24 Vdc Controls Sheet 3 18 Axis Drive Bus Sheet 4 19 Page 17 Tormach 2022 Specifications subject to change without notice tormach com TD10801 Installation Guide 24R Z Axis Brake Retrofit Kit 0722A ...

Страница 18: ... Contactor 2 1 02 9 3 4 5 6 13 14 03 7 K2 X2 16 17 428 430 430 D1 37514 415 414 TS1 37420 Thermal Switch 427 425 X2 14 15 426 K2 13 14 37343 VFD Contactor 423 XS1 1 2 3 4 5 37353 420 P6 COL7 3 2 406 405 P6 COL7 P6 COL7 408 XS2 1 2 3 4 5 39263 P9 COL6 X2 1 404 P7 COL6 P7 COL6 P7 COL6 118 115 408 413 424 423 410 GND6 419 418 417 416 489 S1 5 6 3 4 S1 Reset 37342 S2 1 2 Emergency Stop 30462 XS29 1 2 ...

Страница 19: ...9 J6 8 J6 7 J6 24 J6 23 J6 22 J6 21 J6 20 J6 19 209 210 211 P6 COL5 P6 COL5 P6 COL5 P6 COL5 P6 COL5 P6 COL5 P6 COL5 P6 COL5 P6 COL5 P6 COL5 P6 COL5 P6 COL5 P6 COL5 P6 COL5 P6 COL5 P6 COL5 P6 COL5 DR4 32793 A DRIVE AC AC A A B B DIR DIR PUL PUL EN EN P6 COL5 P6 COL5 P6 COL5 P6 COL5 P6 COL5 P6 COL5 Motor M4 A MOTOR XS10 1 2 4 6 7 30480 XS9 1 2 4 6 7 30235 235 234 233 219 220 221 222 232 GND9P9 COL6 ...

Отзывы: