


Connecting and setting up the water timer
a) Inserting and replacing the batteries
• Pull the battery holder out of the battery compartment (
E
).
• Insert four AA batteries into the battery holder in the correct polarity (observe the plus/+ and
minus/- markings). The diagram in the battery compartment will help you to ensure that you
have the correct polarity.
• Slide the battery holder back into the battery compartment (
E
) until it clicks into place. Pro
-
vided that no force is used, the battery holder can only be inserted in the correct orientation.
• After inserting the batteries, the status LED ring (
D
) will flash alternately in white and red. The
water timer is ready for use when the LED turns off.
• The batteries must be replaced when the status LED ring (
D
) flashes red every six seconds.
b) Connection to a tap
The water timer can be connected to the gateway and programmed before it is
connected to the water tap.
• If a quick-release coupling is attached to your garden tap, remove it.
• Check the correct positioning of the coarse filter (
A
) in the union nut.
• Then, hold the water timer firmly while you tighten the union nut (
C
) to the garden tap.
Depending on the existing water tap and its thread, you may need to use the sup
-
plied adapter ((
B
).
Do not jam the thread, otherwise it will be damaged! Tighten the union nut (
C
) by
hand; do not use any tools, otherwise the union nut may be damaged, resulting in
the loss of the warranty!
• You can connect the garden hose to the output (
F
); if necessary, use a quick-release cou
-
pling.
c) Turning the water tap on/off
In order for the water timer to work and distribute water for watering, the water tap must be
turned on. Check that all connections are tight.
For safety reasons, regular checks must be performed to check that the water timer
is functioning/watering correctly. A damaged hose, leaking connections or children
playing with the hoses could cause flooding or water damage (for example, if water
runs from a garden bed next to the house into a light shaft/cellar).
We recommend turning the tap off if the water timer is not going to be used for a long
time.
d) Manual watering without the app
To start manual watering, briefly press the button (
D
) on the water timer.
To stop manual watering, press the button (
D
) again.
Setting up the soil moisture sensor
The soil moisture sensor should not be connected to the irrigation system until the
water timer is connected to the gateway. We therefore recommend that you do not
set up the sensor until you have connected the water timer to the gateway.
a) Inserting and replacing the batteries
• First, remove the four screws from the battery compartment cover. Then remove the battery
compartment cover.
• Insert three AAA batteries into the battery compartment (
N
), paying attention to the correct
polarity (observe the po and negative/- markings). The diagram in the battery com
-
partment (
N
) will help you to ensure that you have the correct polarity.
• After you have inserted the batteries, the LEDs will light up one after another. The first status
LED (
H
) will stay constant for a while. When the LED turns off, this indicates that the soil
moisture sensor is ready for operation.
• Close the battery compartment (
N
) again once you have connected the sensor to the irriga
-
tion system. Ensure that the sealing ring on the battery compartment cover is in the correct
position. Replace the four screws that you removed earlier.
b)
Displaying the soil moisture and configuring the moisture settings
After connecting the soil moisture sensor to the irrigation system in the app, you can display
the current soil moisture directly on the sensor and set the soil moisture level at which the
automatic watering stops.
As a general rule, the left-hand button (
L
) is for configuring the settings, and the right-hand
button (
K
) is for confirming.
Displaying the soil moisture:
• Press and hold the left-hand (
L
) and right-hand (
K
) buttons for approx. 5 seconds until all
LEDs flash one after the other on the LED bar (
H
). The current soil moisture will then be
displayed. Each of the 5 LEDs (
H
) from left to right represents 20% soil moisture.
• To update the display, briefly press the right-hand button (
K
). The LEDs will turn off briefly and
then switch back on again. The current soil moisture will then be displayed again.
• The sensor will exit this mode automatically after 20 seconds.
Setting the soil moisture for automatic watering:
• Press and hold the left-hand (
L
) and right-hand (
K
) buttons again for approx. 5 seconds until
all LEDs flash one after the other on the LED bar (
H
).
Status LED
Description
White, flashing slowly The water timer runs the watering plan
White, flashing
quickly
The water timer is ready to connect to the app
Flashes red every 6
seconds
The batteries are empty
Flashes red every 1
seconds
Water is leaking (more than 2 liters) when the water timer is turned
off
Button
Description
Short press
Opens or closes the valve manually
3 seconds, until the white
LED flashes quickly
Places the water timer in connection mode
b) Soil moisture sensor
G
LED, red
H
5 green LEDs; for displaying
the soil moisture; each LED
represents 20% (20%, 40%,
60%, 80%, 100%)
J
3 moisture measuring pro
-
bes
K
Right-hand button
L
Left-hand button
M
Recessed button in the bat
-
tery compartment
N
Battery compartment
Button
Description
Battery compartment button,
approx. 5 seconds until the red LED
lights up continuously
The soil moisture sensor is ready to connect to
the app
Left and right buttons
simultaneously, approx. 5 seconds
The soil moisture sensor switches to the mode for
displaying soil moisture and configuration
Left button
Change setting
Right button
Confirm; save setting
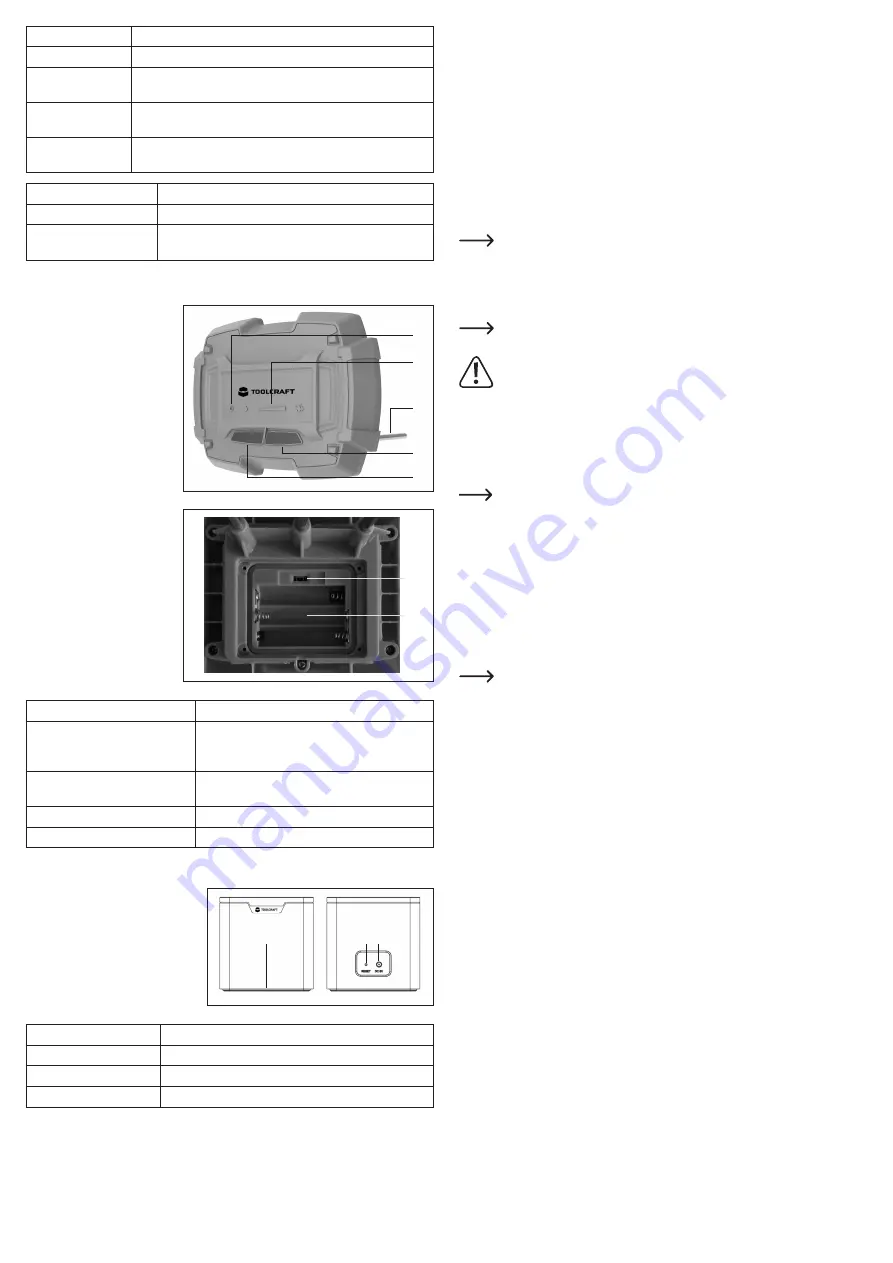
c) Gateway
O
Status LED red/green
P
Recessed „
RESET
“ button
Q
„
DC 5V
“; connection for the power
adapter
Status LED
Description
Red, flashing slowly
The gateway is not connected to the app
Red, flashing quickly
The gateway is ready to connect to the app
Constant green
Normal operation (gateway is connected to app)
H
G
J
K
L
M
N
O
P Q


