background image

1

2

3

Troubleshooting


Other

If you have any questions, please consult the following troubleshooting guide 

THERE IS NO IMAGE AND NO SOUND

 Check the ON button is connected 

Check the socket works

Check the power supply cable is not

damaged

 Check the plug is firmly inserted into the 

wall socket

THERE IS IMAGE BUT NO SOUND

● 

Check the audio connecti

Check the audio key is not damaged


 Check you have setup the DVD pl

ons are properly

connected

 Check the volume is activated in the VOL / 

CH setup 

ayer’s

AUDIO settings correctly

 Check you have used the correct AV IN

 on your television 

THERE IS SOUND BUT NO IMAGE

Check the video connecti

Check the video key is not broken

 Check you have setup the DVD play

ons are properly

connected

 Check you have used the correct AV IN on 

your TV 

er’s

VIDEO settings correctly

DISTORTED IMAGE OR SOUND

 Check you have setup the DVD pl

 Check the disc in not scratched or stained 

ayer’s

AUDIO settings correctly

damaged

 Check the AV key or the OUT terminal

are not 

THE MESSAGE “BAD DISC” APPEARS

Check the disc is not bent, broken or deformed

Check the disc is not too stained or damaged

●  

 Please check if you have attempted to play 

 Check the disc format is compatible with the 

DVD player 

a

software CD. If so, turn the DVD player 

THE REMOTE CONTROL DOES

NOT WORK


Point the remote control directly

 Check the main unit POWER button is 

connected

 Check the remote control batteries are 

working

towards

the unit’s infrared sensor

 Remove any obstacles between the remote

control and the sensor 

Check the audio is not in silent mode
(MUTE)

THE UNIT DOES NOT WORK

  Disconnect the power supply and reconnect 

THE MESSAGE “NO DISC” APPEARS


 Check that the disc is the right way up. 

 Check that the disc is not deformed, stained 

or scratched. 

 Check that you have placed the disc in the

tray.

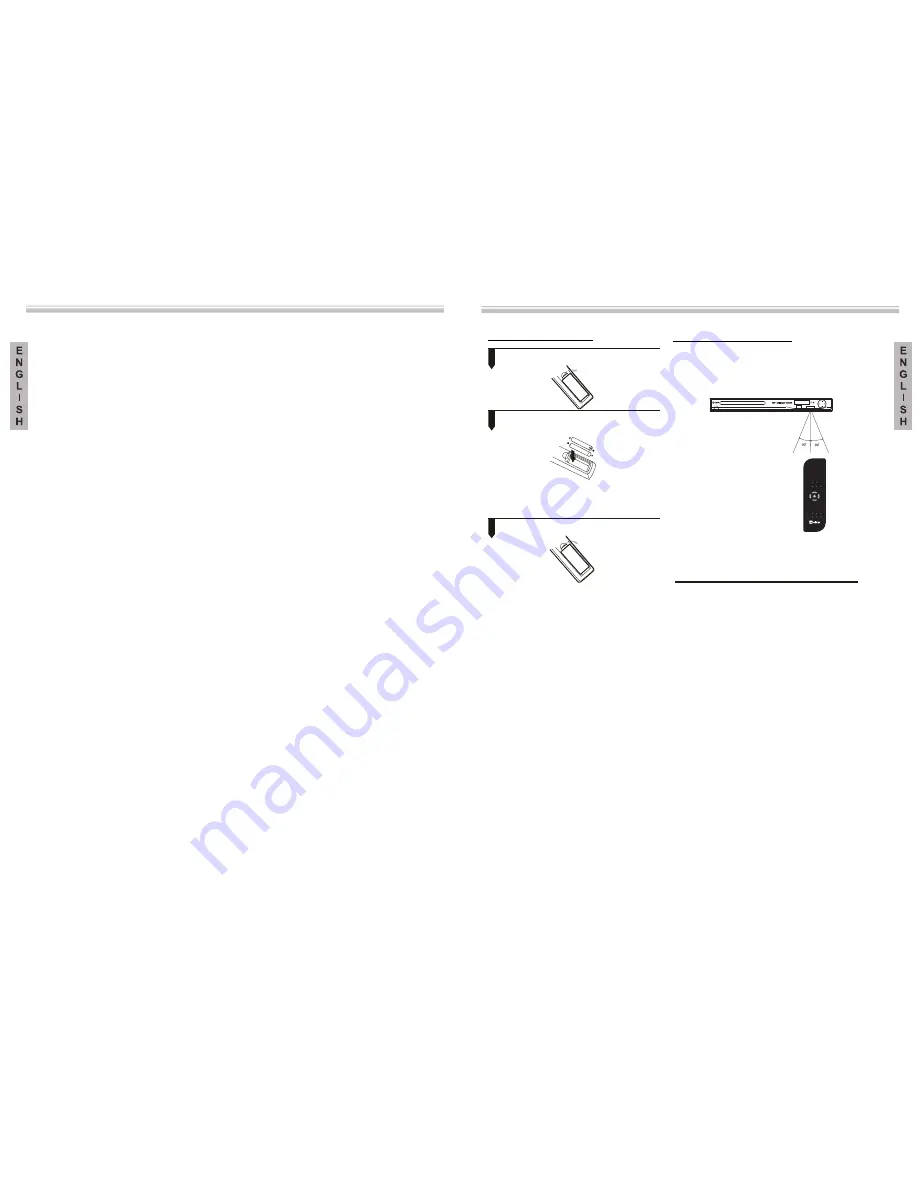
Preparing the remote control  


Other

Inserting the batteries

1. Open the cover 

2. Insert the batteries(2XAAA size

of the battery compartment.

Make sure that the + and – poles of the
batt eries coincide with the marks on the 

inside

3. Close the cover

Notes:
The incorrect use of batterie

handle the remote control safel

s can produce

leakage of the inner liquid and corrosion. 

To

y,

follow these instructions:

 Do not put the batteries in the wrong way. 

 Do not recharge, heat, open or

 Do not throw the batteries in the fire.

 Do not leave empty batteries 

old ones. 

rol for a long period of time, remove the 

batteries to avoid potential corrosion damage.

ance is very short, 

replace with new batteries. 

?

If liquid leakage occurs in

clean the battery compartment

and then put new ones in. 

short-

circuit the batteries.

inside the

remote control.

 Do not use different types of battery at 

the same time. Do not mix new batteries 
with

If you are not going to use the remote

cont

 If the remote control does not work 

correctly,

or the

working dist

side the batteries,

carefully

Using the remote control

Point the remote control towards the DVD

 player’s sensor. (The images below are only

for reference).

sunlight.

e DVD player to strong li

Note: Do not expose the remote control or

th

ght such as

direct

Notes:


 Do not leave the remote control in 

Battery life is of approximately

 Point the remote control directly towards the 

DVD player. 

an excessively 

hot or damp place.

 Do not spill water or place anything wet on 

the remote control. 

one year in

normal use conditions. 

70

7

0

71

DISPL AY

OPEN/CLOSE

PROGRAM CL EA R SUBTITLE

TIME

TITL E

HDMI

VOL+

VOL-

SL OW

DVD/DVB

RADIO/TV

ZOOM

MUTE

POWER

+

REPEAT

V-MODE

RETURN

A -B

SETUP

MENU/PBC

ENTER

PLAY/PAUSE

LANGUAGE

L/R

STOP

REV

NEXT

PREV

FWD

USB /CA RD

REC

S D /M M C /M S

U S B

LDT-1200

1.5V)

Содержание ldt 1200

Страница 1: ...YING THE WARNING TO AVOID FIRE OR ELECTRIC SHOCK TO RAIN OR MOISTURE NEVER A ASSISTANCE OF DO NOT EXPOSE THIS APPLIANCE TTEMPT TO OPEN THE APPLIANCE COVER DANGEROUS HIGH TENSION CURRENTS ARE INSIDE SE...

Страница 2: ...37...

Страница 3: ...ked or c over of the appliance are for as well as preventin overed up They must not be covered up by placing the appliance on a bed sofa carpet or other similar surface The product should not be place...

Страница 4: ...losing control to open Features Introduction MPEG4 files on disc Wide angle Dolby Digital Subtitle options Kodak picture CD Audio options MP3 files on CD R CD RW TV aspect relation modes Video DVD Par...

Страница 5: ...42 43...

Страница 6: ...onnecting to am AV Amplifier with Digital Audio Input Notes 1 Select the COAXIAL or OPTICAL digital audio output 2 Set the players audio out to RAW or PCM mode 3 Set the Amplifier to the AV input conn...

Страница 7: ...46 47...

Страница 8: ...to the START interface press ENTER button to start encoding When highlighted the CHANGE SPEED press ENTER button to change the encoding speed Use LEFT and RIGHT button to cancel REFERENCE 1 To protect...

Страница 9: ...ey to activate the page For example if you want to setup the video page press right to highlight the video icon and the video page will be shown on the screen Press the down key to highlight the desir...

Страница 10: ...up option RESTORES the player to work in the best possible condition factory settings It allows your DVD player to work in the best possible condition incorrect settings Please try using the restore f...

Страница 11: ...and press the function key to select the subtitle language you prefer Press ENTER to confirm If the disc you are playing has that language available it will play in that language Highlight the option...

Страница 12: ...P The speaker setup options are as follows 2 5 1 DOWNMIX A LT RT Choose this setting option when audio in B STEREO Choose this setting option when therefore a modulator you are connected to a two way...

Страница 13: ...fter turning on The first time you setup the unit Picture 1 amessage appears asking if the user wishes to setup assistant to be activated After selecting Yes a new frame appears shown in Picture 2 req...

Страница 14: ...g Tetris and Hit Rat See picture 8 3 Channel Guide 3 1 TV Channels The TV Channels Menu is shown in Picture 9 The channels appear on the left of the menu and a preview window appears on the right From...

Страница 15: ...gs press the left and right function keys to alternate between the different settings or press ENTER and then the up and down function keys options The possible options are TV system NTSC PAL Automati...

Страница 16: ...ADIO function key to alternate between television channels and radio channels Picture 21 Parental Control Menu Picture 22 Changing the Password Picture 23 Introducing the Password Picture 24 Channel l...

Страница 17: ...ory every directory can show photo file and folder name only 3 Press P DOWN key to choose photo file name Press OK key to play Photo file 4 Press PREV key to play previous Photo NEXT key to play next...

Страница 18: ...ng Name of current MP3 JPEG file To play a JPEG file the name must have the JPEG extension The file being played is an audio MP3 file Name of the current MPEG 4 file To play a MPEG 4 file the name mus...

Страница 19: ...up Check that the disc is not deformed stained or scratched Check that you have placed the disc in the tray Preparing the remote control Other Inserting the batteries 1 Open the cover 2 Insert the bat...

Страница 20: ...on the heater or the cold air from an air conditioner directly hits the unit If you move the unit from an air conditioned room to a hot humid room The room is humid or damp If condensation occurs the...

Отзывы: