background image

hair, clothing and gloves away from moving parts.

 Loose clothes, jewellery 

or long hair can be caught in moving parts.

g.  If  devices  are  provided  for  the  connection  of  dust  extraction  and       

collection facilities, ensure these are connected and properly used. 

Use 

of these devices can reduce dust-related hazards.

4.   Power tool use and care.

a.  Do  not  force  the  power  tool.  Use  the  correct  power  tool  for  your      

application.

 The correct power tool will do the job better and safer at the rate for 

which it was designed.

b. Do not use the power tool if the switch does not turn it on and off. 


Any power tool that cannot be controlled with the switch is dangerous and must 
be repaired.

c.  Disconnect  the  plug  from  the  power  source  before  making  any 

adjustments,  changing  accessories,  or  storing  power  tools. 

Such 

preventive safety measures reduce the risk of starting the power tool accidentally.

d. Store idle power tools out of the reach of children and do not allow      

persons unfamiliar with the power tool or these instructions to operate 

the power tool.

 Power tools are dangerous in the hands of untrained users.

e. Maintain power tools. Check for misalignment or binding of moving       

parts,  breakage  of  parts  and  any  other  condition  that  may  affect  the       

power tools operation. If damaged, have the power tool repaired before 

use.

 Many accidents are caused by poorly maintained power tools.

f. Keep cutting tools sharp and clean.

 Properly maintained cutting tools with         

sharp cutting edges are less likely to bind and are easier to control.

g. Use the power tool, accessories and tool bits etc., in accordance with      

these instructions and in the manner intended for the particular type of 

power tool, taking into account the working conditions and the work to 

be performed.

 Use of the power tool for operations different from intended could 

result in a hazardous situation.

5.   Service

a. Have your power tool serviced by a qualified repair person using only 

identical replacement parts. 

This will ensure that the safety of the power tool 

is maintained.

HEALTH ADVICE

       WARNING!

 When drilling, sanding, sawing or grinding, dust particles will be

produced. In some instances, depending on the materials you are working with,
this dust can be particularly harmful to you (e.g. lead from old gloss paint).
You are advised to consider the risks associated with the materials you are working 
with and to reduce the risk of exposure. You should:
- Work in a well-ventilated area.
-Work with approved safety equipment, such as those dust masks that are specially 
designed to filter microscopic particles.

Содержание SF290E

Страница 1: ...1 2 SHEET SANDER SF290E SAFETY AND OPERATING MANUAL...

Страница 2: ...f routine maintenance Failure of consumable items such as batteries Accidental damage Cosmetic damage Failure to follow manufacturer s guidelines Loss of use of the goods Repairs attempted by anyone u...

Страница 3: ...he cord Never use the cord for carrying pulling or unplugging the power tool Keep cord away from heat oil sharp edges or moving parts Damaged or entangled cords increase the risk of electric shock e W...

Страница 4: ...reakage of parts and any other condition that may affect the power tools operation If damaged have the power tool repaired before use Many accidents are caused by poorly maintained power tools f Keep...

Страница 5: ...hout wearing a dust mask 15 Where possible seal off the working area to contain the dust for later removal WARNING Some dust particles created by power sanding sawing grinding drilling and other const...

Страница 6: ...SYMBOLS Read the manual Warning Wear gloves Wear dust mask eye ear protection Conforms to relevant safety standards...

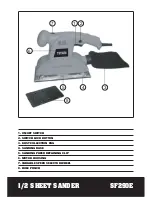
Страница 7: ...SHEET SANDER SF290E 1 ON OFF SWITCH 2 SWITCH LOCK BUTTON 3 DUST COLLECTION BAG 4 SANDING BASE 5 SANDING PAPER RETAINING CLIP 6 MOTOR HOUSING 7 VARIABLE SPEED SELECTOR WHEEL 8 HOLE PUNCH 6 7 5 4 8 3 1...

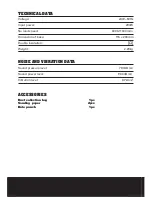
Страница 8: ...peed 6000 11000min 1 Dimension of base 115 x 230mm Double insulation Weight 2 29kg ACCESSORIES Dust collection bag 1pc Sanding paper 2pcs Hole punch 1pc NOISE AND VIBRATION DATA Sound pressure level 7...

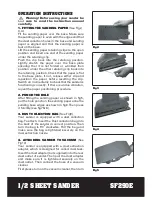
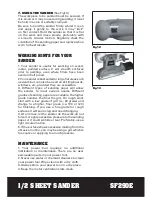
Страница 9: ...ng the clip Switch on momentarily to check that the sander is functioning correctly If there is undue vibration repeat the paper positioning procedure 2 PUNCH THE HOLE After tting the sanding paper as...

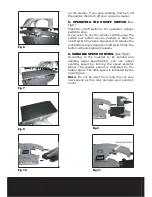
Страница 10: ...s been depressed To release the lock button simply depress on off switch fully the button will automatically release 6 VARIABLE SPEED CONTROL See Fig12 According to the material to be sanded and sandi...

Страница 11: ...ble 3 Different types of sanding paper will allow the sander to meet various needs Different grades of sanding paper are available the higher grade number the ner the grit For rough work start with a...

Страница 12: ...nd paper is worn replace with new paper The paper must be kept in a dry place if it is allowed to become damp the abrasive particles will lose their adhesion to the backing paper and will not abrade 3...

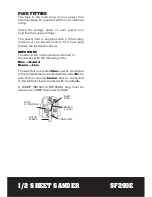
Страница 13: ...new plug follows the instruction below IMPORTANT The wire in the mains lead are coloured in accordance with the following code Blue Neutral Brown Live The wire that is coloured blue must be connected...

Страница 14: ...uirements of the following directives 89 336 EEC 93 68 EEC EMC Directive 73 23 EEC 93 68 EEC Low Voltage Directive 98 37 EC Machinery Directive Standards and technical speci cations referred to EN5501...

Страница 15: ......

Отзывы: