background image

1/2 SHEET SANDER 


SF290E

ADDITIONAL SAFETY INSTRUCTIONS FOR YOUR SANDER

1.   Never use this sander for wet sanding or liquid polishing. Failure to follow this rule 

may result in risk of electrical shock.

2.   Always wear eye protectors when using this sander.

3.   Always wear a dust mask when using this sander.

4.   Always inspect and remove all nails and screws etc from lumber before sanding.

5.  Always check walls and ceiling to avoid hidden power cables and pipes. A metal 

detector can be obtained from any good DIY store for this purpose.

6.   If possible, ensure the workpiece is firmly clamped to prevent movement.

7.    Your sander is a hand held tool, do not clamp your finishing sander.

8.   Never stop the sander by applying a force to the base plate.

9.   Only use sanding paper in good condition. Do not use torn or worn sanding paper.

10. 


Do not sand magnesium material due to the risk of fire.

11.  Do not sand material including asbestos due to a health rise.

12. Do not sand lead based paint due to the rise of lead poisoning.

13. Do not eat or drink in the working area of the sander.

14. Do not allow people to enter the working area without wearing a dust mask.

15. Where possible, seal off the working area to contain the dust for later removal.

WARNING!

Some  dust  particles  created  by  power  sanding,  sawing,  grinding,             

drilling  and  other  construction  jobs  contain  chemicals  known  to  cause  cancer, 

birth defects or other reproductive harm. Some examples of these chemicals are:

Lead from lead-based paints.

Crystalline silica from bricks and cement and other masonry products.

Arsenic and chromium from chemically treated lumber.

Your risk form these exposures varies, depending upon how often you do this type of 

work. To reduce your exposure to these chemicals:

Work in a well ventilated area.

Work with approved safety equipment, such as those dust masks that specially designed 

to filter out microscopic particles and use the dust bag at all times.

Double insulation: 


The tool is double insulated. This means that all the external metal parts are electrically 

insulated  from  the  mains  power  supply. This  is  done  by  placing  insulation  barriers 

between the electrical and mechanical components making it unnecessary for the tool 

to be earthed.

Important note

Be sure the supply is the same as the voltage given on the rating plate. The tool is fitted 

with a two-core cable and plug.

Remove the mains plug from socket before carrying out, any adjustment or servicing. 

Содержание SF290E

Страница 1: ...1 2 SHEET SANDER SF290E SAFETY AND OPERATING MANUAL...

Страница 2: ...f routine maintenance Failure of consumable items such as batteries Accidental damage Cosmetic damage Failure to follow manufacturer s guidelines Loss of use of the goods Repairs attempted by anyone u...

Страница 3: ...he cord Never use the cord for carrying pulling or unplugging the power tool Keep cord away from heat oil sharp edges or moving parts Damaged or entangled cords increase the risk of electric shock e W...

Страница 4: ...reakage of parts and any other condition that may affect the power tools operation If damaged have the power tool repaired before use Many accidents are caused by poorly maintained power tools f Keep...

Страница 5: ...hout wearing a dust mask 15 Where possible seal off the working area to contain the dust for later removal WARNING Some dust particles created by power sanding sawing grinding drilling and other const...

Страница 6: ...SYMBOLS Read the manual Warning Wear gloves Wear dust mask eye ear protection Conforms to relevant safety standards...

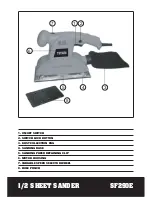
Страница 7: ...SHEET SANDER SF290E 1 ON OFF SWITCH 2 SWITCH LOCK BUTTON 3 DUST COLLECTION BAG 4 SANDING BASE 5 SANDING PAPER RETAINING CLIP 6 MOTOR HOUSING 7 VARIABLE SPEED SELECTOR WHEEL 8 HOLE PUNCH 6 7 5 4 8 3 1...

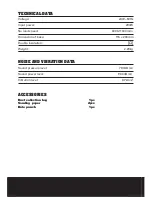
Страница 8: ...peed 6000 11000min 1 Dimension of base 115 x 230mm Double insulation Weight 2 29kg ACCESSORIES Dust collection bag 1pc Sanding paper 2pcs Hole punch 1pc NOISE AND VIBRATION DATA Sound pressure level 7...

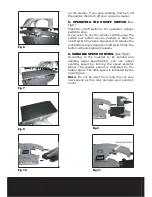
Страница 9: ...ng the clip Switch on momentarily to check that the sander is functioning correctly If there is undue vibration repeat the paper positioning procedure 2 PUNCH THE HOLE After tting the sanding paper as...

Страница 10: ...s been depressed To release the lock button simply depress on off switch fully the button will automatically release 6 VARIABLE SPEED CONTROL See Fig12 According to the material to be sanded and sandi...

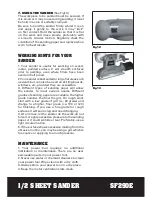
Страница 11: ...ble 3 Different types of sanding paper will allow the sander to meet various needs Different grades of sanding paper are available the higher grade number the ner the grit For rough work start with a...

Страница 12: ...nd paper is worn replace with new paper The paper must be kept in a dry place if it is allowed to become damp the abrasive particles will lose their adhesion to the backing paper and will not abrade 3...

Страница 13: ...new plug follows the instruction below IMPORTANT The wire in the mains lead are coloured in accordance with the following code Blue Neutral Brown Live The wire that is coloured blue must be connected...

Страница 14: ...uirements of the following directives 89 336 EEC 93 68 EEC EMC Directive 73 23 EEC 93 68 EEC Low Voltage Directive 98 37 EC Machinery Directive Standards and technical speci cations referred to EN5501...

Страница 15: ......

Отзывы: