Titan Implement, LLC
37
3515 Flex-Wing Rotary Cutter
(423) 334-0012
February 2020
6.6 Machine Break-In
Although there are no operational restrictions on
the rotary cutter when used for the first time, it is
recommended that the following mechanical items be
checked:
1. After 1/2 hour of operation:
a. Tighten all fasteners if necessary.
b.
Lubricate all grease fittings.
2. After 10 hours of operation:
a.
Go to the normal servicing and maintenance
schedule, as defined in the Maintenance
Section.
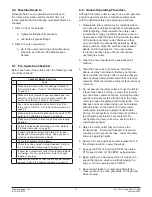
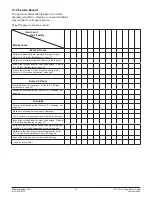
6.7 Pre-Operation Checklist
Before each use of the rotary cutter, the following areas
should be checked.
Checklist Before Each Use
4
Task
Make sure the rotary cutter is positively attached to
the tractor drawbar. Refer to “6.3 Attaching to Tractor”
on page 33.
Make sure the hydraulic hoses are undamaged, are
secured on the hose rack, and cannot contact the
tractor when turning or drag on the ground.
Use only an appropriately-sized tractor to pull the
rotary cutter. Refer to “6.2 Tractor Requirements” on
page 32.
Make sure the driveline is attached to the tractor PTO.
Refer to “6.3 Attaching to Tractor” on page 33.
Make sure all safety shields and guards are properly
installed.
Check the blade bolts and blade pan nuts. Refer to
“9.6 Blade Servicing” on page 47.
Inspect wing blade carriers and blades for locked
blades prior to lowering the wings. Use a pry bar or
other tool to separate locked blades.
Check the condition of the blades.
Check the cutting height. Adjust if needed. Refer to
“6.4.2 Setting the Cutting Height” on page 35.
Inspect the overall rotary cutter for potential problems
or damage. Do not use the rotary cutter if it needs
repairs of any type.
Make sure the driveline CV joint, U-joints, and slip joints are
greased. Refer to “9.5 Driveline Lubrication” on page 47.
6.8 General Operating Procedure
Although the rotary cutter is easy to use, each operator
should review this section to familiarize themselves
with the detailed safety and operating procedures.
1. Operate the rotary cutter only in conditions where
you have clear visibility in daylight or with adequate
artificial lighting. Never operate the rotary cutter
in darkness or foggy conditions where you cannot
clearly see at least 300 feet in front and to the sides
of the tractor and rotary cutter. Make sure that
you can clearly see and identify passersby, steep
slopes, ditches, drop-offs, overhead obstructions,
debris, and foreign objects. If you are unable
to clearly see these type of items, discontinue
operating the cutter.
2. Clear the area of bystanders, especially small
children.
3. Clear the area to be cut of stones, branches,
debris, and any hard objects that may be thrown.
Never operate the rotary cutter in an area that you
have not inspected and removed debris or foreign
material. Mark the location of objects that cannot be
removed.
4. Do not operate the rotary cutter, or drive the tractor
into material that is burning, or areas that recently
burnt and may contain hot spots. Burning material,
sparks, and coals could be thrown from the rotary
cutter to areas of vegetation that might ignite. Tire
damage can occur when driving over hot material.
Oil and grease on the tractor and rotary cutter
could ignite, resulting in equipment destruction.
Carry a fire extinguisher on the tractor at all times
to extinguish possible fires encountered. Do
not operate the rotary cutter on a tractor with an
underframe exhaust.
5. Raise the rotary cutter fully and remove the
transport lock. Fasten the transport lock around
a leveling rod to prevent its loss. Lower the rotary
cutter to operating height.
6. Remove the wing uplock pins and replace them in
the storage location. Lower the wings.
7. Engage the PTO at low engine RPM, then raise
PTO speed to 540 or 1000 RPM, as appropriate.
8. Begin cutting at a slow speed, then increase to a
speed that gives a clean cut without lugging the
engine. Do not operate above 5 MPH.
9. Never allow blades to contact solid objects like
rocks, posts, wire, curbs, guardrails, or the ground
while mowing.
Содержание 3515
Страница 1: ......
Страница 2: ......
Страница 4: ......
Страница 6: ......
Страница 55: ...Titan Implement LLC 55 3515 Flex Wing Rotary Cutter 423 334 0012 February 2020 ...
Страница 59: ...Titan Implement LLC 59 3515 Flex Wing Rotary Cutter 423 334 0012 February 2020 ...
Страница 61: ...Titan Implement LLC 61 3515 Flex Wing Rotary Cutter 423 334 0012 February 2020 ...
Страница 63: ...Titan Implement LLC 63 3515 Flex Wing Rotary Cutter 423 334 0012 February 2020 ...
Страница 64: ...3515 Flex Wing Rotary Cutter 64 Titan Implement LLC February 2020 423 334 0012 12 4 Wheel Lift ...
Страница 65: ...Titan Implement LLC 65 3515 Flex Wing Rotary Cutter 423 334 0012 February 2020 ...
Страница 67: ...Titan Implement LLC 67 3515 Flex Wing Rotary Cutter 423 334 0012 February 2020 12 6 Driveline Shield ...
Страница 70: ...3515 Flex Wing Rotary Cutter 70 Titan Implement LLC February 2020 423 334 0012 12 9 Outboard Gearbox ...
Страница 71: ...Titan Implement LLC 71 3515 Flex Wing Rotary Cutter 423 334 0012 February 2020 12 10 1 540 RPM Driveline ...
Страница 72: ...3515 Flex Wing Rotary Cutter 72 Titan Implement LLC February 2020 423 334 0012 12 10 2 1000 RPM Driveline ...
Страница 73: ...Titan Implement LLC 73 3515 Flex Wing Rotary Cutter 423 334 0012 February 2020 12 10 3 Center Deck Driveline ...
Страница 74: ...3515 Flex Wing Rotary Cutter 74 Titan Implement LLC February 2020 423 334 0012 12 10 4 Wing Deck Driveline ...
Страница 75: ...Titan Implement LLC 75 3515 Flex Wing Rotary Cutter 423 334 0012 February 2020 12 11 Wing Deck Driveline ...
Страница 76: ...3515 Flex Wing Rotary Cutter 76 Titan Implement LLC February 2020 423 334 0012 ...
Страница 77: ...Titan Implement LLC 77 3515 Flex Wing Rotary Cutter 423 334 0012 February 2020 ...
Страница 78: ...Form No 3515M Printed in USA 09 2016 ...

