background image

Содержание 28813 - 46 in. Lawn Tractor

Страница 1: ...ines Before you start the engine read and understand this Owner s Manual IMPORTANT Read and follow all Safety Rules and Instructions before operating this equipment For answers to your questions about this product Call 1 800 659 5917 Sears Craftsman Help Line 5 am 5 pro Mon Sat SEARS ROEBUCK AND CO HOFFMAN ESTATES IL 60179 U S A Visit our Craftsman website www sears com craftsman As rated by the e...

Страница 2: ...el replacement or repair resulting from normal wear accident or improper operation or maintenance Repairs necessary because of operator abuse including but not limited to damage caused by towing objects beyond the capability of the riding equipment impacting objects that bend the frame or crankshaft or over speeding the engine Repairs necessary because of operator negligence including but not limi...

Страница 3: ...ades Be sure the area is clear of bystand ers before operating Stop machine if anyone enters the area Never carry passengers Do not mow in reverse unless abso lutely necessary Always look down and behind before and while backing Never direct discharged material toward anyone Avoid discharging material against a wall or obstruction Material may ricochet back toward the operator Stop the blades when...

Страница 4: ...d in the watchful care of a respon sible adult other than the operator Be alert and turn machine off if a child enters the area Before and while backing look behind and down for small children Never carry children even with the blades shut off They may fall off and be seriously injured or interfere with safe machine operation Children who have been given rides in the past may suddenly appear in th...

Страница 5: ...r wear gloves and use extra caution when servicing them Check brake operation frequently Ad just and service as required Maintain or replace safety and instruc tion labels as necessary Be sure the area is clear of bystand ers before operating Stop machine if anyone enters the area Never carry passengers Do not mow in reverse unless abso lutely necessary Always look down and behind before and while...

Страница 6: ...Code Other states may have similar laws Federal laws apply on federal lands A spark arrester for the muffler is available through your nearest Sears service center See REPAIR PARTS manual REPAIR PROTECTION AGREEMENTS Congratulations on making a smart pur chase Your new Craftsman product is designed and manufactured for years of dependable operation But like all products it may require repair from ...

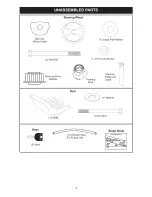
Страница 7: ...g 1 Large Flat Washer Wheel Insert 1 Hex Bolt 1 5 16 Lock Washer _ Steering Wheel _ Adapter __ Steering Extension Steering Shaft Boot Seat 1 Washer 1 Seat 1 Hex Bolt Keys 2 Keys 1 Oil Drain Tube For Future Use Slope Sheet 7 ...

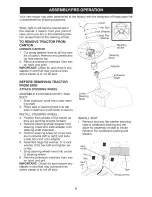
Страница 8: ...ver tab slots in dash and push down to secure INSTALL STEERING WHEEL 3 Position front wheels of the tractor so they are pointing straight forward 4 Remove steering wheel adapter from steering wheel and slide adapter onto steering shaft extension 5 Position steering wheel so cross bars are horizontal left to right and slide inside boot and onto adapter 6 Assemble large flat washer 5 16 lock washer ...

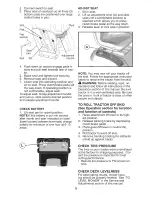
Страница 9: ...ch brake pedal all the way down 3 Release lever to lock seat in position NOTE You may now roll your tractor off the skid Follow the appropriate instruction below to remove the tractor from the skid _L WARNING Before starting read un derstand and follow all instructions in the Operation section of this manual Be sure tractor is in a well ventilated area Be sure the area in front of tractor is clear...

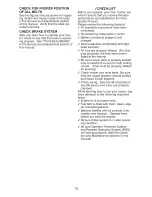
Страница 10: ...nd tight ened securely All tires are properly inflated For ship ping purposes the tires were overin flated at the factory Be sure mower deck is properly leveled side to side front to rear for best cutting results Tires must be properly inflated for leveling Check mower and drive belts Be sure they are routed properly around pulleys and inside all belt keepers V Check wiring See that all connection...

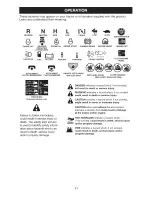
Страница 11: ...could result in serious injury or death The safety alert symbol is used to identify safety inform ation about hazards which can result in death serious injury and or property damage DANGER indicates a hazard which if not avoided will result in death or serious injury WARNING indicates a hazard which if not avoided could result in death or serious injury CAUTION indicates a hazard which if not avoi...

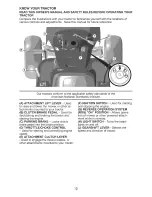
Страница 12: ...ted to your tractor B CLUTCH BRAKE PEDAL Used for declutching and braking the tractor and starting the engine C PARKING BRAKE Locks clutch brake pedal into the brake position D THROTTLE CHOKE CONTROL Used for starting and controlling engine speed E ATTACHMENT CLUTCH LEVER Used to engage the mower blades or other attachments mounted to your tractor F IGNITION SWITCH Used for starting and stopping t...

Страница 13: ...ss clutch brake pedal all the way down Move gear shift lever J to neutral posi tion ENGINE Move throttle control D between half and full speed fast position NOTE Failure to move throttle control between half and full speed fast posi tion before stopping may cause engine to backfire Turn ignition key F to STOP position and remove key Always remove key when leaving tractor to prevent unau thorized u...

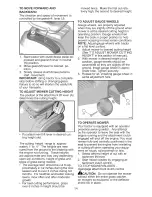
Страница 14: ...o desired height TO ADJUST GAUGE WHEELS Gauge wheels are properly adjusted when they are slightly off the ground when mower is at the desired cutting height in operating position Gauge wheels then keep the deck in proper position to help prevent scalping in most terrain conditions NOTE Adjust gauge wheels with tractor on a flat level surface 1 Adjust mower to desired cutting height See TO ADJUST M...

Страница 15: ... start ing up or down hills Avoid stopping or changing speed on hills If stopping is absolutely necessary push clutch brake pedal quickly to brake posi tion and engage parking brake Move gearshift lever to 1st gear Be sure you have allowed room for tractor to roll slightly as you restart movement To restart movement slowly release parking brake and clutch brake pedal Make all turns slowly TO TRANS...

Страница 16: ...er use engine or carburetor cleaner products in the fuel tank or permanent damage may occur TO START ENGINE When starting the engine for the first time or if the engine has run out of fuel it will take extra cranking time to move fuel from the tank to the engine 1 Sit on seat in operating position depress clutch brake pedal and set parking brake 2 Place gear shift lever in neutral N position 3 Mov...

Страница 17: ...ences driveways etc After one or two rounds mow in the opposite direction making left hand turns until finished f J If grass is extremely tall it should be mowed twice to reduce load and pos sible fire hazard from dried clippings Make first cut relatively high the second to the desired height Do not mow grass when it is wet Wet grass will plug mower and leave undesirable clumps Allow grass to dry ...

Страница 18: ...aintain tractor as instructed in this manual Some adjustments will need to be made periodically to properly maintain your tractor At least once a season check to see if you should make any of the adjustments described in the Service and Adjustments section of this manual At least once a year you should replace the spark plug clean or replace air filter and check blades and belts for wear A new spa...

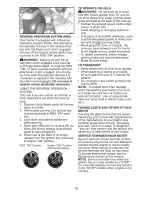
Страница 19: ...ormal Operating CHECK REVERSE OPERATION ROS SYSTEM When the engine is running with the ignition switch in the engine ON posi tion and the attachment clutch engaged any attempt by the operator to drive in reverse should shut off the engine When the engine is running with the ignition switch in the ROS ON position and the attachment clutch engaged any attempt by the operator to drive in reverse shou...

Страница 20: ...evel TO CHANGE ENGINE OIL Determine temperature range expected before oil change All oil must meet API service classification SG SL Be sure tractor is on level surface Oil will drain more freely when warm Catch oil in a suitable container 1 Remove oil fill cap dipstick Be careful not to allow dirt to enter the engine when changing oil 2 Remove yellow cap from end of drain valve and install the dra...

Страница 21: ...ecomes clogged obstructing fuel flow to carbu retor replacement is required 1 With engine cool remove filter and plug fuel line sections 2 Place new fuel filter in position in fuel line with arrow pointing towards carbu retor 3 Be sure there are no fuel line leaks and clamps are properly positioned 4 Immediately wipe up any spilled gaso line Base Tabs _ Slots CLEAN AIR SCREEN Air screen must be ke...

Страница 22: ...wer remove retainer spring and washer 7 Go to either side of mower and discon nect mower suspension arm A from chassis pin B and rear lift link C from rear mower bracket D remove retainer springs and washers 8 Go to other side of mower and discon nect the suspension arm and rear lift link CAUTION After rear lift links are dis connected the attachment lift lever will be spring loaded Have a tight g...

Страница 23: ...rear corner of mower and position slot in link assembly over pin on rear mower bracket D and secure with washer and retainer spring 6 Repeat on opposite side of tractor 7 ATTACH FRONT LINK E Work from left side of tractor Insert rod end of link assembly through front hole in tractor front suspension bracket F 8 Insert end of link E into hole in front mower bracket H and secure with washer and reta...

Страница 24: ...cessary until you are satisfied with the results PRECISION SIDE TO SIDE ADJUSTMENT 1 With all tires properly inflated park tractor on level ground or driveway CAUTION Blades are sharp Protect your hands with gloves and or wrap blade with heavy cloth 2 Raise mower to its highest position 3 At both sides of mower position blade at side and measure the distance A from bottom edge of blade to the grou...

Страница 25: ...s R and all idler pulleys S MOWER DRIVE BELT INSTALLATION 1 Install belt around all mandrel pulleys R and around idler pulleys S as shown 5 25 TO CHECK BRAKE If tractor requires more than five 5 feet to stop at highest speed in highest gear on a level dry concrete or paved surface then brake must be serviced You may also check brake by 1 Park tractor on a level dry concrete or paved surface depres...

Страница 26: ...ing and washers to allow wheel removal rear wheels have a square key Do not lose 3 Repair tire and reassemble NOTE On rear wheels only align grooves in rear wheel hub and axle Insert square key 4 Replace washers and snap retaining ring securely in axle groove 5 Replace axle cover TO START ENGINE WITH A WEAK BAT TERY _WARNING Lead acid batteries gen erate explosive gases Keep sparks flame and smoki...

Страница 27: ...g cable to negative terminal with remaining hex bolt and keps nut Tighten securely _ _ Negative Black Cable TO 1 2 REPLACE HEADLIGHT BULB Raise hood Remove bulb holder from the hole in the backside of the grill 3 Replace bulb in holder and install bulb holder securely back into the hole in the backside of the grill 4 Close hood INTERLOCKS AND RELAYS Loose or damaged wiring may cause your tractor t...

Страница 28: ...on 2 Move throttle control lever to slow posi tion With finger rotate and hold throttle lever against idle speed screw Turn idle speed screw to attain 1750 RPM 3 While still holding throttle lever against idle speed screw turn idle mixture valve full travel clockwise then coun terclockwise until engine runs rough Turn valve to a point midway between those two positions Release throttle lever ACCEL...

Страница 29: ...n NOTE Fuel stabilizer is an acceptable alternative in minimizing the formation of fuel gum deposits during storage Add stabilizer to gasoline in fuel tank or stor age container Always follow the mix ratio found on stabilizer container Run engine at least 10 minutes after adding stabilizer to allow the stabilizer to reach the car buretor Do not empty the gas tank and carburetor if using fuel stabi...

Страница 30: ...sition 3 Build up of grass leaves and trash under mower 4 Dirty air filter 5 Low oil level dirty oil CORRECTION Empty fuel tank and carburetor refill tank with fresh gasoline and replace fuel filter Check all wiring See To Adjust Carburetor in Service and Adjustments section Contact a Sears or other qualified service center 1 Clean replace air filter 2 Replace spark plug 3 Recharge or replace batt...

Страница 31: ...ngine air screen fins 12 Clean replace muffler 13 Check all wiring 14 See To Adjust Carburetor in Service and Adjustments section 15 Contact a Sears or other qualified service center 1 Replace blade Tighten blade bolt 2 Contact a Sears or other qualified service center 3 Tighten loose part s Replace damaged parts 1 Check wiring switches and connections If not corrected contact a Sears or other 1 W...

Страница 32: ...Replace bulb s or lamp s 3 Check replace light switch 4 Loose or damaged wiring 4 Check wiring and connections 5 Blown fuse 5 Replace fuse Battery will not charge 1 Bad battery cell s 2 Poor cable connections 1 Replace battery 2 Check clean all connections 3 Faulty regulator if so equipped 3 Replace regulator Engine backfires when turning engine OFF Engine dies when tractor is shifted into reverse...

Страница 33: ...000 _ I o_H o _ _ 0 _ _0 _ o_ _ o _ ro _g_ _ _o _ o_ _ _ a 0 r_ m m _ X zo Oz Ir Z o Z 33 ...

Страница 34: ...as tocones o vidrios Reemplazo o reparaci6n de neum ticos o ruedas por el desgaste normal accidentes o por operaci6n o mantenimiento incorrectos Reparaciones necesarias pot abuso del operador incluso pero sin limitarse a ello dafios causados por remolcar objetos que superen la capacidad del equipo tractor chocar contra objetos que doblen el bastidor o el cigOefial o por sobrepasar la velocidad del...

Страница 35: ...ado hacia nadie Evitar descargar material contra paredes u obstrucciones El material podria rebotar hacia el operador Parar las cuchillas cuando se pasan superficies de grava No hacer funcionar la mAquina sin el captador de hierba entera la protecci6n de descarga u otros dispositivos de seguridad en su lugar yen buenas condiciones Ralentizar antes de girar Nunca dejar una maquina encendida sin vig...

Страница 36: ...a que tenga un gancho disefiado para remolcar Enganchar el equipo o remolcar s61o en el punto dispuesto al efecto Seguir las recomendaciones del productor con respecto a los limites del equipo por remolcar y el remolque en pendientes Nunca permitir que nifios u otras personas est6n dentro del equipo por remolcar En pendientes el peso del equipo remolcado puede causar la p6rdida de tracci6n y la p6...

Страница 37: ... pasajeros No cortar marcha atras al no set absolu tamente necesario Mirar siempre abajo y delante mientras se procede atr_ s Nunca Ilevar nifios incluso si hay las cuchillas apagadas Podrian caer y herirse seriamente o interferir con el funcionamiento seguro de la maquina los nifios que se han Ilevado precedentemente pueden aparecer de pronto en el _trea de corte por otto paseo y set atropellados...

Страница 38: ...lican en la tierras federales Su centro de Servicio mas cercano tiene disponible amortiguadores de chispas para el silenciador Vea la secci6n de Partes de Repuesto en el manual Ingl6s del duefio ACUERDOS DE PROTECCION PARA LA REPARACION Congratulaciones por su buena compra Su nuevo producto Craftsman est disefiado y fabricado para funcionar de modo fiable por muchos ahos Pero como todos los produc...

Страница 39: ...direccion 1 Arandela 1 Perno hexagonal 1 Arandela de seguridad 1 1 Adaptador __cesorio de transci6n de la direcci6n Eje de Extenci6n Asiento Arandela de calibre 1 Asiento 1 Pemo hexagonal Llaves ll l 2 Uaves 1 Tubo de desagQe Hoja de pendiente 39 ...

Страница 40: ...as para las orejas en el tablero y empOjelas hacia abajo para asegurarlas INSTALACION DEL VOLANTE DE DIREC ClON 3 Ponga las ruedas delanteras del tractor para que estOn indicadas hacia adelante 4 Remueva el adaptador del volante y deslice el adaptador sobre la extensi6n del eje de direcci6n 5 Ponga el volante de direcci6n de manera que las barras transversales queden hori zontales izquierda a dere...

Страница 41: ...A hacia arriba y mueva el asiento hasta que alcance una posici6n c6moda que le permita presionar completamente sobre el pedal del em brague freno 3 Desconecte la palanca para trabar el asiento en la posici6n AVlSO Ahora puede rodar o conducir su trac tor fuera de la corredera Siga las siguientes instrucciones para remover el tractor de la _rAredera DVERTENClA Antes de empezar leer entender y segui...

Страница 42: ... forma c6moda y apretado en forma segura Todas las Ilantas han sido infladas en forma adecuada Para fines de envio las Ilantas se inflaron demasiado en la fgtbrica Aseg0rese que el conjunto segador est6 nivelado en forma adecuada de lado a lado y desde adelante hacia atras para obtener los mejores resultados en el corte Las Ilantas tienen que estar infladas en forma adecuada para la nivelaci6n Rev...

Страница 43: ...6nde las reglasde seguddad PELIGRO indica un peligro que si no se evita provoca muerte o lesiones graves ADVERTENCIA indica un peligro que si no se evita puede provocar muerte o lesiones graves PRECAUCION indica un peligro que si no se evita puede provocar lesiones ligeras o moderadas PRECAUCION cuando se utiliza sin et simboto de aviso indica una situaci6n que puede provocar daSos al tractor y o ...

Страница 44: ...RENO Se usa para desembragar y frenar el tractor y para hacer arrancar el motor C PALANCA DEL FRENO DE ESTAClO NAMIENTO Asegura el pedal del embrague freno en la posici6n del freno D CONTROL DE ACELERACION Se usa para controlar la velocidad del motor E PALANCA DEL EMBRAGUE DEL AC CESORIO Se usa para enganchar las cuchillas segadoras o los demas accesorios montados en su tractor F INTERRUPTOR DE IG...

Страница 45: ...a palanca L de mando entre la posici6n de velocidad media y maxima ra pida AVlSO Si no se mueve la palanca de mando entre la posici6n de velocidad media y m_ xima rapida antes de pararse se puede causar un retorno de llama del motor Gire la Ilave de ignici6n F a la posici6n de apagado STOP y remueva la Ilave al abandonar el tractor para evitar el uso no autorizado Nunca use la estrangulaci6n C par...

Страница 46: ... sobre el suelo Instale las ruedas calibradoras en el agujero adecuado con el perno con resalto la arandela de 3 8 y la tuerca de seguridad de 3 8 16 y apri6telos en forma segura 3 Repita el procedimiento para el lado opuesto instalando la rueda calibradora en el mismo agujero de ajuste Coloque la palanca elevadora en la ranura de la altura deseada La gama de la altura de corte es de aproxima dame...

Страница 47: ... Evite parar o cambiar la velocidad en cerros Si es absolutamente necesario el parar empuje el pedal del embrague freno r pida mente a la posici6n de freno y enganche el freno de estacionamiento Mueva la palanca de cambio a primera Asegt3rese que ha dejado suficiente lugar para que el tractor pueda rodar un poco cuando vuelva a empezar el movimiento Para volver a empezar el movimiento suelte lenta...

Страница 48: ...namiento para mas informaci6n Nunca use productos de limpieza para el motor o para el carburador en el estanque del combustible pues se pueden producir dahos permanentes PARA HACER ARRANCAR EL MOTOR AI hacer arrancar el motor por la primera vez o si se ha acabado el combustible del motor se necesitar tiempo para el arranque extra para mover el combustible desde el estanque hasta el motor 1 Si6ntas...

Страница 49: ...egue en la direcci6n opuesta haciendo virajes a la izquierda hasta que termine 00272 Si el c6sped est demasiado alto se debe segar dos veces para reducir la carga y los posibles peligros de incendio debido a los recortes secos Haga el primer corte relativa mente alto el segundo a la altura deseada No siegue el c6sped cuando esta mojado El cesped mojado taponara la segadora y dejara montones indese...

Страница 50: ...Hay algunos ajustes que se tienen que hacer en forma peri6dica para poder mantener su tractor adecuadamente AI menos una vez cada estaci6n comprobar si es necesario efectuar los adjustes descritos en las secciones de Servicio y Ajustes de este manual Una vez al aho cambie la bujia limpie o cambie el filtro de aire y revise si las cuchillas y las correas estan desgastadas Una buj a nueva y un filtr...

Страница 51: ...N y el embrague del accesorio conectado cual quier tentativa del operador de viajar marcha atras apagara el motor 51 Cuando el motor esta en marcha con el interruptor de Ilave del sistema de funcionamiento atras ROS en la posici6n ON y el embrague del accesorio conectado cualquier tentativa del operador de viajar marcha atr_s NO apagara el motor CUIDADO DE LA CUCHILLA Para obtener resultados 6ptim...

Страница 52: ...pa varilla indicadora de nivel para relleno del aceite Tenga cuidado de no permitir que la mugre entre en el motor cuando cambie el aceite 2 Quite el casquillo amarillo de la parte inferior de la valvula de desag0e e instale el tubo de desag0e sobre la guarnici6n Valvula de desag_e del aceite Posicion cerrada y _ CasquilIo ___ u __ amarillo _ _ _ _ _Tubo d e desague 3 Abra la v lvula de desagOe em...

Страница 53: ...Limpiela con un cepillo de alambre o con aire comprimido para remover la mugre y las fibras de goma secas pegadas SISTEMA DE ENFRIAMIENTO DE AIRE Los escombros pueden atascar el sistema de enfriamiento de aire de motor Remueva la cubi erta del soplador y limpie el area mostrada para evitar el recalentamiento y daflos al motor FILTRO DE COMBUSTIBLE EN LINEA El filtro de combustible debe cambiarse u...

Страница 54: ...onten ci6n y la arandela 7 Por uno de los lados de la cortadora desconecte el brazo de suspensi6n de la cortadora A del chasis y la pieza de uni6n posterior C de la barra posterior de la cortadora D retire los resortes de contenci6n y las arandelas 8 Pot el otto lado de la cortadora desconecte el brazo de suspensi6n y la pieza de uni6n posterior _I CUIDADO Una vez que se desconecten las piezas de ...

Страница 55: ... barra 8 Introduzca el otto extremo de la pieza de uni6n E en el orificio que se encuentra en la barra anterior de la cortadora H y fijelo pot medio de una arandela y un resorte de contenci6n J 5 FIJE LAS PIEZAS DE PROPULSION POS TERIORES C Levante la parte posterior de la cortadora ubique la ranura de la pieza de uni6n por encima de la clavija que hay en la barra posterior de la cortadora D y fij...

Страница 56: ... en caso necesario hasta obtener resultados satisfactorios REGULACION DE LA PRECISION DE LADO A LADO 1 Con todos los neum ticos correctamente in flados estacione el tractor a nivel del suelo o en la entrada a la casa CUIDADO Las cuchillas son afiladas Pro tejase las manos con guantes o envuelva las cuchillas con tela gruesa o bien haga ambas cosas 2 Suba la SEGADORA a la posici6n mas alta 3 A ambo...

Страница 57: ...punta anterior de la hoja de la cuchilla quede 1 8 a 1 2 m_ts abajo que la punta posterior Mantenga en la posici6n la tuerca de ajuste pot medio de una Ilave inglesa y apriete bien la tuerca contra dicha tuerca de ajuste PARA REEMPLAZAR LA CORREA DE TRANSMISION DE LA CUCHILLA DE LA SEGADORA DESMONTAJE DE LA CORREA DE TRANS MISlON DE LA SEGADORA 1 Estacione el tractor en una superficie nive lada Po...

Страница 58: ...las ruedas del anteras de su nuevo tractor vienen asi de fabri ca y son normales La impresi6n y la inclinaci6n de las ruedas delanteras no son regulables En caso que se produzca algt3n dafio que afecte la impresi6n o la inclinaci6n de las ruedas del anteras tal como vinieron de fabrica p6ngase en contacto con un centro de servicios Sears u otto centro de servicios autorizado PARA REMOVER LAS RUEDA...

Страница 59: ...teria vieja _ Negafivo _ Cable negro 4 Primero conecte el cable de la bateria ROJO con el terminal positivo con el perno hexagonal y la tuerca segOn se muestra Aprietelos en forma segura Desl ize la cubierta terminal sobre el terminal 5 Conecte el cable de conexi6n a tierra NEGRO al terminal negativo con el perno hexagonal y la tuerca que queden Apri6telos en forma segura PARA CAMBIAR LA BOMBILLA ...

Страница 60: ...1 Haga arrancar el motor y permita que se caliente pot cinco minutos Haga los ajustes finales con el motor funcionando y con la palanca de control de cambio movimiento en la posici6n de neutro N 2 Mueva la palanca de control de la aceler aci6n a la posici6n de lento Con el dedo rote y sujete la palanca de la aceleraci6n en contra del tornillo de la velocidad en vacio Gire el tornillo de la velocid...

Страница 61: ...nguera del combustibles mezclados con alcohol conocido como gasohol o que tienen etanol o metanol pueden atraer humedad Io que conduce a la separaci6n y a la formaci6n de acudos durante elalmacenamiento La gasolina acidica puede dafiar el sistema de combustible de un motor durante el periodo de almacenamiento Vaciar el dep6sito del carburante poniendo en marcha el motor y dejandolo funcionar hasta...

Страница 62: ...ANCAR EL MOTOR en la secci6n de operaci6n 3 Espere varios minutos antes de tratar de arrancar 4 Cambie la bujia 5 Limpie cambie el filtro de aire 6 Cambie el filtro de combustible 7 Vaciar el estanque de combustible y el carburador vuelva a Ilenar el estanque con gasolina nueva cambie cambie el filtro de combus tible 8 Revise todo el alambrado 9 Yea Para ajustar el Carburador en la secci6n de Serv...

Страница 63: ...os mandriles 3 Limpie la parte inferior de la caja de la segadora 4 Limpie cambie el filtro de aire 5 Revise el nivel de aceite cambie el aceite 6 Limpie y vuelva a ajustar la abertura o cambie la bujia 7 Cambie el filtro de combustible 8 Vaciar el estanque de combustible y vuelva a Ilenarlo con gasolina nueva 9 Vaciar el estanque de combustible y el carburador vuelva a Ilenar el estanque con gaso...

Страница 64: ...lemento s de la bateria malo s 2 Malas conexiones de conexiones 3 Regulador fallado si equipado 4 Alternador fallado 1 El control de la aceleraci6n del motor no fue ajustado en la posici6n de velocidad media y m_txima rapida antes de parar el motor 1 Remueva la obstrucci6n 2 Cambie la correa de impulsi6n de la segadora 3 Cambie la polea de guia 4 Pongase en contacto con un centro de servicio Sears...

Страница 65: ...65 ...

Страница 66: ...66 ...

Страница 67: ..._0 _ _o_ o_ _ _ _ _ _ o o o __ _ _ __ _ _ g_ _g _ _ _ _ O _ g N rrl 0 0 Oo rn N _rn _m o o r 67 ...

Страница 68: ... electronics call or go on line for the nearest Sears Parts and Repair Center 1 800 488 1222 Anytime day or night U S A only www sears com To purchase a protection agreement U S A or maintenance agreement Canada on a product serviced by Sears 1 800 827 6655 U S A 1 800 361 6665 Canada Para pedir servicio de reparaci6n a domicilio y para ordenar piezas 1 888 SU HOGAR 1 888 784 6427 Au Canada pour s...

Отзывы: