


22
system preparation
ProMark
4.2
fIllINg The Bpo TANk
i
Prior to first usage the Benzoyl Peroxide (BPO)
tank should be filled. It can be refilled as
necessary for future uses.
Follow all safety information from the material
manufacturer when handling liquid Benzoyl
Peroxide (BPO). Make sure to follow all
precautions and warnings on the BPO container.
Avoid contact with skin.
fIll The Bpo TANk
High pressure hazard. Make sure the blue BPO
valve is open (vertical) prior to removing the BPO
tank lid.
NeVer
attempt to fill the BPO tank while the unit
is under pressure or running.
1.
Open the two brass clasps on either side of the BPO tank
lid and remove the lid. The tank lid can hang from its
safety cord.
2.
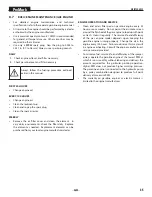
Using a clean funnel, pour the liquid BPO into the tank. DO
NOT fill the tank past the opening of the outlet on the side
of the tank (the top of the “B”). See figure 6.
3.
Replace the BPO tank lid and secure with the brass clamps.
fIgure 6
Do NoT fIll
pAST here
Bpo VAlVe
4.3
fIllINg The SolVeNT fluSh TANk
Attention
The ProMark system needs to be flushed with
solvent whenever the system remains idle for
more than 2-3 minutes, otherwise the spray
material / BPO mixture will harden inside
the mixing chamber, hoses and spray guns,
rendering them inoperable.
Check the solvent flush level before each use.
It is a good idea to always keep extra solvent
available during jobs.
i
If purchasing more solvent, it is recommended
to use Non-Chlorinated Brake Cleaner (such as
Johnsen’s® or Brakleen®).
fIll The SolVeNT fluSh TANk
The blue valve handle at the very bottom of the
solvent tank should be in the open (vertical)
position prior to filling the tank.
1.
Open the two brass clasps on either side of the solvent
flush tank lid and remove the lid. The tank lid can hang
from its safety cord.
2.
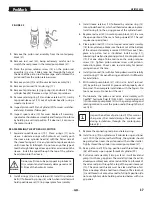
If using the system for the first time, fill the solvent flush
tank with the included solvent. DO NOT fill the tank past
the opening of the outlet on the side of the tank (the top
of the “S”). See figure 7.
3.
Replace the solvent flush tank lid and secure with the brass
clamps.
fIgure 7
Do NoT fIll
pAST here
Содержание 200
Страница 12: ...12 description of unit ProMark 3 3 System controls FIGURE 3 1 5 4 8 2 3 6 7 9 10 11 12 ...
Страница 45: ...45 troubleshooting ProMark ...
Страница 56: ...56 Gerätebeschreibung ProMark 3 3 GERÄTESTEUERUNG abb 3 1 5 4 8 2 3 6 7 9 10 11 12 ...
Страница 89: ...89 ProMark ...
Страница 100: ...100 Description du matériel ProMark 3 3 COMMANDES DU SYSTÈME fig 3 1 5 4 8 2 3 6 7 9 10 11 12 ...
Страница 133: ...133 ProMark ...