15
description of unit
ProMark
3.5
DATAlogger
i
The DataLogger comes standard with ProMark
250 units. It tracks spraying performance and
can be used to adjust for your particular spraying
job.
To view the screens on the DataLogger without starting the
unit, turn the ignition key to the right and flip the power switch
in the upper left hand corner to ON.
The DataLogger contains many different screens that track
and enhance your performance. To choose an option on the
screen, simply touch the applicable function on the screen. See
the information about the screens below.
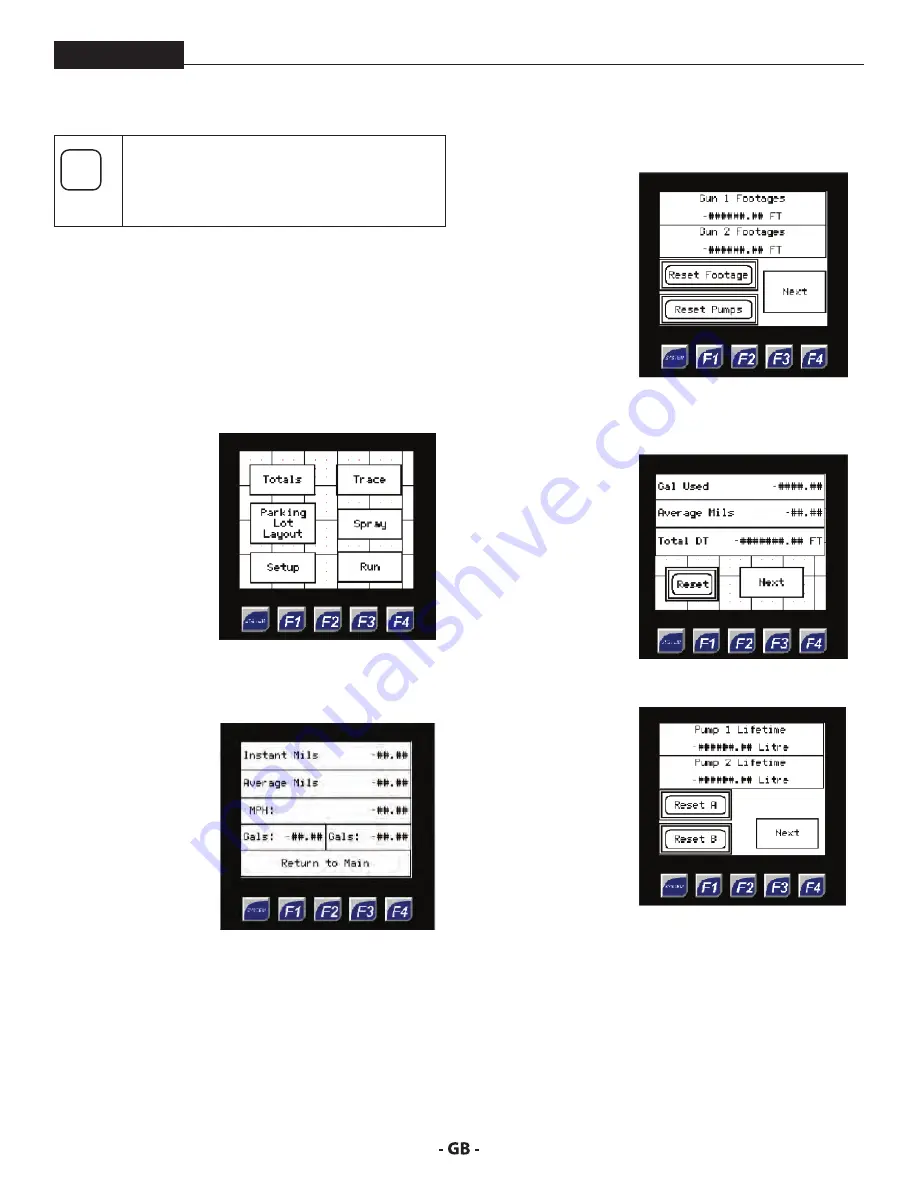
mAIN meNu ScreeN
This is the first screen
shown when the
DataLogger is switched
ON.
From the Main Menu
screen users can view
the total footages
applied, set spacing
for the trace function,
view/modify the setup
screen, and go to the
RUN screen.
ruN ScreeN
From the Main Menu
screen users can view
the total footages
applied, set spacing
for the trace function,
view/modify the setup
screen, and go to the
RUN screen.
Whenever spraying
the RUN screen will be
displayed.
The Instant and Average mil of material applied, current
speed, and the gallons of material applied will be shown.
Pressing F2 will reset the instant and average mils. To exit
out of the run screen and go to the menu screen, press the
“Return to Main” button.
ToTAlS ScreeNS
This screen shows the
total footage applied
for each gun.
To reset the footage
simply press the
“Reset” button.
“Reset Pumps” will
reset the gallons
applied number
displayed on the run
screen.
Press ‘Next’ to view gallons used, average mil, and total
distance travelled (DT).
This screen shows the
total gallons used,
average mils applied,
as well as the total
Distance Traveled (DT)
for the job.
To reset these values
press the “Reset”
button.
Pressing ‘Next’ will take
the user to the pump
lifetime screen.
This screen shows
lifetime pump usage of
both pumps.
To reset these values
simply hit the reset
button. These values
are only to be reset
when the pump is
serviced.
Содержание 200
Страница 12: ...12 description of unit ProMark 3 3 System controls FIGURE 3 1 5 4 8 2 3 6 7 9 10 11 12 ...
Страница 45: ...45 troubleshooting ProMark ...
Страница 56: ...56 Gerätebeschreibung ProMark 3 3 GERÄTESTEUERUNG abb 3 1 5 4 8 2 3 6 7 9 10 11 12 ...
Страница 89: ...89 ProMark ...
Страница 100: ...100 Description du matériel ProMark 3 3 COMMANDES DU SYSTÈME fig 3 1 5 4 8 2 3 6 7 9 10 11 12 ...
Страница 133: ...133 ProMark ...


