


20
21
OK
EPG
MENU
EXIT
TEXT
SIZE
HOLD
INDEX
2
3
4
5
6
7
8
0
9
16:9
1
PR
FAV
VOL
AUDIO
TVS/00370/04
1
3
4
2
5
9
14
12
11
13
15
16
17
19
20
21
22
23
10
6
7
8
18
Where buttons have different functions in DTV mode than they have in ATV mode,
(
)
denotes DTV
mode functions and
(
)
denotes ATV functions.
Where buttons have different functions in DTV mode than they have in ATV mode,
(
)
denotes DTV mode functions and
(
)
denotes ATV functions.
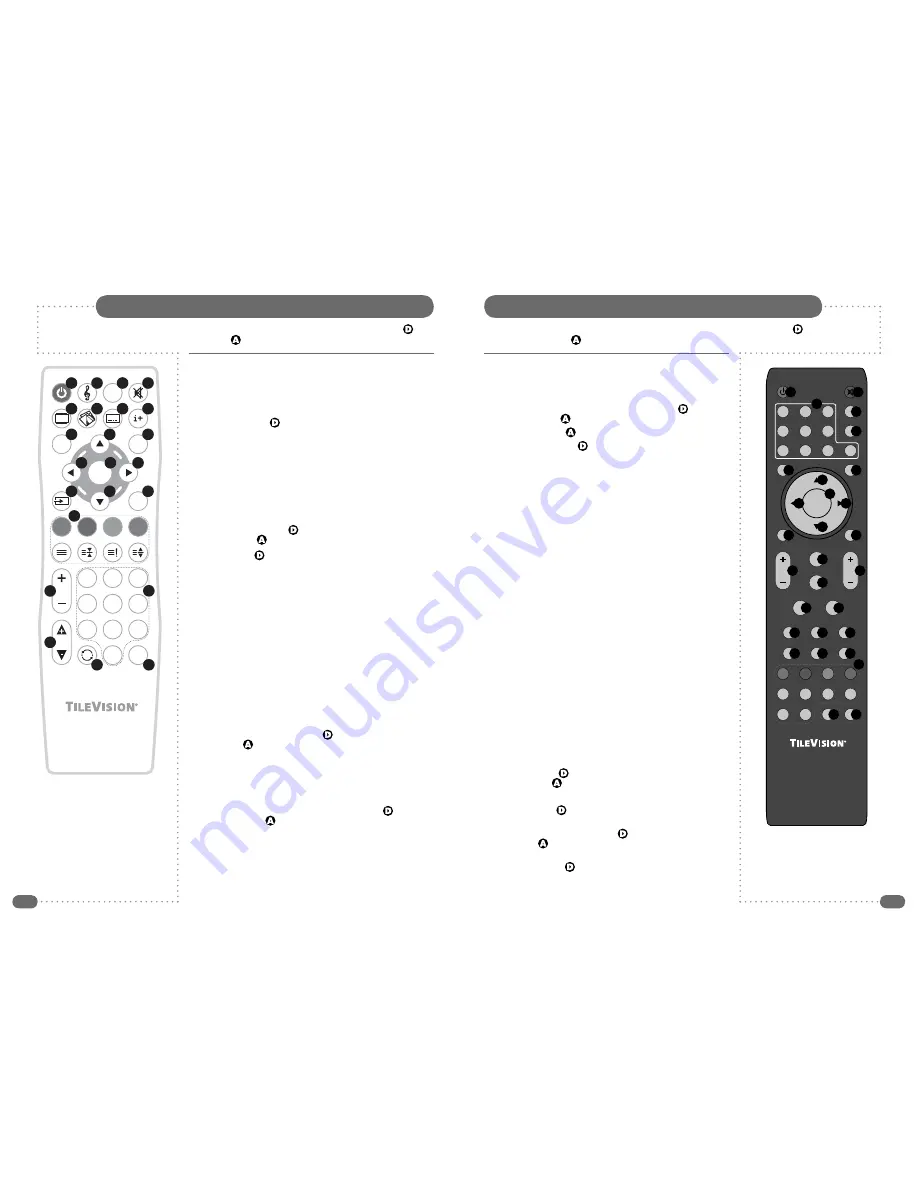
The Standard Remote Control
The Waterproof Remote Control
1
Power On/Off button
– Turns the TileVision
®
on from,
or off to, standby –
page 22
2
Sound Mode button
– Switches between sound modes:
Standard, Personal, Sports, Movie, Music –
page 40
3
AUDIO button
– (
) Selects language for dual language
broadcasts –
page 42
4
Sound Mute button
– Turns the sound on or off –
page 34
5
Aspect Ratio button
– Switches between picture formats:
Auto, 16:9, 4:3, Zoom1, Zoom2 –
page 38
6
Picture Mode button
– Switches between picture modes:
Standard, Movie, Dynamic, Personal, Soft –
page 36
7
Subtitles button
– Switches subtitles on or off –
page 39
8
Information button
– (
) Displays channel and programme
information – (
) Displays channel information only –
page 31
9
EPG button
(
) – Displays the Electronic Programme Guide –
page 32
10
MENU button
– Displays or closes the menus
11
Up button
– Menu and EPG navigation
12
Right button
– Menu and EPG navigation
13
Down button
– Menu and EPG navigation
14
Left button
– Menu and EPG navigation
15
OK button
– Accepts menu selections or displays the
programme list –
page 30
16
Input Source button
– Displays the Input Source menu and
allows source selection: DTV, ATV, SCART, COMPONENT,
PC-RGB, HDMI, COMPOSITE, S-Video –
page 23
17
EXIT button
– Closes all on-screen menus and lists
18
Colour and Teletext buttons
– (
) DTV Text and text menu
options – (
) Teletext and FastText functions –
see page 51 for
Teletext functions
19
VOL (Volume up/down) buttons
– Adjust the volume
20
PR (Programme up/down) buttons
– Selects next or previous
programme
21
Number buttons
– Input programme numbers – (
) DTV Text
menu options – (
) Teletext page number input
22
Back button
– switches between last and current programmes
23
FAV button
– Displays or closes the favourite programme list.
1
POWER On/Off button
– Turns the TileVision
®
on from,
or off to, standby –
page 22
2
MUTE button
– Turns the sound on or off –
page 40
3
Number buttons
– Input programme numbers – (
) DTV Text
menu options – (
) Teletext page number input
4
NICAM button
– (
) Stereo/Mono
5
TV/RADIO button
– (
) switches between DTV and Radio
6
MENU button
– Displays or closes the menus
7
INPUT button
– Displays the Input Source menu and allows
source selection: DTV, ATV, SCART, etc. –
page 23
8
Up button
– Menu and EPG navigation
9
Right button
– Menu and EPG navigation
10
Down button
– Menu and EPG navigation
11
Left button
– Menu and EPG navigation
12
ENTER button
– Accepts menu selections or displays the
programme list –
page 30
13
RETURN button
– switches between last and current
programmes
14
EXIT button
– Closes all on-screen menus and lists
15
VOL (Volume up/down) buttons
– Adjust the volume
16
CH (Channel up/down) buttons
– Selects next or previous
channel
17
Sound Mode button
– Switches between sound modes:
Standard, Personal, Sports, Movie, Music –
page 40
18
PC button
– Switches between picture modes: Standard,
Dynamic, Personal, Movie –
page 36
19
SLEEP button
– Displays/sets the sleep timer
20
ASPECT button
– Switches between picture formats:
Auto, 16:9, 4:3, Zoom1, Zoom2 –
page 38
21
AUTO button
– No function on TileVision
®
TV19
22
SRS button
– No function on TileVision
®
TV19
23
TEXT button
– switches DTV Text or Teletext on or off
24
INFO button
– (
) Displays channel and programme
information – (
) Displays channel information only –
page 31
25
FAV button
– Displays or closes the favourite programme list
26
EPG button
– (
) Displays the Electronic Programme Guide –
page 32
27
Colour and Teletext buttons
– (
) DTV Text and text menu
options – (
) Teletext and FastText functions –
see page 51 for
Teletext functions
28
AUDIO button
– (
) Selects language for dual language
broadcasts –
page 49
29
SUBTITLE button
– Switches subtitles on or off –
page 39
.
☛
Make sure there are no
objects between the
remote control and
the TileVision
®
.
Do not place the remote
control near a heater.
A strong blow to the
remote control may cause
it not to operate.
☛
The standard remote
control is not waterproof
and should not be
splashed or immersed
in water.
POWER
MUTE
NICAM
TV/RADIO
INPUT
MENU
RETURN
SOUND
ENTER
PC
CH
VOL
SLEEP
AUTO
SRS
TEXT
INFO
REVEAL
HOLD
LIST
INDEX
SIZE
AUDIO
SUBTITLE
FAV
EPG
ASPECT
EXIT
1
4
5
6
7
8
9
0
2
3
SUBPAGE
3
4
1
2
5
9
14
12
11
13
15
16
17
18
19
20
21
22
23
24
25
26
10
6
7
8
27
28
29


