Blade Modification
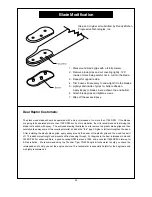
1. Mark around blade grips with a felt-tip marker.
2. Remove blade grips and cut covering lightly .125”
inside of mark, being careful not to cut into the blade.
3. Repeat for opposite side.
4. Trim bosses if necessary to allow tight fit to the blades.
5. Lightly sand inside of grips for better adhesion.
Apply Epoxy to blades in area shown top and bottom.
6. Attach blade grips and tighten screws.
7. Wipe off the excess Epoxy.
Idea and original art submitted by Randy Wishon,
Progressive Technologies, inc.
Dear Raptor Customers:
The stock wood blades should be operated with a main rotorspeed of no more than 1700 RPM. If the blades
are going to be operated at more than 1700 RPM, such as for aerobatics, then it is recommended reinforcing the
blade root section with epoxy. The enclosed drawing illustrates how to remove the plastic blade grips and then
carefully slice away some of the covering material, and add the "thin" type CA glue to further strengthen the wood.
After installing the plastic blade grips, apply epoxy around the seam of the plastic grip and the wood to seal it
off. This adds more strength and prevents oil from seeping through. For beginners, the best rotorspeed is around
1550 RPM. For advanced fliers, a good hovering RPM is around 1550, and a constant 1800RPM in idle-up for
3-D aerobatics. We recommend using the Thunder Tiger TR-2000 optical tachometer to help you check the
rotorspeed and to help you set the engine mixture. This tachometer is especially helpful for the beginners and
we highly recommend it.
35
Содержание RAPTOR 30
Страница 1: ......
Страница 24: ...22 FLIGHT TRAINING SECTION...
Страница 32: ...30 MAINTENANCE SECTION...
Страница 38: ...36 PARTS LIST SECTION...


