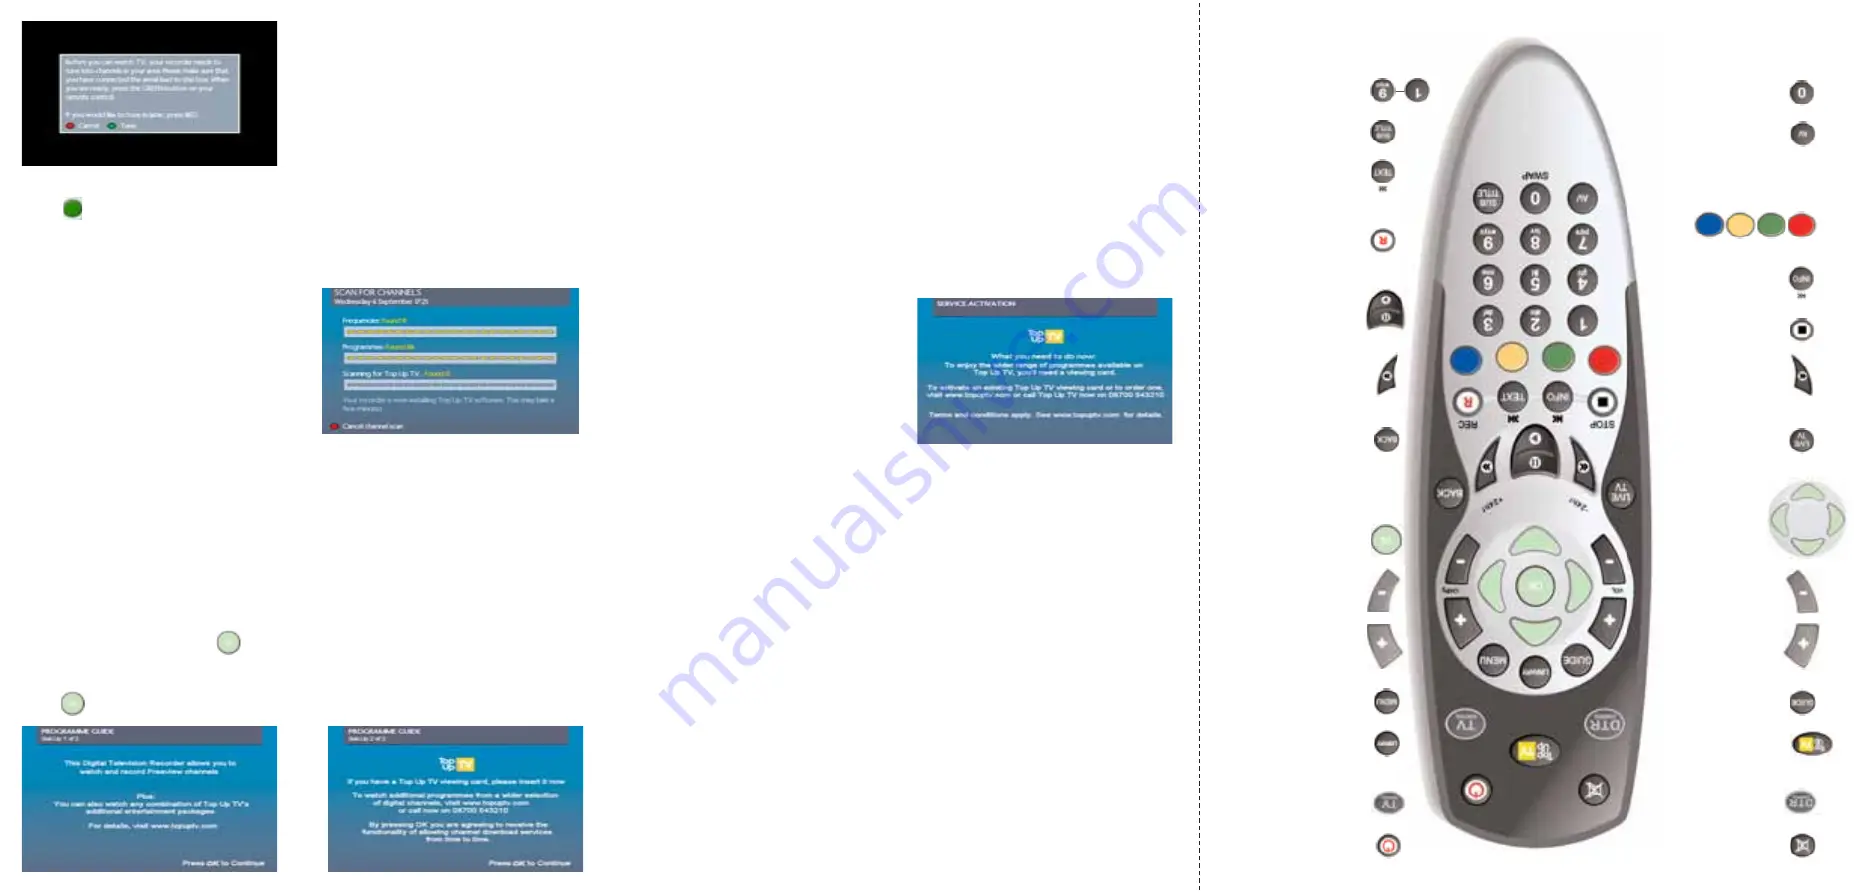
THOMSON DTI6300-16 Скачать руководство пользователя страница 6

Turn on/of

f sound

(on the TV).

“Quick” key to the

T op-Up TV 

services.

Sets the remote

control to DTR

mode.

Displays the TV

listings screen.

Controls the TV

sound level.

VOL

VOL

Navigation in

menus and

programmes

(up/down for

channels,

Left/right for

time).   

T akes you from

delayed TV in

memory to live TV

Rewind and -24Hr

in the TV listings. 

Stop recording or

playback.

STOP

STOP

Current programme

information. Skip

back in recordings.

Controls the Audio & V

ideo

signals sent to the TV

.

Used to select the

corresponding

colour option shown

on the screen.

Turns the DTR (or

TV) on or off.

Sets the remote

control to TV

mode.

Display the recorded

programmes screen.

Displays the DTR

main menu.

Up/down channel

or page (in menus).  

CH/Pg

CH/Pg

Chooses the

highlighted option

or confirms your

selection. Also

activates

Quickfind (fast

channel selection).

Navigates back up

from menus.

Fast forward and

+24Hr in the TV

listings. 

Pause/ Play a

recording or pause

live TV.

T op half is Pause

Bottom half is Play

Make an instant

recording of the

current programme.

REC

REC

Stop recording or

playback.

Subtitles on or off.

Enter channel

numbers or

information into

menus.

Enter channel numbers or

information into menus and

“swap” between tuners and

hard disk drive.

SWAP

SWAP

Your television should automatically switch
to external input and display the image as
shown. If your television does not switch
automatically, select the external TV input to
which the DTR is connected. Refer to your TV
handbook for details (The button will be
labelled AV, AUX, E or similar).

Once you can see the start-up menu and are sure all the connections are correct,
press       on your DTR remote control.

Y

Yo

ou

urr  D

DTTR

R  w

wiillll  n

no

ow

w  sse

ea

arrcch

h  ffo

orr  a

allll  a

avva

aiilla

ab

blle

e  cch

ha

an

nn

ne

ellss..

In the event that your DTR does not find any channels, or has missed some, see
over the page for

W

Wh

ha

att  tto

o  d

do

o  iiff  yyo

ou

urr  iin

nsstta

alllla

attiio

on

n  ffa

aiillss

..

When your DTR has successfully found all
channels,  your DTR will search and install
your on-screen programme guide.    

P

Pa

arreen

ntta

all  A

Ad

dvviiccee::

Once you have completed this stage you will be prompted to set-up the Parental
Control screen. Your DTR can also receive programming from Top Up TV Anytime
which is additional programming available at all times of the day. 

If children have access to your DTR, parents are advised to select the appropriate
viewing certification now, in order to restrict access. E.g By setting Certificate 12A,
you will only receive programming up to this Certificate and not programming of
Certificate 15 and higher.

Once you’ve done this, press

(OK) on your remote control and you will soon be

watching your new programming.

Press

(OK) on your remote control to move through the following screens.

W

Wa

attcch

hiin

ng

g  P

Prro

og

grra

am

mm

me

ess  o

on

n  TTo

op

p  U

Up

p  TTV

V  A

An

nyyttiim

me

e

Your DTR also gives you access to programmes from channels like  UKTV Gold and
Cartoon Network on Top Up TV Anytime. To view these additional programmes, you
need to insert your Top Up TV Viewing Card now. 

If you do not have a viewing card, please visit 

www.topuptv.com

or call Top Up TV

on 

08700 543210

.

Open the door on the front of your DTR and insert your Top Up TV Viewing card
(with the gold chip facing down and following the direction of the arrow) into the
viewing card slot of your DTR. Make sure the viewing card is fully inserted and then
close the door.

If your card is not properly inserted, you will 
see the service activation screen shown
here. 
Check that your viewing card is correctly
inserted or call the number displayed on the
screen to continue.

P

Plleea

assee  n

no

ottee,,  iitt  w

wiillll  tta

akkee  2

24

4  h

ho

ou

urrss  ffo

orr  n

neew

w  TTo

op

p  U

Up

p  TTV

V  A

An

nyyttiim

mee  p

prro

og

grra

am

mm

meess  tto

o  b

bee  sseen

ntt

tto

o  yyo

ou

urr  D

DTTR

R,,  b

bu

utt  yyo

ou

u  n

neeeed

d  tto

o  een

nssu

urree  yyo

ou

u  lleea

avvee  yyo

ou

urr  D

DTTR

R  O

ON

N  o

orr  o

on

n  sstta

an

nd

db

byy  o

ovveerrn

niig

gh

htt

tto

o  m

ma

akkee  ssu

urree  yyo

ou

u  rreecceeiivvee  a

allll  tth

hee  p

prro

og

grra

am

mm

meess  TTo

op

p  U

Up

p  TTV

V  a

arree  ttrryyiin

ng

g  tto

o  sseen

nd

d  yyo

ou

u..  Y

Yo

ou

urr

D

DTTR

R  w

wiillll  b

bee  ffiilllleed

d  tto

o  cca

ap

pa

acciittyy  w

wiitth

hiin

n  tth

hee  n

neexxtt  7

7  d

da

ayyss..

W

Wh

ha

att  tto

o  d

do

o  iiff  yyo

ou

urr  iin

nsstta

alllla

attiio

on

n  ffa

aiillss

• Check that all the connections have been made as shown in the diagram

and the power is switched on to all of the equipment.

• Check that the batteries in the remote control are in the right way round 

and press the D

DTTR

R button. Check that the DTR button flashes when pressed.

• Make sure the TV aerial is connected directly to your DTR (1st in chain).
• Check any signal boosters are Digital TV compatible and switched on.
• Repeat the installation by following the tuning instructions on page 21 of 

the main user manual.

• If this does not help, you m

ma

ayy need an aerial upgrade. For more information, 

contact our approved Aerial Installation Helpline on 

0800 5428265


Содержание DTI6300-16

Страница 1: ...n more than 10 days in advance may be provisional and subject to change Thank you for your co operation Corrections Remote control illustration TEXT key description This description should read Access digital text services Skip forward whilst watching recordings Page 22 The default RF modulator output channel is channel 38 not 22 Page 27 The illustration shown for the second conflict resolution is...

Страница 2: ... i i n n g g e e q q u u i i p p m m e e n n t t Place your DTR in your preferred position and connect it to your TV following these simple steps A Unplug the aerial cable from your VCR or TV and plug it into the A A e e r r i i a a l l I I n n socket of your DTR B Using the aerial lead supplied connect the R R F F O O u u t t socket on your DTR to the A A e e r r i i a a l l I I n n socket of you...

Страница 3: ...i in ng g e eq qu ui ip pm me en nt t Place your DTR in your preferred position and connect it to your TV following these simple steps A Unplug the aerial cable from your VCR or TV and plug it into the A Ae er ri ia al l I In n socket of your DTR B Using the aerial lead supplied connect the R RF F O Ou ut t socket on your DTR to the A Ae er ri ia al l I In n socket of your VCR or TV C Using the sc...

Страница 4: ...i in ng g e eq qu ui ip pm me en nt t Place your DTR in your preferred position and connect it to your TV following these simple steps A Unplug the aerial cable from your VCR or TV and plug it into the A Ae er ri ia al l I In n socket of your DTR B Using the aerial lead supplied connect the R RF F O Ou ut t socket on your DTR to the A Ae er ri ia al l I In n socket of your VCR or TV C Using the sc...

Страница 5: ...tificate 12A you will only receive programming up to this Certificate and not programming of Certificate 15 and higher Once you ve done this press OK on your remote control and you will soon be watching your new programming Press OK on your remote control to move through the following screens W Wa at tc ch hi in ng g P Pr ro og gr ra am mm me es s o on n T To op p U Up p T TV V A An ny yt ti im me...

Страница 6: ...tificate 12A you will only receive programming up to this Certificate and not programming of Certificate 15 and higher Once you ve done this press OK on your remote control and you will soon be watching your new programming Press OK on your remote control to move through the following screens W Wa at tc ch hi in ng g P Pr ro og gr ra am mm me es s o on n T To op p U Up p T TV V A An ny yt ti im me...

Страница 7: ...ogramming of Certificate 15 and higher Once you ve done this press OK on your remote control and you will soon be watching your new programming Press OK on your remote control to move through the following screens W W a a t t c c h h i i n n g g P P r r o o g g r r a a m m m m e e s s o o n n T T o o p p U U p p T T V V A A n n y y t t i i m m e e Your DTR also gives you access to programmes from ...

Страница 8: ...mme Guide 15 Using your Programme Library 17 Using Planned Recordings 19 Recorder Functions 20 Set Up 27 Troubleshooting 30 Technical Specifications 30 Product Details 31 Index For a Q Qu ui ic ck k s st ta ar rt t g gu ui id de e t to o s se et tt ti in ng g u up p y yo ou ur r D DT TI I6 63 30 00 0 1 16 6 please turn to the back cover of this instruction manual Safety Information Getting Started...

Страница 9: ... B Important If the plug is removed rewire new plug as follows The wires in the mains plug are coloured in accordance with the following code BLUE NEUTRAL BROWN LIVE As the colours of the wires in the mains lead of this apparatus may not correspond with the coloured markings identifying the terminals in your plug proceed as follows BLUE wire to the terminal coded N Neutral or coloured black BROWN ...

Страница 10: ... a flat and hard surface D Do o n no ot t place any objects e g newspapers on or under the recorder If placed in an enclosed unit the all round distance between the recorder and the sides of the unit must be at least 10cm D Do o n no ot t allow the vent slots in the sides or underneath to become obstructed D Do o n no ot t place the recorder in the immediate vicinity of a heat source or in direct ...

Страница 11: ...hing TV your DTR automatically records everything you watch It saves a review buffer of the channel currently being watched until you change channels or your recorder is switched off by pressing the B B button Your dealer should have checked your postcode for reception but the availability of Digital Signals does depend on the transmitter s available to your receiving aerial If you have any doubt ...

Страница 12: ...these additional programmes you need to insert your Top Up TV Viewing Card now Open the door on the front of your DTR and insert your Top Up TV Viewing card with the gold chip facing down and following the direction of the arrow into the viewing card slot of your DTR Make sure the viewing card is fully inserted and then close the door If you do not have a viewing card but would like to enjoy the a...

Страница 13: ...TV set B B Switches the TV set on or off V Vo ol l TV Volume control c c Switches sound off or on again C CH H Switches channel or selects an AV socket A AV V Selects an AV socket 0 0 t to o 9 9 Change channel or enters digital values T TE EX XT T Access Teletext pages On Off P Pl la ay y b bu ut tt to on n Access Teletext pages Off C Co ol lo ou ur r b bu ut tt to on ns s Enables you to use the T...

Страница 14: ...et of your VCR Your DTR should now be linked first to your aerial then to your VCR and finally the VCR to the TV C C Using the scart lead supplied link the T TV V S SC CA AR RT T socket on your DTR to the A AV V1 1 E EX XT T1 1 A AU UX X1 1 socket of your TV D D Finally connect the mains lead to the M Ma ai in ns s I In np pu ut t socket on your DTR and turn on your TV I If f y yo ou u h ha av ve ...

Страница 15: ...n t to o a a H Hi i F Fi i s sy ys st te em m Use a pair of stereo coaxial phono leads to connect the L L R R A AU UD DI IO O O OU UT T socket on your DTR to the L L R R A AU UD DI IO O I IN N on your Hi Fi unit This will allow you to hear higher quality sound through your Hi Fi N NO OT TE E Audio sockets are generally identified by colour White for Left and Red for Right C Co oa ax xi ia al l c c...

Страница 16: ... set a favourite channel list which will allow you to skip between the channels you watch most often How to set up this list is explained on page 25 Note that the channel numbers are not continuous These are set by the broadcaster and cannot be changed If you wish to search for your channel by name use Q Qu ui ic ck kf fi in nd d Press the O OK K button Use the arrow buttons to move the highlighte...

Страница 17: ...N N arrow to move it down the list Once you have highlighted your choice with the yellow box press the O OK K button to move to the new menu level If the DTR states that a PIN number is required Personal Identification Number enter this now The default number is 0 00 00 00 0 you can find how to change this on page 25 As you learn to use the DTR you will find that the number buttons can take you di...

Страница 18: ... This is the small banner that appears at the bottom of the screen during channel changes or when you press an arrow button N NO OT TE E The full Programme Guide will be updated by your recorder automatically overnight Until then you will have use of a reduced guide that will not enable you to access all the features of your recorder Please ensure you leave your recorder in standby overnight Shows...

Страница 19: ...is only the case when the programme takes up the whole of that 30 minute time slot As programmes can be longer or shorter than 30 minutes the Programme Guide has been constructed to inform you of this If a programme is longer than 30 mins the next time slot shows three dots to indicate that the programme runs in to the next slot If a programme is shorter that 30 mins the programme name is followed...

Страница 20: ...Pressing the R RE ED D button will close the pop up Pressing the GREEN button will take you to the F Fa av vo ou ur ri it te es s set up screen Use the Up and Down arrows to highlight a channel that you would like to make a favourite Press O OK K to add it to your Favourites Your Favourites are identified by a You can remove it from your list by pressing the OK button again Also use the RED button...

Страница 21: ...time you will also be able to view programmes from a wider selection of channels including UKTV Gold TCM LIVINGtv and Animal Planet The channels from which you can choose to watch programmes from are shown across the bottom of the P Pr ro og gr ra am mm me e G Gu ui id de e screen Pressing the Top Up TV button on your remote control or moving the yellow highlighter to the bottom of the Programme G...

Страница 22: ...ime storage area you will notice that the screen appears slightly different There are two differences the first and most important is the Days Left column the second is the red S Sa av ve e button D Da ay ys s L Le ef ft t This shows how many days the programme will remain stored on your DTR before it is automatically deleted and replaced with new programmes You may watch the programme at anytime ...

Страница 23: ...eting I IC CO ON NS S There are two icons used to assist you in managing your P Pr ro og gr ra am mm me e L Li ib br ra ar ry y The at the end of the programme name field is used to indicate that a programme has been watched The at the end of the programme name field is used to indicate that a programme is currently playing P Po op p u up ps s Finally you need to be aware of a few pop ups that may...

Страница 24: ...cording event that you are setting This DTR allows you to change both the start time TIME and the duration of a recording Entering a recording from the P Pr ro og gr ra am mm me e G Gu ui id de e or manually from the P Pl la an nn ne ed d R Re ec co or rd di in ng gs s menu the highlighter will be positioned over the PROGRAMME field Press the R RI IG GH HT T arrow button to move the highlighter ov...

Страница 25: ...verlap and look to see if you can manually change the start times or durations of the overlapping events to resolve the conflict This will still enable you to record the programmes you wish and not miss anything of significance S Se er ri ie es s L Li in nk k Some programmes are broadcast with special tags that indicate that the programme is part of a series If while setting a recording your DTR d...

Страница 26: ...rol Your DTR will automatically record the programme to the end of the scheduled time and add any of that programme that exists in your review buffer C Ch ha as se e p pl la ay y v vi ie ew wi in ng g This is the ability to view a programme that is currently being recorded as part of a scheduled record or an instant record process There are two ways to view a programme while it is being recorded F...

Страница 27: ...n process but if for any reason you wish to re scan for new channels if you have moved or have a new aerial for example make sure that all the connections to your DTR are connected correctly Press the G GR RE EE EN N button to start the automatic search for available channels Once the scan has started you can cancel it by pressing the R RE ED D button You can monitor the progress of the search as ...

Страница 28: ...e en nt tr re e C Cu ut t O Ou ut t full screen but lost picture on left and right 4 4 3 3 F Fu ul ll l S Sc cr re ee en n if your 4 3 TV supports 16 9 switching check your TV manual or 1 16 6 9 9 W Wi id de es sc cr re ee en n for widescreen TV s S SC CA AR RT T s se et tt ti in ng g Use the L LE EF FT T and R RI IG GH HT T arrow buttons to choose from S S V Vi id de eo o for specific TV s R RG G...

Страница 29: ...u are connected to the main TV with a scart lead as shown on page 7 Make sure that all the a ae er ri ia al l connections have been made as shown in the diagram below You will need an aerial distribution amplifier splitter this can be purchased at most good dealers or DIY stores Make sure you use good quality double screened co ax aerial cables e g CT100 Referring to your TV user manual tune your ...

Страница 30: ... WN N arrows to select a programme and then delete it by pressing the R RE ED D button Once you have created enough space you can activate the new channel by pressing the G GR RE EE EN N button To exit this menu press the Y YE EL LL LO OW W button You may attempt to activate a channel for which you do not have the right level of subscription If this occurs you will be taken to the S Su ub bs sc cr...

Страница 31: ...at you can pause and rewind the channel you are watching back by 30 minutes or by the amount of time you have set as the P Pa au us se e l li iv ve e T TV V buffer size As with the guard times this obviously takes up space on your Hard disk drive for recording other programmes so if you do not use this feature you can turn it off to increase the available space for recordings The available setting...

Страница 32: ...determine the access you and your family have to content As soon as you select this option you will be prompted to enter your Personal Identification Number PIN The default number for this is 0 00 00 00 0 It is highly recommended that you change this number as soon as possible Once you have entered a valid PIN you are given the option to change the PIN by pressing the RED button and following the ...

Страница 33: ...nel that you would like to make a favourite Press O OK K to add it to your Favourites Your Favourites are identified by a You can remove it from your list by pressing the O OK K button again Also use the R RE ED D button to select all or the G GR RE EE EN N button to delete all To exit this menu press the B BA AC CK K button L La an ng gu ua ag ge es s A Ad dv va an nc ce ed d P Pr re ef fe er rr ...

Страница 34: ...orded or you are watching a Top Up TV Anytime programme but then try to change channels In the event of a conflict you will see this pop up If you press the R RE ED D button you will continue to record the Top Up TV Anytime programmes however if you press the G GR RE EE EN N button the Top Up TV Anytime recordings will be abandoned and your recorder will be considered to be in override mode Your R...

Страница 35: ...ave to be re aligned Alternatively add a second aerial to your system If you need to use a mast head amplifier make sure that it is a digitally compatible one and that it is as close to the aerial as possible In some blocks of flats filters may be in use that will interfere with digital signals Consult with your landlord if you have difficulties Indoor or window mounted aerials are not recommended...

Страница 36: ...R to your amplifier directly No Power or indicators not lit Check mains plug is inserted correctly and the power is switched on Check that the mains socket is operational Use a lamp to test it Picture shape looks wrong Set your DTR to match your type of TV 4 3 conventional See page 20 for instructions 16 9 widescreen DTR won t record any more The hard disk is full Clear some space to allow the DTR...

Страница 37: ... ei ig gh ht t Capacity DTI6300 16 160GB Dimensions W x H x D 368 x 62 x 221mm Weight Approx 1 8kg P Pr ro od du uc ct t D De et ta ai il ls s F Fr ro on nt t P Pa an ne el l i in nd di ic ca at to or rs s L LE ED D s s Power status Green On Red Standby Remote Command Recording Message Waiting R Re ea ar r p pa an ne el l c co on nn ne ec ct ti io on ns s F Fr ro on nt t p pa an ne el l i in nd di...

Страница 38: ...es 24 Optical digital audio output 8 29 Parental control changing your pin 10 setting 10 PIN 10 25 Playback Choosing programme 16 Pop ups 16 18 22 Problem Solving 29 Programme finding 9 11 12 information 11 12 Recording currently showing programmes 19 future programmes using the Programme Guide 14 making space 16 Reminders 13 Remote control replacing the batteries 6 operating your TV 6 Removing fa...

Страница 39: ...s s t t i i l l l l be damaged by lightning strikes V V e e n n t t i i l l a a t t i i o o n n The ventilation holes in the casing of your recorder prevent it from overheating D D o o n n o o t t block or cover these holes especially with cloth or paper If your recorder is to be built into a compartment or similarly enclosed make sure that there is a gap of at least 10cm on both sides and 20cm at...

Отзывы: