background image


Revision A 


December 2011 

21

Installation 

All physical connections to the product use industry-standard connectors.  Non-supplied cables 
that may  be  needed  are  commercially  available.    All  connections  are  found  on  the  rear  of the 
unit. 


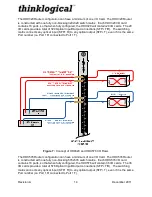
Figure 23: Typical HDX576 Router Application using SDI Xtreme 3G+ Extenders  


Set-Up 

Note:    Insure  that  all  thumb  screws  are  finger  tight  so  that  all  the  modules 

are properly held in the chassis. 

1.  Carefully  remove  the  HDX  Router  from  its  shipping  container.    Inspect  the  HDX 

Router to make certain that no damage occurred during shipment. 

2.  All of the I/O cards are installed at the factory to meet the configuration.  Insure 

that  the  I/O  cards  are  properly  seated  in  the  unit.    All  of  the  I/O  cards  have 
thumb screw retainers. 

3.  After  checking  the  I/O  cards,  go  to  the  top  of  the  unit.    There  are  two  power 

supplies located in the top part of the chassis.  Verify that the power supplies 
are secure in the chassis.   

Содержание HDX576

Страница 1: ...Fiber Matrix Switch Product Manual Subject HDX80 HDX576 SDI Router Product Manual Revision A December 2011 Thinklogical Inc 100 Washington Street Milford Connecticut 06460 U S A Telephone 203 647 8700...

Страница 2: ......

Страница 3: ...011 All rights reserved Printed in the U S A Thinklogical a subsidiary of Logical Solutions Incorporated 100 Washington Street Milford Connecticut 06460 U S A Telephone 203 647 8700 All trademarks and...

Страница 4: ...nput Output Cards 13 Fiber Optic Cable 17 Fiber Optic Cable Requirements 17 Handling Fiber Optic Cable 17 Installing Fiber into Input Output Cards 18 Removing Fiber from Input Output Cards 18 Connecti...

Страница 5: ...Concept of HDX80 I O Flows 13 Figure 7 Concept of HDX320 and HDX576 I O Flows 14 Figure 8 Input Output Port Numbering on the HDX80 15 Figure 9 I O Board Port Numbering on the HDX576 Upper and Lower C...

Страница 6: ...55 Figure 39 Editing a Macro 55 Figure 40 Create a New Macro 56 Figure 41 Test Function 57 Figure 42 Snapshots 58 Figure 43 Studio View 59 Figure 44 View of Log File 60 Figure 45 Global Values 61 Figu...

Страница 7: ...customer support available If you have any questions or need to contact the company please refer to this section of the manual Conventions Used in this Manual As you read this manual you will notice c...

Страница 8: ......

Страница 9: ...tions The HDX Routers from Thinklogical includes Redundant Current Sharing Power Supply Modules Redundant Controller Cards Single Fan Tray includes three fans Optional Modules Spares HDX 576 Matrix Ro...

Страница 10: ...2011 2 See Appendix A for the complete line of the Thinklogical HDX Routers Warning The HDX Routers are a Class 1 LASER product that emits near infrared light Do not look directly into the fibers or t...

Страница 11: ...d without interrupting signal processing by powering down the router The HDX routers are configurable with any combination of multi mode single mode and coaxial I O ports which supports both short and...

Страница 12: ...ode and Multi Mode Coaxial I O Modules Redundant Hot Swappable and Current Sharing Power Supply Modules Hot Swappable SFP Optical Modules Hot Swappable Fan Tray with Annunciator Port for alarms Hot Sw...

Страница 13: ...576 Physical Dimensions Rack Size EIA 19 48 26 cm EIA 19 48 26 cm Physical Dimensions Height 6 RU 10 50 26 70 cm 26 RU 45 5 115 6 cm Physical Dimensions Width 17 16 43 59 cm 17 19 43 7 cm Physical Dim...

Страница 14: ...replaced without interruption to other module functions Load sharing Redundant Power Supplies Enunciator Ports for alarms Fan Tray Module Primary Controller Card Back Up Controller Card is optional I...

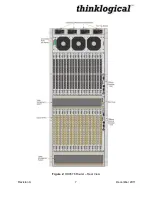
Страница 15: ...Revision A December 2011 7 Figure 2 HDX576 Router Rear View...

Страница 16: ...orts HDM D00005 HDX80 Sync Card HDM 000008 The HDX80 ships configured to customer specifications All physical connections to the product use industry standard connectors When you receive your Thinklog...

Страница 17: ...outer system Although the HDX Routers functions properly with one Power Module it is recommended that both Modules be used preferably connected to two independent power sources for redundancy Addition...

Страница 18: ...d or current out of range AC power input interruption or module removed Fan failure temperature spikes DC voltage and or current out of range AC power input interruption or module removed Individual f...

Страница 19: ...nt cover removed 1 8 0 0 0 0 1 0 1 1 Pin 1 is on the bottom The left position 1 DIP Switch Figure 5 HDX Router DIP Switch Locations and Setting The simplest network connection is an isolated network w...

Страница 20: ...ference Input and loop output so that switch connections can be made synchronously with an external reference or House Sync All switch connection timing complies with SMPTE RP 168 and with SMPTE 274M...

Страница 21: ...n the HDX80 and as 1 through 16 on the HDX320 and HDX576 Video The Fan Tray module lists the port numbers all numbering is bottom to top left to right See figs 10 12 on pg 13 A LED located at the top...

Страница 22: ...FP T even if it is the same Port number i e Port 1 R connected to Port 1 T INPUTS OUTPUTS INPUTS OUTPUTS Figure 7 Concept of HDX320 and HDX576 I O Flows The HDX576 Router configuration can have a mini...

Страница 23: ...Revision A December 2011 15 Figure 8 Input Output Port Numbering on the HDX80 Figure 9 I O Board Port Numbering on the HDX576 Upper and Lower Card Cages...

Страница 24: ...aps to protect against damage when a fiber optic connector is not attached to its coupling device fiber optic equipment bulkheads etc Figure 10a SFP Module Figure 10b It is good practice to install du...

Страница 25: ...of 1000m where Single mode fiber has the ability to extend distances beyond 1000m Warning Do not use APC Angle Physical Contact Connectors If inserted into an SFP APCs will destroy the SFP Patch Pane...

Страница 26: ...h the tab depressed slowly remove the cable by pulling the connector straight out of the SFP port Warning Laser in use Do not look directly into the opening Step 2 Immediately install a dust cap on th...

Страница 27: ...Revision A December 2011 19 Figure 13 Connecting the Thinklogical SDI Xtreme 3G Extender Receiver to the HDX80 Figure 20 Connecting the Thinklogical SDI Xtreme 3G Extender Receiver to the HDX576...

Страница 28: ...rces e g computers are then connected followed by any local video devices Power can then be supplied to the unit The Transmitter connects to the HDX I O ports using fiber Multi mode fiber for distance...

Страница 29: ...o that all the modules are properly held in the chassis 1 Carefully remove the HDX Router from its shipping container Inspect the HDX Router to make certain that no damage occurred during shipment 2 A...

Страница 30: ...Other temperature sensors are mounted in the fan trays on the Controller card s on the I O cards and on the Backplane Note If any of these sensors detect an over temperature condition power will be r...

Страница 31: ...Step 2 Place the new module upright so that the POWER LED is on the top Grasp the module by the handles or by the outer edge of the aluminum housing The card should slide freely until it reaches the b...

Страница 32: ...the new module upright so that the ACTIVE LED is on the top Grasp the module by the handles or by the outer edge of the aluminum housing The card should slide freely until it reaches the backplane con...

Страница 33: ...tep 4 Hand tighten the thumbscrews Warning Do not tighten the thumbscrews with a screwdriver How to Replace a Power Supply Warning Disconnect the power cord before proceeding Note No shutdown is requi...

Страница 34: ...found on the product Markings and labels on the product follow industry standard conventions Regulatory markings found on the products comply with requirements Regulatory Compliance Thinklogical produ...

Страница 35: ...Name Model HDX80 Router HDX576 Router These products comply with the requirements of the Low Voltage Directive 72 23 EEC and the EMC Directive 89 336 EEC Standards with Which Our Products Comply Safe...

Страница 36: ...gital device pursuant to part 15 of the FCC Rules These limits are designed to provide reasonable protection against harmful interference when the equipment is operated in a commercial environment Thi...

Страница 37: ...ou successfully use our products Thinklogical is always here to help Thinklogical is an engineering company and we will make every effort to ensure that you receive the information you require directl...

Страница 38: ...in Milford Connecticut at 203 647 8700 The support lines are manned Monday through Friday 8 30am to 5 00pm Eastern Time Zone International Sales Please contact our US sales staff in Milford CT at 203...

Страница 39: ...d that the defective product is returned to the authorized dealer within a year from the date of delivery If you wish to return your device contact the Thinklogical authorized dealer where you purchas...

Страница 40: ...product have product questions or need technical assistance with your Thinklogical system please call us at 800 291 3211 USA only or 203 647 8700 and let us help If you d like to write us our mailing...

Страница 41: ...on Matrix Router 80 Data I O Card 5 Ports SFP Single Mode HDM D00C05 High Definition Matrix Router 80 Data I O Card 5 Ports SFP Coaxial HDM 000008 High Definition Matrix Router 80 Sync Card High Defin...

Страница 42: ...rd 16 Ports SFP Coaxial HDM 000005 High Definition Matrix Router 576 Switch Card HDM 000003 High Definition Matrix Router 576 Sync Card High Definition Matrix Router 576 Spare Modules HDM 000001 High...

Страница 43: ...Revision A December 2011 35 Appendix B Quick Start Guides...

Страница 44: ...Revision A December 2011 36...

Страница 45: ...Revision A December 2011 37 Appendix C SD Flash Card Replacement...

Страница 46: ...Revision A December 2011 38...

Страница 47: ...ers Router information is stored by IP Address so it should not change A web browser is used to manage the HDX Router s One or more HDX Routers can be controlled via a web based software package runni...

Страница 48: ...user Password user When the router is first being configured there will be stations defined The setup process is described starting on page 43 NOTE There is a HELP tab located on each page This tab w...

Страница 49: ...the stripe s above the source Many additional destinations can be clicked and connected to the same source When a serial control signal is required from destination to source many destinations can be...

Страница 50: ...source To disconnect a source from a destination simply click the X on the destination ADMINISTRATION When logged in as administrator you use the ADMIN link from the top of the browser window to load...

Страница 51: ...setup Note The ProgramData directory is hidden by default It can be made visible in Control Panel Folder Options View If installed for just one user the files are in Users user s name AppData Roaming...

Страница 52: ...ns csv This file creates sources and destinations and determines which router ports are part of which stations To view and edit the stations csv file using web access set your browser s URL to the web...

Страница 53: ...rly valuable during collaborative work TAKE is the final connection type In the case of a TAKE style connection only the last destination connected to a source will have both video and control Any exi...

Страница 54: ...encountered L1 through L5 The port names below these headers become part of the station New columns can be added by right clicking on an existing L column header and selecting Append from the drop do...

Страница 55: ...the header for the last column and selecting Append from the drop down menu and then clicking the header in the new column and selecting Viewable from the drop down menu Multiple Viewable columns can...

Страница 56: ...s Right click on last column header and select Append New column is added with same header name Left click on new columns header and select Viewable New Viewable column now ready for user group names...

Страница 57: ...ection of users that share the same permissions and general behaviors Each user can have a separate username and password but once logged in the user while still identified as an individual user will...

Страница 58: ...e groups Each row describes a group with a Group Name the Startpage they will first see after logging in and then any additional pages that will be available to members of that group These additional...

Страница 59: ...P Address Socket and Enabled Where appropriate a drop down list of choices is offered to fill in these values but it is important that the Type IP Address usually 192 168 13 15 and Socket usually 1756...

Страница 60: ...the supplied House Sync signal Clicking in this field will pop up a list of choices as seen in figure 35 The House Sync field will display the format of the sync detected at the sync input If no card...

Страница 61: ...o repeat steps that will be executed frequently They can be restricted to specific user groups or made available to all Please note that you can also use a csv file to create save edit and delete macr...

Страница 62: ...macro and give it a name here it s 1 4 and press SAVE Once saved the Macro will appear as a new button on the MACROS page Figure 37 Select Steps for Macro To edit a Macro navigate to the ADMIN page a...

Страница 63: ...Revision A December 2011 55 Figure 38 Selecting a Macro to Edit Once a macro has been selected you can view and edit information about the macro Figure 39 Editing a Macro...

Страница 64: ...ight This step cannot be undone It is also possible to create new macros from the ADMIN MACROS page From the First Select Macros pull down menu find and select the Create New Macro line at the very bo...

Страница 65: ...or more routers including whether or not they are connected at all When a snapshot is played back or executed every port will be reset to the connections that were present when the snapshot was record...

Страница 66: ...back arrow in your browser To make a connection select both a destination and a source in any order They will turn blue when selected TAKE will cause any existing destinations for the selected source...

Страница 67: ...described previously in the VIEW section if SHARE is used to connect a source to a destination the source name will appear without parenthesis in that destination and with parenthesis in any other pr...

Страница 68: ...ce between blocks of data If the first character in the first field of a row is then the contents of the entire row will be ignored This gives the administrator the ability to enter and save comments...

Страница 69: ...its own name some number of input and or output ports that should all be switched at the same time and additional other fields Figure 47 Object Values In the example above the station with the source...

Страница 70: ...50 After selecting Append from the Column drop down Figure 51 Left click a column header to see header name choices While each file uses a similar method to define and populate various objects the ki...

Страница 71: ...ups 2 stations csv will be read and interpreted by stations pyc to set general values for station button sizes and fonts and also to create the source and destination objects and their constituent por...

Страница 72: ...th methods are described below In both cases you will first need to decide the IP address of the web server before configuring the touchpanel s Direct Configuration 1 Attach the USB keyboard to a USB...

Страница 73: ...by default reads http 192 168 13 9 touch a Change the IP address to match that of the web server also called the Control Computer b Save and exit The files have now been configured but the Touch Pane...

Страница 74: ...t have the control for that source will cause the connected source s control to be assumed taken by the selected destination Macro buttons are available on a separate screen which can be viewed by pre...

Страница 75: ...ation on the operational status of the HDX Router hardware The file is located on our FTP site and on the install disk included with your HDX Router It is also included on the HDX Router SD Card in th...

Отзывы: