These operating instructions cover Thetford cassette toilets models C-
200 S / CS and C-200 CW / CWE. There are a few differences in the
use of these models. Make sure that you follow the instructions that
apply to your toilet model.
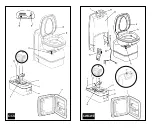
The parts and functions that are referred to by letters are illustrated on
the fold-out at the back of these operating instructions.
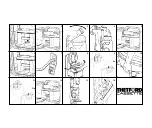
The actions to be taken, referred to by numbers, are illustrated on the
fold-out at the front of these operating instructions.
C-200 S / CS PARTS AND FUNCTIONS
a. Removable seat and cover.
b. Swivelling toilet bowl.
c. Valve blade handle.
d. Flush button.
e. Waste tank level indicator: warning light illuminates when the
waste tank requires emptying.
f.
Rotating emptying spout: ensures that the waste tank can be
easily and hygienically emptied.
g+h. Automatic pressure release vent: ventilates the waste tank when
this is inserted into the cassette toilet. Avoids excessive pressure
build up in the waste tank.
N.B. A black hose is attached to the automatic pressure release
vent on some toilets. This hose transports the air to the outside
through an access door or through the floor.
i.
Upper handle.
j.
Cover guarantees optimal hygiene. Opens when the waste tank is
inserted into the toilet and closes when the waste tank is removed
from the toilet.
k. Valve blade / valve seal.
l.
Vent plunger: for emptying the waste tank without splashing.
m. Handle.
n. Valve blade opener.
o. Access door.
C-200 CW / CWE PARTS AND FUNCTIONS
a. Removable seat and cover
b. Swivelling toilet bowl.
c. Valve blade handle.
d. Flush water tank.
e. Level indicator: warning light illuminates when the waste tank
requires emptying.
f.
Flush lever: the toilet flushes when the lever is moved up and down.
g. Power supply for the level indicator: two Penlite/AA 1.5 V alkaline
batteries.
h. Waterfill door.
i.
Rotating emptying spout: ensures that the waste tank can be
easily and hygienically emptied.
j+k. Automatic pressure release vent: ventilates the waste tank when
this is inserted into the cassette toilet. Avoids excessive pressure
build up in the waste tank.
N.B. A black hose is attached to the automatic pressure release
vent on some toilets. This hose transports the air to the outside
through a hatch or through the floor.
l.
Upper handle.
m. Cover: guarantees optimal hygiene. Opens when the waste tank is
inserted into the toilet and closes when the waste tank is removed
from the toilet.
n. Valve blade / valve seal.
o. Vent plunger: for emptying the waste tank without splashing.
p. Handle.
q. Valve blade opener
r.
Access door.
INTRODUCTION
The Thetford cassette toilet is a high quality product. The functional
design combines modern styling with ease of use forming an integrated
part of your caravan or motorhome bathroom. The cassette toilet is
manufactured from high quality synthetic material with a high gloss
finish. This makes it a durable and user & maintenance friendly toilet.
The toilet is made up of two parts: a permanently fixed toilet and a
waste tank that is accessible from the outside. The removable waste
tank is located under the toilet and can be removed via an access door
on the outside of the caravan or motorhome.
The Thetford cassette toilet is the solution to all sanitary problems in
your caravan or motorhome!
PREPARING FOR USE
1. Remove the waste tank by pulling the safety catch upwards.
2. Pull the waste tank outwards to the stop. Tip it slightly and take
out the tank completely.
3. Place the tank upright and turn the emptying spout upwards.
4. Remove the cap, with the measuring cup inside, from the
emptying spout and pour the stated quantity of Thetford toilet
fluid into the waste tank. This quickly breaks down waste, avoids
unpleasant smells in the waste tank and keeps the inside of the
waste tank clean. Next add approximately 2 litres of water -
enough to ensure that the bottom of the waste tank is covered.
Screw the measuring cap back onto the emptying spout. Turn the
emptying spout back to its original position.
N.B.: The emptying spout cap is supplied in the same packaging
as this manual.
Warning! Never add toilet fluid via the valve blade or via the toilet
bowl. The fluids are immediately mixed with water and sealed in
the waste tank. This avoids a penetrating smell in the bathroom.
5. Slide the waste tank back into its original position via the access door.
Note! Never use force if you are having trouble getting the tank
back into place easily. This may cause serious damage.
6. Make sure that the waste tank is secured with the safety catch.
Shut the access door and lock it.
Point 7 only applies to models CW / CWE.
CW / CWE
7. Open the waterfill door and fill the flush tank with the stated
amount of Thetford Toilet Fluid. This keeps the flush water fresh
and improves the flushing. Next, fill the flush water tank with
clean water using a jerry can or hose.
USE
8. Turn the toilet bowl to the desired position.
CW
9. + 10. Run some water into the bowl by moving the flush handle up
and down once. The toilet may be used with blade open or closed.
To open the valve, pull the valve handle under the toilet bowl
towards you. Your Thetford toilet is now ready for use.
S/CS AND CWE
9a. + 10. Run some water into the bowl by pressing the flush button
once. The toilet may be used with the blade open or closed. To
open the valve, pull the valve handle under the toilet bowl towards
you. Your Thetford toilet is now ready for use.
S/CS
Note! Some vehicles are equipped with a high-pressure water pump.
This can result in a powerful flush that spills over the top of the toilet
bowl. In this case use the pressure reducer supplied (packed with the
toilet instructions). This pressure reducer must be inserted into the water
hose at the point where the toilet is connected to the central water system.
CW
11 After use, open the valve blade (if it is still closed) and flush the
toilet by moving the flush handle up and down. Close the valve
blade after flushing.
S/CS AND CWE
11a After use, open the valve blade (if it is still closed) and flush the
toilet by pressing the flush button. Close the valve blade after
flushing.
Note! Do not leave water in the bowl if the toilet is not being used.
This does not help to reduce unpleasant smells and only leads to
flooding.
EMPTYING
The waste tank has a capacity of approximately 17 litres and must be
emptied, at the latest, when the warning lamp is lit. It is advisable to
empty the waste tank earlier. The warning lamp illuminates when the
waste tank contains in excess of 15 litres. This indicates that a
capacity of 2 litres is left, which will allow approximately 5 uses.
Note! Do not allow the waste tank to become too full.
12 Make sure that the valve blade is closed. Open the access door
outside the vehicle. Pull the safety catch upwards and remove the
waste tank.
13 Carry the tank by the handles to a normal toilet or to a legal waste
disposal site. Place the waste tank upright on the ground and turn
the emptying spout upwards.
14 Remove the emptying spout cap. Hold the waste tank by the upper
handle nearest to the emptying spout. Hold the rear handle with
your other hand so that you can operate the vent plunger with your
thumb. Keep the vent plunger pressed in to ensure the tank is
emptied without splashing.
Note! The vent plunger should only be pressed once the emptying
spout is pointing downwards!
In this way the tank can be emptied without splashing. After
emptying, flush the tank and clean the valve blade thoroughly with
water. Also, clean the valve blade with water. If required, make the
toilet ready for use once again. Slide the waste tank into the toilet
and close the access door.
GB
- 1 -
GB
Instructions for use
Содержание CASSETTE C-200 CS
Страница 1: ...C 200 S CS CW CWE GB F S ES DK D NL I P N SF SLO...
Страница 3: ...1 2 3 4 5 6 7 8 9 9a 10 11 11a 12 13 14...
Страница 4: ...C CS CW CWE h k...
Страница 28: ...24 NOTES...


