background image

777

SITE INSPECTION

STORAGE TANK LOCATION

• The storage tanks are to be installed at ground or 

floor levele and must stand vertically upright as the 

manufacturer has intended.

• The storage tanks are able to be installed indoors or 

outdoors. 

• The storage tanks are to be installed at ground or 

floor level and must stand vertically upright as the 

manufacturer has intended. 

• The storage tank should be located as close as 

the building such as the bathroom or kitchen. If the 

storage tank is located a long way from hot water 

draw points, a hot water circulation loop on a timer 

may be considered to reduce the time-lag for water 

to heat up and resultant water wastage.

• The tank should not obstruct any windows, doors 

or exits and should cause minimal intrusion to the 

existing site. Clearances must be allowed for to make 

servicing and maintenance convenient without the 

must also be easily accessible. 

• For glass-lined tanks, consider the positioning 

of the tank to allow room for anode removal and 

replacement maintenance.

• The storage tank must be installed in a properly 

drained safe tray where leakage may otherwise 

cause damage. The installation of the storage tank 

and safe tray must comply with AS/NZS 3500.4 and 

all local codes and regulatory authority requirements 

with regards to its construction, installation and 

draining. Tanks installed outside must be installed on 

a suitable concrete slab. 

• The tank label must be clearly visible. 

TRANSPORTATION AND UNPACKING

Transportation of Components

:

When transporting boxes, note the orientation of the 

“THIS WAY UP” arrows.
• Ensure all boxes are strapped and secured to prevent 

movement during transit.

• All tanks must be transported upright. Stacking is 

not recommended for any tanks.

• Products should always be handled with care. 

Damage incurred during the transportation is not 

covered under product warranty.

Unpacking of Components:

• When unpacking, take care to ensure that the 

components are not damaged in the process.

• Avoid using sharp blades or knives as this can 

scratch the surfaces of the products particularly the 

tanks.

Содержание TH250GLE

Страница 1: ...INSTALLER S MANUAL Electric Hot Water Tanks Solar Ready Installation Details Warranty H0025 028627 A 1 1 1 INSTALLER S MANUAL Electric Hot Water Tanks Solar Ready Installation Details Warranty H0025 028627 A ...

Страница 2: ...Thermann Installer s Manual Electric Hot Water Tanks Solar Ready 2 Thermann Installer s Manual Electric Hot Water Tanks Solar Ready 2 ...

Страница 3: ...umbing 9 Commissioning 11 Auxiliary Heating 12 Post Installation 12 Appendix 13 Warranty 14 CONTENTS 3 3 3 Introduction 4 Warnings and Precautions 5 Site Inspection 7 Component Inspection 8 System Plumbing 9 Commissioning 11 Auxiliary Heating 12 Post Installation 12 Appendix 13 Warranty 14 CONTENTS ...

Страница 4: ...COPE This manual has been designed to provide installation instructions for the installer or plumber Thermann Installer s Manual Electric Hot Water Tanks Solar Ready 4 INTRODUCTION TERMINOLOGY Boost the process where a heating component such as an electric element is used to provide auxiliary heating Collector the Thermann solar collector includes the manifold with heat pipes and evacuated tubes i...

Страница 5: ...spected at least every three 3 years and serviced as required Table 1 Water Quality Threshold Values 5 5 5 WARNINGS AND PRECAUTIONS TOTAL DISSOLVED SOLIDS 600 mg L OR PPM TOTAL HARDNESS 200 mg L OR PPM ELECTRICAL CONDUCTIVITY 850 µS cm CHLORIDE 250 mg L OR PPM pH LEVEL MIN 6 5 TO MAX 8 5 MAGNESIUM 10 mg L OR PPM SODIUM 150 mg L OR PPM INSTALLER REQUIREMENTS Installation of a system must be complet...

Страница 6: ... the lever on the PTRV Ensure there are no open flames or ignition sources close to the tank WARNING Thermann Installer s Manual Electric Hot Water Tanks Solar Ready 6 WARNING Legionella Control Legionella bacteria can be found naturally in the environment and thrives in warm water and damp places It can weaken the body s immune system which can increase the chances of developing Legionnaires dise...

Страница 7: ...using sharp blades or knives as this can scratch the surfaces of the products particularly the tanks 7 7 7 SITE INSPECTION STORAGE TANK LOCATION The storage tanks are to be installed at ground or floor levele and must stand vertically upright as the manufacturer has intended The storage tanks are able to be installed indoors or outdoors The storage tanks are to be installed at ground or floor leve...

Страница 8: ...ay be additional parts or materials required by plumbers installers for installation not listed here Thermann Installer s Manual Electric Hot Water Tanks Solar Ready 8 COMPONENT INSPECTION COMPONENTS PROVIDED BY THERMANN Upon receiving the system prior to installation check that the following components have been provided Any concerns must be brought to the attention of Thermann immediately Storag...

Страница 9: ...or ports The bottom port connects to the Sensor 2 S2 the top port connects to the Sensor 3 S3 sensor 9 9 9 IT IS NECESSARY THAT ALL VALVES FITTINGS AND PIPING CONNECTIONS USED ARE SOLAR RATED AND ARE ABLE TO WITHSTAND TEMPERATURES OF UP TO 220 C SYSTEM PLUMBING SYSTEM LAYOUT The system components that are a part of a typical electric solar hot water systems are depicted in the system schematic in ...

Страница 10: ...ins Line Valves CAP THIS PORT WITH BRASS PLUG SUPPLIED WHEN SOLAR COLLECTORS ARE NOT BEING INSTALLED Thermann Installer s Manual Electric Hot Water Tanks Solar Ready 10 Solar Flow This port is used for the water line directed up to the solar collectors to be heated This line consists of the following components in order from closest to furthest away from the solar flow port Circulation Pump Flow m...

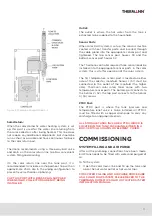
Страница 11: ... A SOLAR DHW SYSTEM PLEASE REFER TO THE THERMANN DOMESTIC SOLAR HOT WATER SYSTEM INSTALLATION MANUAL 11 11 11 Outlet The outlet is where the hot water from the tank is extracted to be supplied to the household Sensor Ports When solar DHW system is set up the sensors must be coated with heat transfer paste and inserted through the cable gland into the appropriate sensor port and tightened The top s...

Страница 12: ...photos of the plumbing lines to and from the tank Note down the Tank Serial Number POST INSTALLATION Thermann Installer s Manual Electric Hot Water Tanks Solar Ready 12 WATER HEATING REQUIREMENTS It is a legal requirement that water be heated on a regular basis to kill Legionella bacteria that can lead to Legionnaires disease The frequency this temperature must be reached varies and is explained i...

Страница 13: ...15 15 13 APPENDIX SYSTEM SCHEMATIC Figure 4 Typical Electric boosted solar hot water system 15 15 13 APPENDIX SYSTEM SCHEMATIC Figure 4 Typical Electric boosted solar hot water system ...

Страница 14: ... of reasonable costs of having the Unit repaired Payment in respect of the reduced value of the Unit Thermann Installer s Manual Electric Hot Water Tanks Solar Ready 14 WARRANTY This warranty applies to Domestic Electric Hot Water Tanks with tank model numbers TH250GLE TH315GLE and TH400GLE 10 Years tank warranty 1 year parts and labour For this tank Thermann Australia Will i For the period up to ...

Страница 15: ...y and Aftersales Department CONTACT DETAILS Phone 1300 277 428 Australia Website www thermann com au 17 17 15 Warranty claims can be placed by completing the following steps Contact Thermann Australia on 1300 277 428 and speak to our Warranty and Aftersales Department Provide the serial number and model number of the HWS located on the white compliance sticker Provide full name address and contact...

Страница 16: ...Thermann Installer s Manual Electric Hot Water Tanks Solar Ready 18 H0025 028627 A Thermann Installer s Manual Electric Hot Water Tanks Solar Ready 18 H0025 028627 A ...

Отзывы: