


English 14
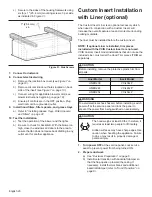
d) Reinstall core partition after running the harness
through the access hole.
e) Insert remote harness end into the mounting hole,
as indicated in
Figure 19
, until it clicks.
f)
Connect the extension harness to the connector
inside the junction box.
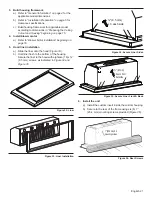
3. Prepare wall (or similar surface) cutout for installation
as shown below in
Figure 21
.
4. Connect the remote control to extension harness with
the included 30 ft (914.4 cm) cable.
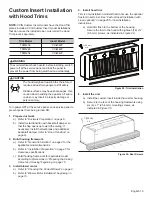
5. Insert remote control into cutout. Secure from behind
with two (2) nuts onto the weld studs (
Figure 22
).
6. Reinstall hood components from
Figure 15
and
Figure 16
.
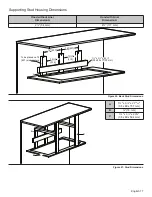
Figure 19: Remote Harness Mounting Hole
Remote
Harness
Remote
Harness
Remote
Harness
Harness
Mounting
Hole
Harness
Mounting
Hole
Harness
Mounting
Hole
Figure 20: Pigtail Remote Connection
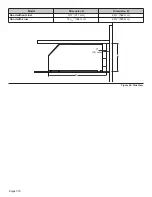
Figure 21: Wall Cutout (view is shown facing wall)
11¾ʺ
(298 mm)
11
/
16
ʺ (17 mm)
¼ʺ
(6 mm)
1½ʺ
(40 mm)
1½ʺ
(40 mm)
1½ʺ
(40 mm)
(17 mm)
(17 mm)
(17 mm)
(15 mm)
9
/
16
ʺ
5
5
/
/
8
8
ʺ
ʺ
1½ʺ
(40 mm)
1½ʺ
(40 mm)
1½ʺ
(40 mm)
10
(263 mm)
3
/
8
ʺ
11
/
16
ʺ (17 mm)
2¾ʺ
(69 mm)
(23 mm)
(23 mm)
(23 mm)
15
15
15
/
/
16
16
16
ʺ
ʺ
1
(35 mm)
1
(35 mm)
1
(35 mm)
3
3
/
/
8
8
ʺ
ʺ
1
(35 mm)
1
(35 mm)
1
(35 mm)
3
3
/
/
8
8
ʺ
ʺ
(10 mm)
(10 mm)
(10 mm)
3
3
/
/
8
8
ʺ
ʺ
(5 mm)
(5 mm)
(5 mm)
3
3
/
/
16
16
16
ʺ
ʺ
Figure 22: Remote Install


