


English 8
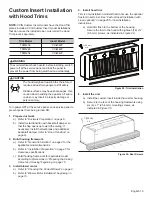
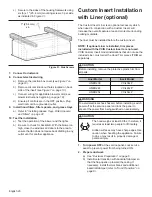
Hood Transition
Assembly of the Transition
1. A minimum height clearance of 10¼'' (260 mm) is
needed above the hood for transition mounting.
2. Remove transition from inside of hood. Discard
brackets attaching transition to the inside of hood.
3. Align mounting holes at base of transition with the
mounting holes of the 1/2'' (13 mm) flange located at
the top or rear of the hood (
Figure 5
).
4. Fasten transition to hood using two (2) 1'' (25.4 mm)
sheet metal screws included with hood (
Figure 5
).
5. Seal connection between transition and hood with
aluminum tape.
DO NOT
use duct tape (
Figure 5
).
6. Remove tape holding damper closed.
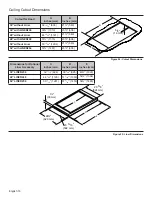
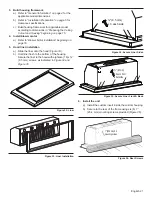
Figure 2: Transition Dimensions
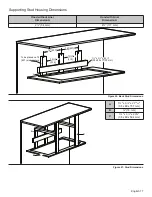
Figure 3: Hood Transition Dimensions
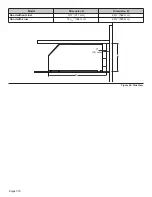
Figure 4: Transition Height
10
"
(254 mm)
Duct
21¾
"
(553 mm)
21¾
" (553 mm)
21¾" (553 mm)
4
5 16
(110 mm)
/
"
1
"
(25.4 mm)
x 2
4
4
5/
5/
16
16
16
"
"
(502 mm)
(502 mm)
(502 mm)
21¾
ʺ
(552 mm)
21¾ʺ
(552 mm)
21¾ʺ
(552 mm)
17½
ʺ
(444 mm)
17½ʺ
(444 mm)
17½ʺ
(444 mm)
10¼ʺ
10¼ʺ
10¼ʺ
(260 mm)
(260 mm)
(260 mm)
12
12
12
13
13
13
/
/
16
16
16
ʺ
ʺ
(325 mm)
(325 mm)
(325 mm)
Figure 5: Transition Connection


