PROVIDENCE INSERT
PELLET STOVE
24
WALL THERMOSTAT HOOK
-
UP AND
INSTALLATION
A wall thermostat or remote thermostat can be used
to automatically control the Providence Insert. You
will have the option of utilizing the thermostat to
turn the stove on and off from Hi or Medium to
Low. This can be done by changing the TYPE
setting jumper located on the circuit board (see
Figure 17). Type 1 will shut the stove on and off.
Type 2 will move the stove from Hi or Medium to
Low based on the temperature setting.
Here is the step-by-step procedure for hooking up
the thermostat option:
A. Unplug heater from power supply (both AC and
DC).
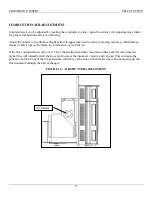
B. Locate thermostat terminal. Behind right door
(see Figure 9).
C. Remove metal shunt between terminals and
hook up thermostat wires to the two terminals.
For remote thermostat, hook up the two receiver
wires to the terminals.
D. Locate thermostat approximately 10 to 12 feet
from heater or in the area that you want to
remain a steady temperature. This may take
some trial and error, especially if the remote
thermostat is used.
E. Make sure all the wiring is complete and
batteries are installed into remote receiver and
hand-held control before plugging the heater
back into the wall outlet.
Important
Any electrical work performed on the Providence
Fireplace Insert should be done by qualified
personnel.
Always plug AC cord in before DC
battery.
START
-
UP AND OPERATION
Open hopper lid and make sure all manuals and
materials shipped with stove have been removed.
Make sure power cord is connected both into stove
(connector under control box on right side) and into
wall outlet.
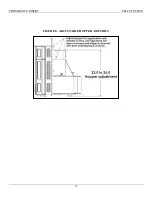
Fill hopper with pellets. Capacity of hopper can be
adjusted depending upon fireplace opening
dimensions (see Figure 8).
Pellet quality
is crucial for proper burn, efficiency,
and overall performance. Good pellets will give you
a bright yellow, vibrant flame with little or no soot
and ash build up over 24 hours. Poor quality pellets
will burn rich (orange flame) and dirty, black soot
and ash will accumulate quickly. Experiment with
different brands until you find one that gives you a
clean, efficient burn.
Lighting Instructions
The Providence Fireplace Insert is equipped with
automatic ignition. Once pellets have been poured
into the hopper and the stove is plugged into the
wall and venting is in place, you simply push the
Low, Medium, or High button and the stove will
light. Following is the start-up sequence, which will
enable you to check all functions:
When the button is pushed the fan and feed will
start in Low mode and the light next to the button
will start blinking. The igniter comes on within 30
seconds and you should have ignition and a flame in
four to six minutes. After 10 minutes, the light next
to the High, Med or Low button will be solid and
the stove will be in run mode. At this time you will
have three distinct fan and feed speeds: Low,
Medium, and High. You can adjust the heat output
accordingly by pushing one of the buttons. If the
stove does not get hot enough to kick into the run
mode it will shut off and you will have to repeat the
process. Failure to ignite on the first try usually
means the stove firepot is clogged up with ash or
the pellet you are using is of poor quality.
Содержание providence
Страница 6: ...PROVIDENCE INSERT PELLET STOVE 6 LABORATORY LISTING LABEL...
Страница 8: ...PROVIDENCE INSERT PELLET STOVE 8 FIGURE 1 STOVE DIMENSIONS...
Страница 19: ...PROVIDENCE INSERT PELLET STOVE 19 FIGURE 8 ADJUSTABLE HOPPER ASSEMBLY...
Страница 20: ...PROVIDENCE INSERT PELLET STOVE 20 FIGURE 9 CONTROL PANEL...
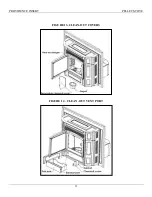
Страница 31: ...PROVIDENCE INSERT PELLET STOVE 31 FIGURE 13 CLEAN OUT COVERS FIGURE 14 CLEAN OUT VENT PORT...
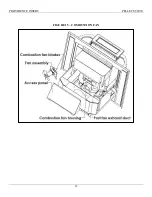
Страница 32: ...PROVIDENCE INSERT PELLET STOVE 32 FIGURE 15 COMBUSTION FAN...
Страница 37: ...PROVIDENCE INSERT PELLET STOVE 37 FIGURE 18 ELECTRICAL SCHEMATIC WIRING DIAGRAM...
Страница 40: ...PROVIDENCE INSERT PELLET STOVE THELIN HEARTH PRODUCTS 63 Laxalt Dr Carson City NV 89706...
Страница 41: ......

