Teletec international Minicom 6000 Скачать руководство пользователя страница 19

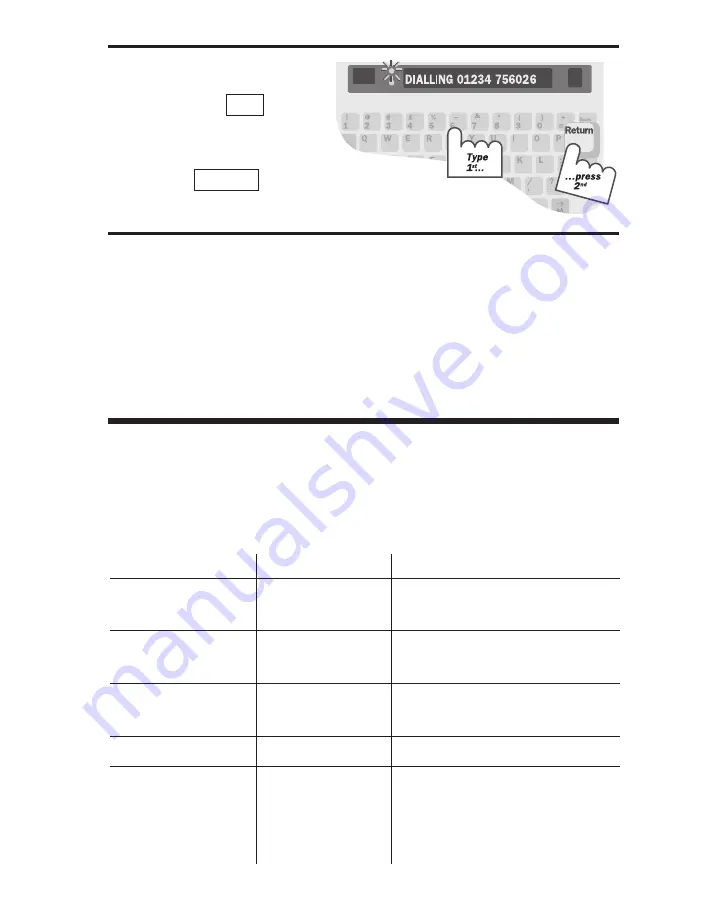
3. Type the telephone

number you are calling.
Then, press to 

dial

the number.

While typing, you can
use the

key to

correct mistakes.

4. When you see an answer

on the display, type a
greeting.

Turn off the Minicom
6000 when you are
finished with your call.

Back Space

Return

16 • BASIC CALLING

About the Signal Light and Display

The Signal light and the display show what is happening on the
telephone line (the display shows call progress in direct connect
only). The following chart explains what you see.

Signal Light

Display

Telephone Line

Stays on

Dial tone

before dialling

Stays on

No connection

after dialling

Flashes quickly

ENGAGED

Engaged

after dialling

Slow flashing

RING

Ringing

Irregular blinking

The other person is picking
up the handset, speaking or
sending Voice Announcer 
message.

Содержание Minicom 6000

Страница 1: ...vans Limited secure online store at www DeafEquipment co uk DeafEquipment co uk Solutions to improve the quality of life S So ol lu ut ti io on ns s t to o i im mp pr ro ov ve e t th he e q qu ua al l...

Страница 2: ...USING YOUR MINICOM 6000 305 007555...

Страница 3: ...H Weitbrecht an American physicist who was deaf developed an acoustic coupler that could send and receive teletypewriter signals over the telephone lines His invention the Weitbrecht Modem enabled peo...

Страница 4: ...ring 19 CHAPTER 4 Advanced Calling 21 Auto ID 21 The Built In Help Feature HELP 22 Turbo Code 22 Conversation Memory 24 The Greeting Memo GREETING 26 The Voice Announcer ANNOUNCER 26 Wait for Response...

Страница 5: ...ing Numbers in the Directory 51 CHAPTER 10 Options 53 Setting the Print Case OPTIONS 53 Setting the Print Style OPTIONS 54 Setting the Display Mode OPTIONS 54 Setting Pulse Dialling OPTIONS 55 Setting...

Страница 6: ...the Batteries 69 Troubleshooting 71 Repair 73 European Union Declaration of Conformity 74 CHAPTER 13 Specifications 75 APPENDIX A Using an External Printer 77 Setting Up an External Printer 77 Turnin...

Страница 7: ...ectric shock when the minicom is subsequently used 10 Avoid using a telephone other than a cordless type during an electrical storm There is a remote risk of electric shock from lightning 11 Unplug th...

Страница 8: ...y Voice Announcer that sends a voice message to tell callers to use the Typetalk service Other features that make calling quick and easy are the following Auto Answer answers calls while you are gone...

Страница 9: ...6 INTRODUCTION Overview of the Minicom 6000...

Страница 10: ...n the Control Key to Use Function Keys You must hold down the key and then press the function key to use a function For example to dial hold down the key while you press the DIAL key NOTE If you have...

Страница 11: ...Diagram of Function Keys This diagram shows the most important functions on the Minicom 6000 8 INTRODUCTION ANNOUNCER...

Страница 12: ...INTRODUCTION 9 GA...

Страница 13: ...ions p 22 Relay Voice RELAY VOICE Turns on Relay Voice Announcer p 35 Announcer Turns on the Voice Announcer p 26 ANNOUNCER Interrupt Interrupts other person s typing p 23 Time Displays date and time...

Страница 14: ...he Minicom 6000 requires a standard analogue telephone line the kind found in most homes Some businesses use digital telephone systems To use the Minicom 6000 with a digital system use only the acoust...

Страница 15: ...or more information on using battery power see About the Batteries on page 69 Step 3 Step 2 Step 1 Step 4 The illustration above shows how to set up for direct connect This means the Minicom 6000 is p...

Страница 16: ...ter you plug in the Minicom 6000 to display the correct date and T Ctrl 9 Ctrl SETUP 13 Return Press Return press 2nd Press 1st PRINT UP LOW CASE Hold down and press OPTIONS time 1 Press the Options k...

Страница 17: ...Return press 2nd Press 1st 4 Press the or the key to set the day Then press to move to the next setting Press when you finish to save changes and exit this menu Esc Return Back Space Spacebar 14 SETUP...

Страница 18: ...ASIC CALLING 15 CHAPTER 3 This chapter covers the basics of making and receiving minicom calls Making a Call in Direct Connect DIAL 1 Ctrl 1 Turn on the Minicom 6000 2 Hold down the key and press the...

Страница 19: ...Signal Light and Display The Signal light and the display show what is happening on the telephone line the display shows call progress in direct connect only The following chart explains what you see...

Страница 20: ...l system or to transfer a call You cannot use and with pulse dialling Redialing the Last Number DIAL Follow these steps to redial the last number you dialled 1 Press the Dial key DIAL TYPE NAME NUM OR...

Страница 21: ...s to hang up The telephone line is hung up even though the Minicom 6000 is still turned on Press if you decide not to hang up Answering a Call in Direct Connect N Y 2 Ctrl 2 Ctrl 18 BASIC CALLING 1 Th...

Страница 22: ...t side 2 Turn on the Minicom 6000 If you are making a call go to Step 3 If you are answering a call type a greeting to begin your conversation 3 Dial the number on the telephone Watch the signal light...

Страница 23: ...20 BASIC CALLING...

Страница 24: ...If you are on line you will see SENDING AUTO ID on the display every time the Minicom 6000 sends out tones Auto ID will also begin sending tones whenever no one types for a few minutes during a conver...

Страница 25: ...ANSWER to start turning on Auto Answer Then press HELP to get more information about the function Press when you finish reading the Help message Turbo Code Turbo Code is an enhancement that is automa...

Страница 26: ...y while the Ring Indicator flashes it means that the other person wants to interrupt you and start typing You can choose to stop and let the other person go ahead or continue typing yourself You may a...

Страница 27: ...the conversation memory until the memory fills up When the memory is full the Minicom 6000 clears the oldest conversations to make room for new ones Shift 24 ADVANCED CALLING Shift Hold down SK and pr...

Страница 28: ...our Minicom 6000 The conversation is recorded from the beginning of the conversation Memos are stored in memory until you clear them For more information on Memos see Chapter 8 To save a conversation...

Страница 29: ...s of the Greeting 5 Type the new message you want to send as your Greeting 6 Press to save the new message 7 To test your new message press the Greeting key GREETING For more information on Memos see...

Страница 30: ...your conversation The Ring Indicator will stop when you start typing Changing to Another Text Telephone If you are at home you can change from using the Minicom 6000 to a different minicom on a differ...

Страница 31: ...ou should press to be sure that you are using Baudot code You may have originally connected in Turbo Code and all three people in a three way conversation must be using Baudot code Transferring a Call...

Страница 32: ...l by pressing and then pressing DIAL You do not need to hold down Or you can type a by pressing and then pressing the key When Sticky Keys is on you can also lock down the key or the key so that it af...

Страница 33: ...30 ADVANCED CALLING...

Страница 34: ...isten with a telephone handset and then respond by typing on the Minicom 6000 You can make VCO calls in Baudot EDT CCITT and Turbo Code See Using Different Codes for VCO HCO on page 32 for more inform...

Страница 35: ...t to use VCO by typing VCO PLEASE GA Check that they say OK before continuing 2 Pick up the telephone handset 3 Hang up the Minicom 6000 by Pressing the Hangup key HANGUP and then pressing You will no...

Страница 36: ...to Typetalk wait for MINICOM 6000 to disappear from the display You can then type your reply 6 Repeat steps 2 to 6 each time you want to listen 7 Be sure to hang up both the telephone and the Minicom...

Страница 37: ...ypetalk Customer Service Team dial 18001 0800 500 888 Fax 0151 709 8119 Switchboard 18001 0151 709 94 94 Website http www typetalk org Email helpline rnid typetalk org uk Typetalk and TextDirect are a...

Страница 38: ...r dial Typetalk 0800 515152 You will see the message on the display at the same time The message stops when someone starts typing NOTE The Typetalk telephone number stored 0800 515152 must be changed...

Страница 39: ...36 AUTO ANSWER...

Страница 40: ...n the Memo memory You can choose any Memo you have saved as your outgoing Auto Answer message If the caller leaves a text telephone message the Minicom 6000 saves the message and displays the number o...

Страница 41: ...d to tell the Minicom 6000 which Memo you want to use as your outgoing Auto Answer message Ctrl 38 AUTO ANSWER 1 Press the Auto Answer key AUTO ANSWER 2 Type a Memo name This example uses the name AA...

Страница 42: ...e display The key erases characters The Clear key CLEAR erases the Memo contents You can change your outgoing Auto Answer Memo at any time See Changing the Outgoing Auto Answer Memo on page 42 for mor...

Страница 43: ...o Answer again after you finish the call Turning Off Auto Answer Press or turn off the Minicom 6000 to turn off Auto Answer If you see REVIEW MESSAGES Y N on the display press to read messages or if y...

Страница 44: ...Press the again to continue Spacebar Spacebar 4 To stop reading messages press 5 Press to clear all of your Auto Answer messages Press if you decide not to clear them N Y Esc If you want to read your...

Страница 45: ...ou will see its name when you read through the list of Memos See Chapter 8 for more information about Memos Auto Answer Options Setting the Number of Telephone Rings OPTIONS You can set Auto Answer so...

Страница 46: ...ng these steps 1 Press the Clear key CLEAR CLEAR CONVERSATION is displayed 2 Press the to change the setting to AA MESSAGES 3 Press CLEAR MESSAGES Y N is displayed 4 Press MESSAGES CLEARED is displaye...

Страница 47: ...essage to end Then press 3 Type and your password like this PASSWORD 4 Press again Your Minicom 6000 sends the number of messages you have and amount of memory space remaining After a pause it begins...

Страница 48: ...en you answer the telephone The Memo that you create when you save a conversation A Memo that contains a message perhaps about a forthcoming meeting that you want to send to several people There is no...

Страница 49: ...S Use these function keys when you type your Memo The left arrow key and the right arrow key move the text back and forth across the display The key starts a new line if the Memo is printed The key er...

Страница 50: ...key SEND MEMO 2 Press the until you see the name of the Memo you want to send You can also type the name instead of pressing the 3 Press The Minicom 6000 sends the Memo Press if you want to stop sendi...

Страница 51: ...mos Clearing One Memo MEMO 1 Press the Memo key MEMO EDIT MEMO is displayed 2 Press the until you see the Memo name on the display 3 Press the clear key CLEAR REMOVE MEMO Y N is displayed 4 Press to c...

Страница 52: ...of telephone numbers you can save as long as the total number of characters in all Directory entries and Memos is less than 9 500 Saving a Telephone Number DIRECTORY Back Space Ctrl 1 Press the Direct...

Страница 53: ...e 17 50 DIRECTORY Use these function keys when you type the number The left arrow key and the right arrow key move the number back and forth across the display The key erases characters The Remain key...

Страница 54: ...r DIRECTORY 1 Press the Directory key DIRECTORY DIR NAME is displayed 2 Press the until you see the number you want to clear on the display 3 Press the Clear key CLEAR REMOVE DIR ENTRY Y N is displaye...

Страница 55: ...52 DIRECTORY...

Страница 56: ...in the Options menu For each item in the Options menu Press the to show the different settings available for the option Press to move to the next option Press when you are finished to save changes and...

Страница 57: ...on Setting the Display Mode OPTIONS The display mode sets the direction in which text moves across the display When you turn on your Minicom 6000 the display mode is always right to left This is the b...

Страница 58: ...Auto Answer Rings OPTIONS Follow the steps below to change the Auto Answer rings setting to any number between 2 and 9 or TS The TS setting is used with remote message retrieval It tells the Minicom 6...

Страница 59: ...to the next option Setting the Auto Answer Password OPTIONS Follow these steps to change your password 1 Press the Options key OPTIONS PRINT UP LOW CASE is displayed 2 Press until CHANGE AA PSWD NO i...

Страница 60: ...Press to exit the Options menu Turning Off Printing of the Date and Time OPTIONS If you have an external printer follow these steps to turn off printing of the date and time on conversations and Auto...

Страница 61: ...hanging the Relay Voice Announcer Number OPTIONS Follow these steps to change the voice access telephone number for Typetalk the national relay service in the Relay Voice Announcer message 1 Press the...

Страница 62: ...he display 3 Press the to change the setting to OFF 4 Press to save the setting and exit the Options menu or press to save the setting and go to the next option Turning Off Interrupt OPTIONS Follow th...

Страница 63: ...d exit the Options menu or press to save the setting and go to the next option NOTE Selecting zero will turn off CCITT code and your Minicom 6000 will not try to use it even if the other minicom is us...

Страница 64: ...the same code in order to communicate To make this easy the Minicom 6000 has an automatic code This means that when you make or receive a call within the U K the Minicom 6000 will make sure that the r...

Страница 65: ...below If you are calling a country that uses CCITT you can set the Minicom 6000 to use only CCITT for the call You can also use CCITT to connect with computers that have modems for communication elec...

Страница 66: ...u use CCITT code often you may need to change settings You can change the following settings on your Minicom 6000 before or during your call Originate Answer determines which machine is calling origin...

Страница 67: ...and return to make your call 4 Press to save and exit CCITT settings and return to your text telephone conversation Changing CCITT Seek Time OPTIONS This option sets the length of time during which t...

Страница 68: ...ling a country that uses Baudot you can set the Minicom 6000 to use only Baudot code for the call Countries that use Baudot are 45 Baud 50 Baud Canada Republic of Ireland Australia Great Britain South...

Страница 69: ...Denmark use a communication code called DTMF To call someone in Denmark your call must go through the CCITT DTMF Gateway The Gateway translates CCITT code into DTMF code and vice versa NOTE The trans...

Страница 70: ...er 00 45 65 99 65 99 3 After you connect to the gateway you will see this display screen which means Enter the telephone number 4 Type the person s number you want to call Do not add the international...

Страница 71: ...ES 5 Press You will see this display which means Calling started Wait while your call is connected 6 When you see a greeting you can begin your conversation Turn off the Minicom 6000 when you finish R...

Страница 72: ...icom 6000 runs on batteries when you unplug the AC adapter or when the power fails Fully charged the six AA rechargeable Nickel Metal Hydride NiMH batteries will provide about 90 minutes of normal use...

Страница 73: ...in less than 30 minutes Use only AA Nickel Metal Hydride NiMH rechargeable batteries Contact your dealer for recommended replacements Turn over the Minicom 6000 and follow these steps to change batter...

Страница 74: ...a handset in the acoustic cups press it firmly The telephone connection may be weak or the other minicom may be sending the wrong signals Press the Sensitivity key SENS HIGH SENSITIVITY is displayed...

Страница 75: ...uto Answer messages at one time Follow these steps to clear all memory 1 Press the Clear key CLEAR CLEAR CONVERSATION is displayed 2 Press the to change the setting to ALL MEMORY 3 Press 4 Press to cl...

Страница 76: ...or an authorized Teletec service centre 1 Pack it in the original shipping carton or a similar STURDY box 2 Include a note that describes the problem The note will help the technicians find the proble...

Страница 77: ...74 SERVICE...

Страница 78: ...e 45 5 and 50 baud Sensitivity 45 dbm 67 dBSPL min Output 10 dbm Turbo Code 100 baud average 7 data bits CCITT Code 7N1 8N1 7E1 and 7O1 300 baud Answer and originate Full and half duplex Compatible wi...

Страница 79: ...do not provide secondary proceed indication If you use the Minicom 6000 with a compatible switchboard it cannot be guaranteed that the Minicom 6000 will operate correctly under all possible condition...

Страница 80: ...that are printed to make them easier to read by setting the print style Setting Up an External Printer You will need a special cable to connect your external printer Contact Teletec International Ltd...

Страница 81: ...ng the Print Style OPTIONS If you have an Epson compatible printer connected to your Minicom 6000 you can change the style of print that the printer uses Follow the steps below to setup the print styl...

Страница 82: ...o key MEMO EDIT MEMO is displayed 2 Press the The display shows the first Memo name If you want to print only part of the list keep pressing the until you see the first name you want to print 3 Press...

Страница 83: ...number in the Directory If you want to print only part of the directory keep pressing the until you see the first number you want to print 3 Press the Print key PRINT 4 Press the Print key again to st...

Страница 84: ...0 compartment 6 70 disposal of 4 70 exercising 70 how long they last 12 75 problems 71 replacing 70 safety 4 type 69 70 75 Baud rate See Baudot code Baudot code turning on 28 65 66 Bosnia calling 61 C...

Страница 85: ...ling 61 Interrupt 23 key 10 turning off 23 Italy calling 61 Latvia calling 65 Lightning danger 4 Lights power 6 69 Signal 6 16 Malta calling 61 Memory Auto Answer 37 75 clearing all 73 conversation 24...

Страница 86: ...ca calling 65 Spacebar 6 Spain calling 61 Specifications 75 Sticky Keys 5 29 Sweden calling 62 Switzerland calling 61 Telephone line 11 connecting 12 jack 6 type 11 75 Three way calling 28 Time See Cl...

Страница 87: ...n marks such as commas and periods although many people choose to omit them You may also abbreviate words such as GA go ahead OPR operator SK stop keying PLS please CD could Q question mark CUL see yo...

Отзывы: