background image

Adjustments

WFM700 Series Waveform Monitors Service Manual

3- 3

Manual Adjustment Procedures

This section describes how to do the manual adjustments of the WFM700
Waveform Monitors. Performing these procedures require the removal of the
cabinet. Read the section

Before Performing Adjustment Procedures

on

page 3--1.

It’s recommended that this procedure be performed in its entirety and in the order
presented.

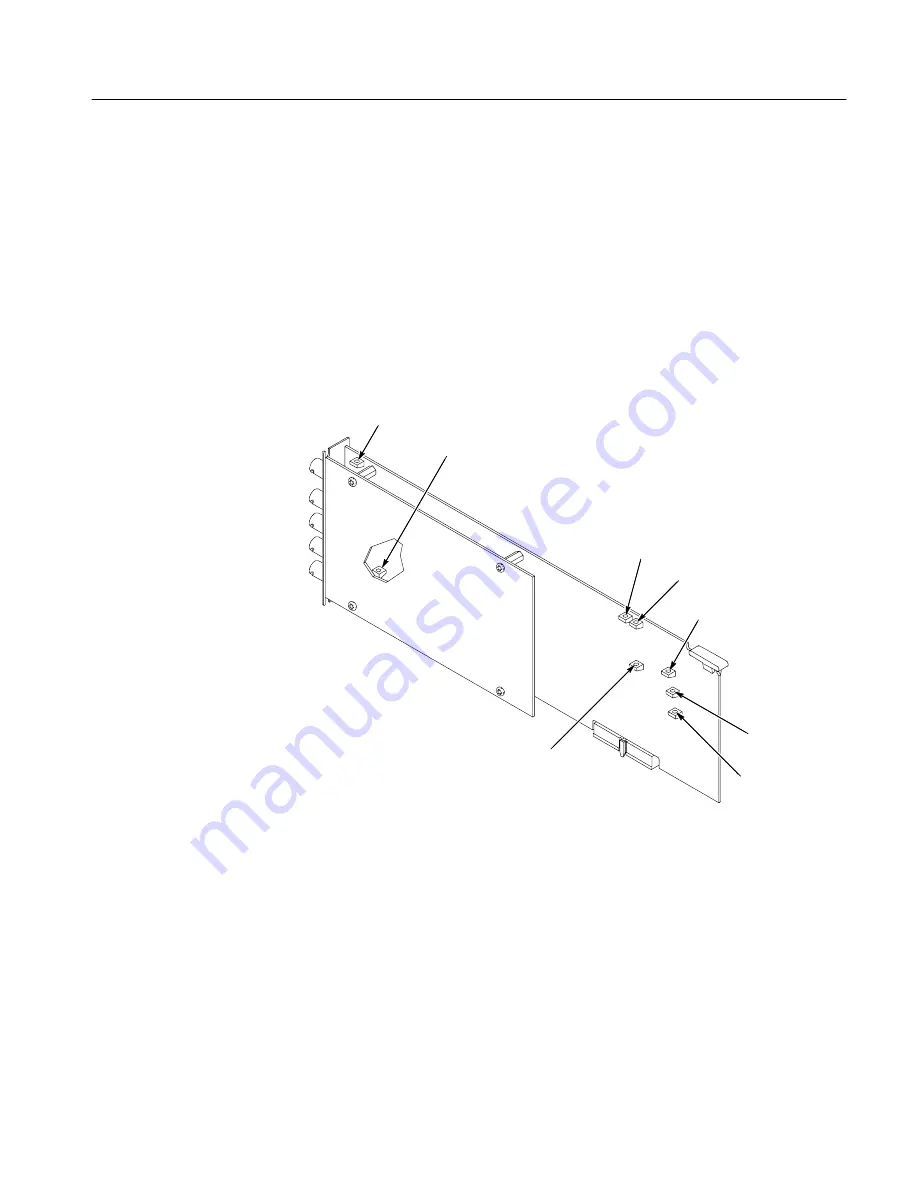
All manual adjustment locations listed in this procedure are illustrated in
Figure 3--1.

R701

R702

R823

R727

R101

R833

R843

R296

Figure 3- 1: Adjustment locations on the video module

Содержание WFM700 Series

Страница 1: ...es to firmware version 1 3 0 and above Warning The servicing instructions are for use by qualified personnel only To avoid personal injury do not perform any servicing unless you are qualified to do s...

Страница 2: ...and foreign patents issued and pending Information in this publication supercedes that in all previously published material Specifications and price change privileges reserved Tektronix Inc P O Box 50...

Страница 3: ...duties taxes and any other charges for products returned to any other locations This warranty shall not apply to any defect failure or damage caused by improper use or improper or inadequate maintena...

Страница 4: ......

Страница 5: ...ptions 1 2 Diagrams 1 7 Performance Verification Prerequisites 2 1 Test Equipment Required 2 2 Performance Verification Conditions 2 4 Self Tests 2 4 Functional Tests 2 6 Performance Tests 2 9 WFM700...

Страница 6: ...Cabinet 4 8 Chassis Cover 4 9 Plug In Modules 4 11 Power Supply 4 18 Front End Assembly 4 19 Fans 4 22 Fan Assembly 4 23 Main Circuit Board 4 25 Troubleshooting 4 27 Check for Problems 4 27 Diagnostic...

Страница 7: ...en 2 30 Figure 2 11 Eye vertical scale performance screen 2 31 Figure 2 12 Eye time base jitter performance screen 2 35 Figure 2 13 Eye clock recovery bandwidth performance screen 2 37 Figure 2 14 Eye...

Страница 8: ...17 Figure 4 9 Front panel assembly 4 20 Figure 4 10 Keyboard access 4 21 Figure 4 11 Fan assembly mounting 4 24 Figure 4 12 Main circuit board securing screws 4 25 Figure 4 13 Primary troubleshooting...

Страница 9: ...or performance verification 2 2 Table 3 1 Test equipment for adjustment procedures 3 2 Table 4 1 External inspection check list 4 4 Table 4 2 Internal inspection check list 4 5 Table 4 3 Tools require...

Страница 10: ...Table of Contents vi WFM700 Series Waveform Monitors Service Manual...

Страница 11: ...s on the product Consult the product manual for further ratings information before making connections to the product Do not apply a potential to any terminal including the common terminal that exceeds...

Страница 12: ...d result in damage to this product or other property Terms on the Product These terms may appear on the product DANGER indicates an injury hazard immediately accessible as you read the marking WARNING...

Страница 13: ...is product unless another person capable of rendering first aid and resuscitation is present Disconnect Power To avoid electric shock switch off the instrument power then disconnect the power cord fro...

Страница 14: ...Service Safety Summary x WFM700 Series Waveform Monitors Service Manual...

Страница 15: ...d to do the service correctly safely and efficiently Manual Conventions This manual uses certain conventions that you should become familiar with before attempting service The term module refers to a...

Страница 16: ...ment using remote control including the ground closure Web server and SNMP interfaces H Procedures for checking the basic functions of the instrument for upgrading the instrument firmware and for perf...

Страница 17: ...nd Lightning displays on the waveform monitor can be used to help prevent the undesired impact of color gamut violations H A Guide to Standard and High Definition Digital Measurements This book is a p...

Страница 18: ...x com Sales support 1 800 833 9200 select option 1 Service support 1 800 833 9200 select option 2 Technical support www tektronix com support 1 800 833 9200 select option 3 6 00 a m 5 00 p m Pacific S...

Страница 19: ...Theory of Operation...

Страница 20: ......

Страница 21: ...ecovered The parallel signal is further processed to extract the embedded audio signal detect the video format and generate an RGB Analog video signal The embedded audio is encoded into AES signals th...

Страница 22: ...supplied to the power supply module a 5 V housekeeping supply is activated providing power to the front panel ON STBY switch and to the Environmental Controller EC on the Main Interface board Pressing...

Страница 23: ...channels of audio signal which is put on the audio bus for future use A DAC block creates a picture monitor signal which is output through the VGA PIX MON connector and the component video connectors...

Страница 24: ...formation The External Reference module acts as a data hub or router for TRS timing reference signal signals to and from the input modules slots 0 or 1 and the Real Time Display module External Connec...

Страница 25: ...al extracted from the video serial input to the module slots for use by future modules H The Video Bus routes the parallel video signal with clock and sync signals to the RTD slot from the two Input s...

Страница 26: ...data Only one channel is processed at a time The RTD is divided into two logical sections The first section the DSP engine performs signal processing and routing operations to create standard wavefor...

Страница 27: ...reates a Lissajous image that is periodically transferred directly to the VGA controller via the PCI bus External Connectors H AES 1 2 I O AES 3 4 I O AES 5 6 I O AES 7 8 I O Four AES EBU format AES 3...

Страница 28: ...ode Processing RTD Module Rasterizer Fast Static Memory Measurement Processing Polyphase Interpolator Selector Selector VGA PIX Mon Aux Out 1 Aux Out 2 PIX B Pb PIX R Pr PIX G Y Ref In Loop Through Sy...

Страница 29: ...ng Supply Power Relay Environmental Controller EC On Off Serial Bus Multiplexer Measurement Processing Logic Devices Polyphase Interpolator Rasterizer Recursive and Pix Processing PCI Interface Fast S...

Страница 30: ...Theory of Operation 1 10 WFM700 Series Waveform Monitors Service Manual...

Страница 31: ...Performance Verification...

Страница 32: ......

Страница 33: ...aranteed Firmware version 1 3 or above is required to perform all performance tests H Test Records are provided at the end of this chapter to record the results of each performance test that checks a...

Страница 34: ...00 color bars 1080i 60 100 color bars 720p 59 94 100 color bars 1080i 59 94 100 sweep 1 30 MHz 1080i 59 94 100 flat field 1080i 59 94 20 30 MHz multiburst Tektronix TG2000 with HDVG1 module D D D D SD...

Страница 35: ...male BNC connectors 36 inches long Tektronix part number 012 0482 00 D D D D Precision 75 8 to 50 8 adapter for test oscilloscope input 1 5 impedance and attenuation accuracy Tektronix AMT75 D D D Wi...

Страница 36: ...ower circuit or to a common power strip if you are unsure of the AC power circuit distribution Self Tests This procedure uses internal routines to verify that the waveform monitor functions and passes...

Страница 37: ...CT button to return to the diagnostics menu 18 Touch View Diagnostics Log 19 CHECK the diagnostics log pages to verify that there are no red FAIL messages 20 Touch Erase NVRAM Log to clear the log fil...

Страница 38: ...alter calibration or presets 3 Connect a serial digital output from the HD video generator to INPUT A using a 75 8 cable 4 Set the HD video generator for a 1080i 59 94 100 color bars signal 5 Connect...

Страница 39: ...d audio disembedding data paths for standard definition video 1 Press the WFM button 2 Press the INPUT button and touch the Input B soft key 3 Disable or disconnect the SD video generator signal to IN...

Страница 40: ...u 5 Touch the Output Active for HD soft key 6 Touch the RGB soft key 7 CHECK that color bars are correctly displayed on the VGA monitor NOTE Some VGA monitors do not synchronize correctly to color bar...

Страница 41: ...ies performance characteristics and is listed in the test record 1 Connect the AC power cord from the WFM700 to the variable autotransformer 2 Power on both the autotransformer and the WFM700 3 Connec...

Страница 42: ...ain Accuracy H Vector Display to Graticule Registration H Lightning and Diamond Vertical Gain Accuracy H Arrowhead Signal to Graticule Registration H Arrowhead Composite Limit Cursor Accuracy and Dete...

Страница 43: ...resolution 8 Press the GAIN button 9 Touch Gain 10x 10 CHECK that the steps in the ramps are 0 7 mV to 0 9 mV Use the voltage cursors for this measurement See Figure 2 2 11 Press the WFM button 12 To...

Страница 44: ...on 2 12 WFM700 Series Waveform Monitors Service Manual Figure 2 1 Signal data paths performance verification screen one Cursors adjusted to measure one step Figure 2 2 Signal data paths performance ve...

Страница 45: ...color difference signals NOTE The Y component must be on to allow both the Pr and Pb components to be turned off 24 CHECK that the steps in the displayed ramps are monotonic all steps are in the same...

Страница 46: ...six perform the procedure again If a pixel fails for both black and white signals count it only once This step checks for defective display pixels with a SD video signal Performance Requirement This...

Страница 47: ...T button and select Input A 4 Press the STATUS button 5 Touch the Display soft key 6 Touch the Alarm Status soft key and then touch the Done soft key 7 Touch the Serial Alarms soft key 8 CHECK that th...

Страница 48: ...asure ment The following substeps will help obtain a measurable display on the test oscilloscope a Ensure that the termination is correct on the test oscilloscope b Set the vertical scale to 200 mV di...

Страница 49: ...nerator for a 525 format 100 color bars signal 3 Connect the SD PIX MON output to the 75 8 input of the test oscilloscope using a 75 8 cable Use a 75 8 to 50 8 adapter on the input of the test oscillo...

Страница 50: ...itions followed by 30 ns with no transitions This is followed by the triggering transi tion See Figure 2 4 f When measuring disregard signal noise Measure the waveform amplitude from the centers of th...

Страница 51: ...the Output Active for HD soft key then YPbPr 8 Press the CONFIG button twice to exit menu 9 Set the test oscilloscope to view the first color bar The following oscillo scope settings normally provide...

Страница 52: ...rizontal Scale 10 us div Horizontal Trigger Position 10 Trigger Slope Rising edge Trigger Level 300 mV 17 Measure the peak to peak amplitude of the waveform displayed on the oscilloscope See Figure 2...

Страница 53: ...th this check if testing a WFM7A or WFM7M Input Module 24 Connect the SD video generator to INPUT B using a 75 8 cable 25 Press the INPUT button and select Input B 26 Set the SD video generator for a...

Страница 54: ...etween the black level and the first color bar and note the measurement See Figure 2 7 34 Calculate the percent amplitude error using the formula Amplitude Error Measured Amplitude mV 700 mV 7 35 CHEC...

Страница 55: ...zontal step referenced to ground on the test oscilloscope Change test oscilloscope settings as needed to obtain the best display See Figure 2 6 44 CHECK that the black level is between 25 mV 45 Move t...

Страница 56: ...n the phase or frequency difference between the HD video generator and the analog video generator A phase difference causes a horizontal shift of the waveform while a frequency difference causes the w...

Страница 57: ...the test oscilloscope if necessary 5 Press the CONFIG button 6 Touch the Video Inputs Outputs soft key then Next Menu 7 Touch the Output Active for HD soft key 8 Touch the RGB soft key 9 Press the CO...

Страница 58: ...ated measurement is between 10 typical 16 Measure the amplitude of the largest packet Note the Largest Packet measurement See Figure 2 8 17 Calculate the percent amplitude variation using the formula...

Страница 59: ...cessary 27 Press the CONFIG button 28 Touch the Video Inputs Outputs soft key then Next Menu 29 Touch the Output Active for SD soft key 30 Touch the RGB soft key 31 Press the CONFIG button twice to ex...

Страница 60: ...t is between 10 typical 38 Measure the amplitude of the largest packet Note the Largest Packet measurement See Figure 2 9 39 Calculate the percent amplitude variation using the formula Amplitude Varia...

Страница 61: ...en touch the Done soft key 7 Touch the Video Session soft key 8 CHECK that no Embedded CRC Y or C errors messages occur in an interval of 10 seconds 9 Disconnect the test setup Stop here for WFM7HD Th...

Страница 62: ...r on the input of the test oscilloscope if necessary 2 Set the SD video generator for a 525 format 100 color bars signal 3 Set the test oscilloscope to view the signal The following oscilloscope setti...

Страница 63: ...soft key Voltage selected 9 Measure the signal amplitude displayed on the WFM700 using the voltage cursors Position the cursors where the waveform is unaffected by overshoot or ringing See Figure 2 11...

Страница 64: ...or as follows Frequency 900 MHz Phase Modulation OFF Frequency Modulation OFF Output Power 7 0 dBm RF Output ON 5 Adjust the test oscilloscope to obtain a stable display of the 900 MHz sine wave from...

Страница 65: ...ranteed characteristics and are not listed in the test record NOTE If this test is performed out of sequence or the sequence of tests has been interrupted such as power off or input from another modul...

Страница 66: ...Operation Check This test checks for typical operation Typical values are not guaranteed characteristics and are not listed in the test record NOTE If this test is performed out of sequence or the se...

Страница 67: ...o 20 using the General Purpose Knob 9 Use the Time cursors to measure the width of the point where a rising edge crosses a falling edge See Figure 2 12 10 CHECK that the measured value is approximatel...

Страница 68: ...ble b Set the SD video generator for a 525 format 100 color bar signal c Press the INPUT button and select Input B d Press the EYE button e Press the INPUT button and select Input A 1 Install the 50 8...

Страница 69: ...eved when the peak positive phase modulation exactly overlaps the peak negative modulation The result is that the sine wave is brighter where the peak positive and negative phase modulations overlap S...

Страница 70: ...deviation See Figure 2 13 13 Calculate percent amplitude error using the formula Amplitude Error 100 1 57 Phase Deviation 1 57 14 CHECK that the calculated amplitude error is between 10 and 10 15 Set...

Страница 71: ...B d Press the EYE button e Press the INPUT button and select Input A 1 Install the 50 8 N to BNC adapter on the RF generator output 2 Connect the RF generator output to INPUT A using a 75 8 cable Impe...

Страница 72: ...epeat steps 7 through 9 13 Set Hi Pass Filter to 10 kHz 14 Change RF generator settings as follows LFGEN2 Frequency 10 kHz 15 Repeat steps 7 through 9 16 Change RF generator settings as follows LFGEN2...

Страница 73: ...EYE button e Press the INPUT button and select Input A 1 Install the 50 8 N to BNC adapter on the RF generator output 2 Connect the RF generator output to INPUT A using a 75 8 cable Imped ance matchi...

Страница 74: ...e 2 13 NOTE 1 UI phase modulation is achieved when the peak positive phase modulation exactly overlaps the peak negative modulation The result is that the sine wave is brighter where the peak positive...

Страница 75: ...37 Note the LFGEN2 frequency setting 18 Calculate the percentage of frequency error using the formula Frequency Error 10 LF2 frequency 10 19 CHECK that the calculated frequency error is between 10 an...

Страница 76: ...er on the RF generator output 2 Connect the RF generator output to INPUT A using a 75 8 cable Imped ance matching is not important for this connection 3 Set the RF generator as follows Frequency 741 7...

Страница 77: ...cale Factor Error Measured Amplitude mV 200 mV 2 12 CHECK that the calculated error is 10 typical 13 Read the Measured Jitter amplitude in UI on the WFM700 display 14 Calculate the HD jitter gain erro...

Страница 78: ...ation soft key and then Next Menu 3 Touch the Eye Sig BW Test soft key and then the Start Eye Sig BW Test soft key This puts the WFM700 in Eye Bandwidth mode and starts the test 4 Touch the Input soft...

Страница 79: ...ors It may be necessary to adjust the vertical position The display is an unsynchronized waveform See Figure 2 16 NOTE When setting and measuring unsynchronized signal amplitude position the cursors h...

Страница 80: ...to 50 kHz 17 Measure the waveform amplitude using the cursors and note the measure ment 18 Calculate the low frequency response using the formula Low Frequency Response 20 log10 Measured Minimum 800...

Страница 81: ...e Verification procedures 1 Press the CONFIG button 2 Touch the Audio Inputs Outputs soft key and then Next Menu 3 Touch the AES Connectors soft key then Input 4 Touch the Top Menu soft key 5 Press th...

Страница 82: ...ator output to the input port of the Return Loss Bridge using a 50 8 cable 3 Connect the output of the Return Loss Bridge to the 50 8 input of the test oscilloscope using a 50 8 cable Do not connect t...

Страница 83: ...with the formula below using the measured values from steps 6 and 13 Input Return Loss 20 log10 Reference Reflection 15 CHECK that the calculated return loss is 25 dB 16 Move the return loss bridge t...

Страница 84: ...or an indication of 20 dB FS and no error messages in the corresponding bars 12 Move the audio generator output to each of the remaining AES I O connectors and repeat step 11 for each connector 13 Set...

Страница 85: ...rs soft key then Output 8 Select Input 1A Select Input 2A if checking a second Input Module in slot 2 9 Set the test oscilloscope to view the signal The following oscilloscope settings normally provid...

Страница 86: ...over an interval of at least 5 seconds 8 Move the cable to each of the remaining AES I O connectors and repeat step 7 for each AES I O connector 9 Disconnect the test setup This test measures jitter...

Страница 87: ...he WFM700 to the factory settings when finished with the Performance Verification procedures 1 Press the CONFIG button 2 Touch the Audio Inputs Outputs soft key and then Next Menu 3 Touch the AES Conn...

Страница 88: ...Performance Verification 2 56 WFM700 Series Waveform Monitors Service Manual...

Страница 89: ...um Power Source Range Stable display from 90 V to 264 V Pass N A Re start at 90 V Pass N A Signal Data Paths High Definition Y component ramp is monotonic Pass N A Y component ramps step size 0 7 mV 0...

Страница 90: ...0i 59 94 0 flat field Embedded CRC status reads Embedded CRC SMPTE 292 Y OK C OK Pass N A 1080i 59 94 0 flat field Gamut errors read as follows RGB Gamut Error X OK Composite Gamut Error X OK Pass N A...

Страница 91: ...error 5 5 PIX R Pr black level 25 mV 25 mV Standard Definition PIX G Y calculated amplitude error 5 5 PIX G Y black level 25 mV 25 mV PIX B Pb calculated amplitude error 5 5 PIX B Pb black level 25 mV...

Страница 92: ...ut B Calculated return loss 25 dB N A Eye Pattern Display Jitter Attenuation Error Calculated amplitude error 10 Hz Clock BW 10 10 100 Hz Clock BW 10 10 1 kHz Clock BW 10 20 Jitter Display High Pass F...

Страница 93: ...Certificate Number Input Module Serial Number Temperature Relative Humidity Date of Calibration Technician Performance Test Maximum Outgoing Incoming Minimum Eye Pattern Display Signal Bandwidth Calcu...

Страница 94: ...WFM700 WFM7M Input Module Test Record 2 62 WFM700 Series Waveform Monitors Service Manual...

Страница 95: ...going Maximum Power Source Range Stable display from 90 V to 264 V Pass N A Re start at 90 V Pass N A Signal Data Paths High Definition Y component ramp is monotonic Pass N A Y component ramps step si...

Страница 96: ...0i 59 94 0 flat field Embedded CRC status reads Embedded CRC SMPTE 292 Y OK C OK Pass N A 1080i 59 94 0 flat field Gamut errors read as follows RGB Gamut Error X OK Composite Gamut Error X OK Pass N A...

Страница 97: ...error 5 5 PIX R Pr black level 25 mV 25 mV Standard Definition PIX G Y calculated amplitude error 5 5 PIX G Y black level 25 mV 25 mV PIX B Pb calculated amplitude error 5 5 PIX B Pb black level 25 mV...

Страница 98: ...Record cont Instrument Serial Number Certificate Number Input Module Serial Number Temperature Relative Humidity Date of Calibration Technician Performance Test Maximum Outgoing Incoming Minimum Input...

Страница 99: ...e Number Input Module Serial Number Temperature Relative Humidity Date of Calibration Technician Performance Test Minimum Incoming Outgoing Maximum Power Source Range Stable display from 90 V to 264 V...

Страница 100: ...read as follows RGB Gamut Error X OK Composite Gamut Error X OK Pass N A 1080i 59 94 SMPTE color bars Gamut errors read as follows RGB Gamut Error X Alarm Composite Gamut Error X OK Pass N A 1080i 59...

Страница 101: ...ce 1080i 50 100 color bars Display remains locked to the external reference Pass N A 1080i 60 100 color bars Display remains locked to the external reference Pass N A 720p 59 94 100 color bars Display...

Страница 102: ...WFM700 WFM7HD Input Module Test Record 2 70 WFM700 Series Waveform Monitors Service Manual...

Страница 103: ...cord Instrument Serial Number Certificate Number Audio Module Serial Number Temperature Relative Humidity Date of Calibration Technician Performance Test Minimum Incoming Outgoing Maximum Return Loss...

Страница 104: ...ror messages Pass N A AES 3 4 I O 20 dB FS indication on display Pass N A No error messages Pass N A AES 5 6 I O 20 dB FS indication on display Pass N A No error messages Pass N A AES 7 8 I O 20 dB FS...

Страница 105: ...ror messages Pass N A AES 3 4 I O 20 dB FS indication on display Pass N A No error messages Pass N A AES 5 6 I O 20 dB FS indication on display Pass N A No error messages Pass N A AES 7 8 I O 20 dB FS...

Страница 106: ...Date of Calibration Technician Performance Test Maximum Outgoing Incoming Minimum Output Amplitude Rise Time and Fall Time AES 1 2 I O Amplitude 0 9 V 1 1 V Rise Time 30 ns 44 ns Fall Time 30 ns 44 ns...

Страница 107: ...Adjustment Procedures...

Страница 108: ......

Страница 109: ...ar or if the instrument fails any of the Performance Tests starting on page 2 9 Adjustment After Repair After repairing the instrument use the Performance Verification procedures to verify operation I...

Страница 110: ...stment procedures WFM700 Test Equipment Requirements Example 1 A HD M HD serial digital video test signal generator 1080i 59 94 100 color bar Tektronix TG2000 with HDVG1 module D D D SD serial digital...

Страница 111: ...hese procedures require the removal of the cabinet Read the section Before Performing Adjustment Procedures on page 3 1 It s recommended that this procedure be performed in its entirety and in the ord...

Страница 112: ...oscilloscope if necessary 6 Adjust R296 for a display of 800 mV 10 mV on the test oscilloscope The following substeps will help obtain a measurable display on the test oscilloscope a Ensure that the t...

Страница 113: ...DVG 525 line color bar signal test oscilloscope 75 8 coaxial cable 1 Connect the SD video generator to the Video Module under test using a 75 8 cable 2 Set the SD video generator for a 525 format 100...

Страница 114: ...rigger position to 90 c Set the display style to dots d Set the trigger level to zero and to neglect glitches of either polarity for widths to 30 ns e The oscilloscope display should show a few random...

Страница 115: ...enu 9 Set the test oscilloscope to view the first color bar The following oscillo scope settings normally provide a usable display Vertical Scale 100 mV div Vertical Position 3 5 div Horizontal Scale...

Страница 116: ...djust R727 for a display of 700 mV on the test oscilloscope Measure the peak to peak amplitude of the waveform displayed on the oscilloscope See Figure 3 5 Black level First color bar Ground reference...

Страница 117: ...ton twice to exit menu 8 Set the test oscilloscope to view the first color bar The following oscillo scope settings normally provide a usable display Vertical Scale 100 mV div Vertical Position 3 5 di...

Страница 118: ...just R843 for a display of 700 mV on the test oscilloscope Measure the peak to peak amplitude of the waveform displayed on the oscilloscope See Figure 3 7 Black level First color bar Ground reference...

Страница 119: ...tter HPF Adjust Eye Sig BW Test These menu select ions appear only on the WFM700M WFM700 with a WFM7M video module Figure 3 8 Calibration routines menu The calibration routines are found in the config...

Страница 120: ...t signals Adjustment requirements Recommended test equipment and test signal REC601 800 mV test signal SD video generator set to 525 format 100 color bar The amplitude of the signal is typical Use the...

Страница 121: ...0 Press the CURSOR button and touch the Voltage soft key Voltage selected 11 Position the cursors so that the delta value matches the measured amplitude of the test signal in step 4 Adjust the and cur...

Страница 122: ...ervice Manual Adjust signal to cursors disregard peaks and dips Figure 3 10 Eye vertical scale adjustment screen 16 Touch the Save and Exit soft key to save the new calibration constant 17 Touch the C...

Страница 123: ...d RF generator you can modulate the signal with the following settings to obtain 2 UI of jitter Frequency 135 MHz Frequency Modulation OFF LFGEN2 Frequency 10 kHz LFGEN2 Waveshape SQUARE Phase Modulat...

Страница 124: ...ext Menu soft key 5 Touch the SD Jitter Gain Adjust soft key and then the Start SD Jitter Gain Adjust soft key 6 Adjust the signal amplitude using the General Purpose Knob to 2 UI as measured on the d...

Страница 125: ...tion 3 14 RADIANS RF Output ON Phase Modulation ON 75 8 coaxial cable 36 inches long NOTE If this test is performed out of sequence or the sequence of tests has been interrupted such as power off or i...

Страница 126: ...eform Monitors Service Manual Figure 3 12 HD Jitter gain adjustment screen One UI phase modulation achieved Under one UI phase modulation achieved Over one UI phase modulation achieved Figure 3 13 Eye...

Страница 127: ...long NOTE If this test is performed out of sequence or the sequence of tests has been interrupted such as power off or input from another module was selected perform the steps in this note to prepare...

Страница 128: ...NOTE If this test is performed out of sequence or the sequence of tests has been interrupted such as power off or input from another module was selected perform the steps in this note to prepare the i...

Страница 129: ...NOTE If this test is performed out of sequence or the sequence of tests has been interrupted such as power off or input from another module was selected perform the steps in this note to prepare the i...

Страница 130: ...DIANS RF Output ON Phase Modulation ON 75 8 coaxial cable 36 inches long NOTE If this test is performed out of sequence or the sequence of tests has been interrupted such as power off or input from an...

Страница 131: ...Adjustments WFM700 Series Waveform Monitors Service Manual 3 23 Figure 3 14 Jitter HPF adjustment screen...

Страница 132: ...Adjustments 3 24 WFM700 Series Waveform Monitors Service Manual...

Страница 133: ...Maintenance...

Страница 134: ......

Страница 135: ...cedure for disassembly of the instrument for cleaning H Troubleshooting Information for isolating and troubleshooting failed modules Included are instructions for operating the instrument s internal d...

Страница 136: ...atic sensitive circuit boards and components 2 Transport and store static sensitive modules in their static protected containers or on a metal rail Label any package that contains static sensitive boa...

Страница 137: ...nstrument and disconnect it from line voltage Use a dry low velocity stream of air to clean the interior of the chassis Use a soft bristle non static producing brush for cleaning around components If...

Страница 138: ...arts of items bent pins broken or frayed cables and damaged connec tors Repair or replace damaged or missing items frayed cables and defective modules The flat panel display must be treated with care...

Страница 139: ...ve and replace damaged circuit board Resistors Burned cracked broken blis tered condition Remove and replace damaged circuit board Solder connections Cold solder or rosin joints Resolder joint and cle...

Страница 140: ...t remove all the dust or dirt the instrument may be spray washed using a solution of 75 isopropyl alcohol by doing steps 4 through 8 4 Gain access to the parts to be cleaned by removing easily accessi...

Страница 141: ...ing ESD on page 4 2 WARNING Disconnect the power source from the WFM700 before beginning this or any procedure requiring you to remove the cover from the instrument chassis Fan blades and other compon...

Страница 142: ...rument with the front panel down on a work surface protecting the front panel with a pad or cover to prevent damage 2 At the rear of the cabinet remove the two attaching screws through the left and ri...

Страница 143: ...s 2 through 6 see Figure 4 2 for screw locations and Figure 4 6 for slot numbering Loosen the screws sufficiently to free the cutouts in the cover about 3 turns It is okay to remove the screws but be...

Страница 144: ...WFM700 Series Waveform Monitors Service Manual Remove these screws T 10 Loosen these screws T 10 Loosen these screws T 15 Remove these screws T 15 Loosen these screws T 10 Figure 4 2 WFM700 chassis c...

Страница 145: ...If removing the CPU plug in module the bottom screw needs to be removed instead of just loosened CPU and Real Time Display Modules With the introduction of the B version of the Real Time Display modu...

Страница 146: ...ual 2 If you have two video modules with a grounding clip installed remove the grounding clip see Figure 4 4 CAUTION When removing a module be careful to avoid damaging the EMI flaps on the rear panel...

Страница 147: ...of the module 4 Holding onto the lever and the rear panel BNC carefully pull the plug in module up and out of the instrument Be careful not to damage the EMI flaps on the rear of the modules Module P...

Страница 148: ...must have one of these modules installed in slot 2 CPU and Real Time Display Modules With the introduction of the B version of the Real Time Display module you must replace the CPU or Real Time Displ...

Страница 149: ...white ejector lever in the down position level with the module See Figure 4 7 4 Slide the module straight down into the plastic guide and line up the connectors on the module with the pins on the Main...

Страница 150: ...Procedures 4 16 WFM700 Series Waveform Monitors Service Manual Module Plastic guide Ejector lever Reinstall this screw T 15 Plastic guide Fan housing Video module grounding clip Figure 4 7 Inserting a...

Страница 151: ...allation Procedures WFM700 Series Waveform Monitors Service Manual 4 17 Place ground clip between modules Grounding clip makes contact on screw heads Figure 4 8 Installing the grounding clip between t...

Страница 152: ...ble fuses are required in the Artesyn power supply module to ensure safe operation of the instrument Although the two versions of the power supply module are directly interchange able at the module le...

Страница 153: ...entire removal procedure before proceeding 1 Remove the four screws T 10 securing the front panel assembly to the chassis two on the bottom and one on each side 2 Slide the assembly away from the chas...

Страница 154: ...cess to the push buttons and button elastomers See Figure 4 10 on page 4 21 while removing and reinstal ling these parts e Lift the metal chassis with circuit boards and LCD out of the front panel bez...

Страница 155: ...sembly in the reverse order of the removal procedure Flex circuit holder assembly Front bezel Align these notches with slots in the Front Bezel then press near each notch until you hear them snap into...

Страница 156: ...ns H Cabinet H Chassis Cover H Front Panel Assembly Read the entire removal procedure before proceeding 1 Remove the four screws T 15 securing each fan to the fan chassis 2 Unplug the fan connector s...

Страница 157: ...chassis 2 Unplug the two fan connectors from the Main board H J580 H J590 3 Tilt the fan assembly out from under the chassis tabs and lift the assembly out To reinstall the fan assembly read the enti...

Страница 158: ...4 11 Fan assembly mounting 3 After the bottom of the fan assembly is properly inserted tilt the assembly to the vertical position lining up the holes in both chassis for the screws 4 Install the two s...

Страница 159: ...oard H Cabinet H Chassis Cover H Power Supply H All installed modules H Front Panel Assembly H Fan Assembly Locate and remove 11 screws T 15 attaching the Main circuit board to the chassis See Figure...

Страница 160: ...Removal and Installation Procedures 4 26 WFM700 Series Waveform Monitors Service Manual...

Страница 161: ...them 3 LED Fault Codes Describes the fault indicated by the status of the front panel LEDs 4 Troubleshooting Trees The troubleshooting trees help diagnose problems that need to be looked at in more de...

Страница 162: ...te correctly Use the Front Panel Buttons and Touch Panel Troubleshooting Tree on page 4 38 Performance requirement not met as tested with the Performance Verifica tion procedures Perform the procedure...

Страница 163: ...the suspected input module the module is faulty If the fault remains in place same slot check the main board for bent pins or the main board is faulty A second video module installed in slot 3 can onl...

Страница 164: ...various tests Warning messages are displayed in yellow text PASS and FAIL messages are labeled PASS green text or FAIL red text Run Internal Digital Path Diagnostics The instrument checks the main di...

Страница 165: ...Page and View Previous Log Page soft keys to page through the log You can also touch the Erase NVRAM Log soft key to clear the diagnostic messages To print the Diagnostic Log you must have first conf...

Страница 166: ...l supplies is out of the allowable range In this state the instrument will be reset This state can occur due to an intermittent problem that requires service or from a drop out on the AC line If the f...

Страница 167: ...The troubleshooting trees may require some test equipment depending on the instrument fault You will need an oscilloscope to check waveforms for video display problems A digital voltmeter is needed to...

Страница 168: ...o Yes No Remove the modules from slots 4 and 5 to gain access to J470 Use a jumper to momentarily short the two pins of J470 together Do you hear the power supply relay click when shorting the pins to...

Страница 169: ...rating for several minutes within specified operating environment Yes No Yes Replace Main Interface board No Yes No Go to LED Fault Troubleshooting Tree 2 on page 4 36 Check that both fans are unobstr...

Страница 170: ...ck for bent connector pins on the Main Interface board Is the fault condition cleared Replace each module one at a time to identify the faulty module Disconnect and remove the Front Panel assembly Use...

Страница 171: ...13 dynamic data with prevalent 31 5 kHz signal Are the signals present at J890 Yes Replace Front Panel assembly Replace Main Interface board Power on the instrument and press and hold the internal re...

Страница 172: ...el assembly The display is functioning If other problems exist refer to Check for Problems on page 4 27 Yes No Perform the Touchpanel Calibration routine Does the calibration routine fail Check that t...

Страница 173: ...aulty module Do reported failures relate to any of the following items Empty area tests NVRAM tests FLASH tests PLX 9054 tests SDRAM tests Yes Replace the CPU board Yes Do reported failures relate to...

Страница 174: ...t the HD video generator with embedded audio to Input A 2 Press PRESET touch more then Restore Factory Settings 3 Press INPUT set Audio Embedded 4 With the test oscilloscope check test points TP29 TP3...

Страница 175: ...r Seal the shipping carton with an industrial stapler or strapping tape Contact the Service Center to get an RMA return material authorization number and any return or shipping information you may nee...

Страница 176: ...Repackaging Instructions 4 42 WFM700 Series Waveform Monitors Service Manual...

Страница 177: ...Replaceable Parts...

Страница 178: ......

Страница 179: ...anges to Tektronix products are sometimes made to accommodate improved components as they become available and to give you the benefit of the latest improvements Therefore when ordering parts it is im...

Страница 180: ...n the parts list Parts List Column Descriptions Column Column name Description 1 Figure Index Number Items in this section are referenced by figure and index numbers to the exploded view illustrations...

Страница 181: ...FERNANDO CA 91340 55322 SAMTEC INC 810 PROGRESS BLVD PO BOX 1147 NEW ALBANY IN 47150 1147 55566 RAF ELECTRONIC HARDWARE INC 95 SILVERMINE ROAD SEYMOUR CT 06483 57924 BOURNS INC INTEGRATED TECHNOLOGY D...

Страница 182: ...02 671 5751 03 B024089 1 CIRCUIT BD ASSY CPU 679 4528 03 TESTED 389 2673 01 WIRED 80009 671 5751 03 NOTE You must replace the CPU board with the same part number 671 4528 XX or 671 5751 XX that is in...

Страница 183: ...DESCR 16 210 1039 00 5 WASHER LOCK 0 521 ID INT 0 025 THK SST 0KB01 1224 02 00 0541C 17 333 4414 00 1 PANEL REAR R TD 0 062 AL 4 563 X 2 000 TK1943 333 4414 00 18 671 4529 00 B010100 B010468 1 CIRCUIT...

Страница 184: ...607 174 4780 00 23 174 4467 00 B011000 1 CABLE ASSY SP RIBBON IDC 5 22 26 AWG 15 00L 1 X 5 CONN BOTH ENDS 12 INCHES HEAT SHRINK IN THE CENTER INCLUDED IN THE 650 4315 51 060D9 174 4467 00 24 174 4779...

Страница 185: ...E SD HD SW WFM700A 80009 672 1680 50 672 1680 51 B010409 1 CKT BD ASSY 292 W EQUALIZER MEZZANINE SD HD SW WFM700A 80009 672 1680 51 672 1680 52 B010410 B022189 1 CKT BD ASSY 292 W EQUALIZER MEZZANINE...

Страница 186: ...e Parts 5 8 WFM700 Series Waveform Monitors Service Manual 1 2 3 4 5 6 7 8 9 10 11 12 13 14 15 16 17 18 19 20 21 22 23 24 15 25 26 27 28 29 30 31 32 33 6 Figure 5 1 WFM700 replaceable circuit boards a...

Страница 187: ...00 3 333 4338 00 B010100 B010999 1 PANEL REAR POWER SUPPLY 0 062 AL NOT INCLUDED IN THE 650 4315 50 TK2359 333 4338 00 4 174 4624 00 B010100 B010999 1 CABLE ASSY SP DISCRETE CPM 3 18 AWG 5 0 L FEMALE...

Страница 188: ...Replaceable Parts 5 10 WFM700 Series Waveform Monitors Service Manual 1 2 3 4 5 6 Figure 5 2 WFM700 power supply assembly and rear panel B010999 and below...

Страница 189: ...PANEL PUSHBUTTON F P LEFT ASSY 22670 119 6131 00 10 119 6132 00 1 SWITCH KEYPAD ELASTOMERIC FRONT PANEL PUSHBUTTON F P RIGHT ASSY 22670 119 3162 00 11 259 0163 00 1 FLEX CIRCUIT BD LEFT KEYBOARD 07416...

Страница 190: ...scription Qty Discont d Effective Tektronix part number 22 386 7154 00 1 FAN PLENUM 0 062 AL TK2359 386 7154 00 23 119 6554 00 2 FAN ASSEMBLY 12 V 0 11A 1 3W 28CFM 2450RPM 27DBA 80MM SQ X 20MM 6 IN 3...

Страница 191: ...Replaceable Parts WFM700 Series Waveform Monitors Service Manual 5 13 1 1 2 3 4 5 6 7 8 9 10 11 12 13 21 20 14 15 16 17 18 19 16 20 21 22 23 24 Figure 5 3 WFM700 replaceable chassis parts...

Страница 192: ...TESTED 389 3388 00 WIRED 80009 672 1720 50 2 131 3378 00 4 CONN RF JACK BNC 50 OHM FE MALE RTANG PCB REAR PNL 0 5 28 THD 0 625 H X 0 187 TAIL W O MTG FLANGE W MTG POSTS MET AL BODY 00779 227677 1 3 3...

Страница 193: ...Replaceable Parts WFM700 Series Waveform Monitors Service Manual 5 15 1 2 3 4 5 Figure 5 4 WFM700 Audio board option DG...

Страница 194: ...Replaceable Parts 5 16 WFM700 Series Waveform Monitors Service Manual...

Отзывы: