background image

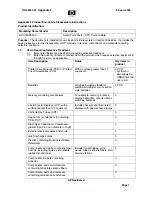
Specification

7D

14

TABLE 

1-1 (cont.)

Characteristic

Performance 

Requirement

Supplemental 

Information

EXT 

GATE (cont)

Max

 Input Voltage

±15

 volts (DC + Peak AC) to 10 mega­

hertz

DISPLAY

 TIME

Range

Continuously

 variable from

 0.1 seconds 

or less to at least 5 seconds

Detent

 Position

°° (infinite)

RESET

Input Requirements

At 

least 2 volts positive-going pulse.

Amplitude

Compatible

 with 

TTL Logic,

Logic 

"0" +500 millivolts


or 

less

Logic 

"1" at least

 +2 volts

Duration

At 

least 

500 

nanoseconds

Input

Resistance

8.2 kilohms 

within 10%

Capacitance

30 

picofarads

Max

 Input Voltage

±20 

volts

 (DC + Peak AC) to

 10 mega­

hertz

OUTPUT


SIGNALS

MONITOR

INT 1


MHz

Signal

Positive-going 

pulse

 from internal 

crystal oscillator

Amplitude

Open


Circuit

5


volts


within 10%

Source 

Impedance

Logic 

"0" 1 kilohms

Logic "1" 

2.2 

kilohms

1

 ms

 —

 10 s

Signal

Time marker pulses from

 internal gate.

Amplitude

Open 

Circuit

5


volts


within 10%

1-4

Содержание 7D14

Страница 1: ...INSTRUCTION MANUAL Serial Num hpr S 6 Ö 7D14 Tektronix Inc P O Box 500 Beaverton Oregon 97005 Phone 644 0161 Cables Tektronix 070 1097 00 371 DIGITAL COUNTER ...

Страница 2: ...e in your area This procedure will assure you the fastest possible service Please include the instrument Type or Part Number and Serial or Model Number with all requests for parts or service Specifications and price change privileges reserved Copyright 1971 by Tektronix Inc Beaverton Oregon Printed in the United States of America All rights reserved Contents of this publication may not be reproduc...

Страница 3: ...4 4 Component Replacement 4 4 SECTION 5 CALIBRATION Recalibration Interval 5 1 Test Equipment Required 5 1 Part I Performance Check 5 4 Part II Adjustment 5 12 SECTION 6 ELECTRICAL PARTS LIST Abbreviations and Symbols Parts Ordering Information SECTION 7 DIAGRAMSAND CIRCUIT BOARD ILLUSTRATIONS Symbols and Reference Designators Voltage and Waveform Conditions SECTION 8 MECHANICAL PARTS LIST Mechani...

Страница 4: ...7D14 ...

Страница 5: ... trigger pickoff from vertical amplifier unit which allows simultaneous signal viewing and counting and a trigger indicator analog CRT display to view the shaped input signal The following electrical characteristics are valid for instruments calibrated at an ambient temperature between 20 C and 30 C after a 20 minute warmup period TABLE 1 1 ELECTRICAL Characteristic Performance Requirement Supplem...

Страница 6: ...cope being used TRIG SOURCE is AC coupled BW 5 MHz Limits upper bandwidth 3 dB point to 5 megahertz within 1 megahertz Trigger PRESET Triggers on the positive slope at 0 volt level VAR LEVEL SLOPE control selects positive or nega tive slope triggering Range INPUT SENS Switch Setting 100 mV 0 5 volt to 0 5 volt 1 V 5 volts to 5 volts 10 V 50 volts to 50 volts MEASUREMENT INTERVAL Internal Time Base...

Страница 7: ...70 duty cycle Input R 10 kilohms within 20 C 30 picofarads within 30 Max Input Voltage 50 volts DC Peak AC to 2 mega hertz EXT GATE Input Requirements Turn On Level Compatible with TTL Logic Logic 1 at least 2 Volts Turn Off Level Logic 0 500 millivolts or less Risetime 500 nanoseconds Maximum Falltime 500 nanoseconds Maximum Minimum Off Time 500 nanoseconds Minimum On Time 200 nanoseconds Propaga...

Страница 8: ...ulse Amplitude Compatible with TTL Logic Logic 0 500 millivolts or less Logic 1 at least 2 volts Duration At least 500 nanoseconds Input Resistance 8 2 kilohms within 10 Capacitance 30 picofarads Max Input Voltage 20 volts DC Peak AC to 10 mega hertz OUTPUT SIGNALS MONITOR INT 1 MHz Signal Positive going pulse from internal crystal oscillator Amplitude Open Circuit 5 volts within 10 Source Impedan...

Страница 9: ...or CRT analog display of trigger output Display Amplitude 0 2 div within 25 Position Range Positionable over 8 div by interna control Usable Frequency Range System Dependent Signal Delay 5 nanoseconds TABLE 1 2 ENVIRONMENTAL CHARACTERISTICS Refer to the Specification for the associated oscillo scope TABLE 1 3 PHYSICAL Size Fits all 7000 series plug in compartments Weight 2 Pounds 6 Ounces 1075 gra...

Страница 10: ...ion corresponding to the plug in compartment used The measurement data portion of the display will be in the top division of the CRT graticule area and the measurement units MHz or kHz when displayed will appear in the bottom division It is not necessary to select the 7D14 with the oscillo scope Vertical or Horizontal Mode switches to view the digital display However in order to view the 7D14 Trig...

Страница 11: ...Operating Instructions 7D14 Fig 2 1 7D14 front panel controls and connectors 2 2 ...

Страница 12: ... trig gered on the negative going slope of the input signal as shown by the negative going edge symbol PRESET Pushbutton that selects a fixed trig ger point at the zero volt level on the positive going slope LEVEL SLOPE control inoperative VAR Pushbutton to allow manual selec tion of trigger level and slope with the LEVEL SLOPE control INPUT SENS P P Rotary switch that selects internal VOLTS or ex...

Страница 13: ...efore each use Preliminary Instructions 1 Install the 7D14 in any available plug in compart ment of a 7000 series oscilloscope referred to in this proce dure as the Indicator Oscilloscope 2 Connect the oscilloscope to a power source which meets the frequency and voltage requirements of the Indi cator Oscilloscope power supply 3 Turn the oscilloscope power on and allow about twenty minutes warmup t...

Страница 14: ...Oscilloscope This method of signal connection minimizes circuit loading for measurements requiring simultaneous counting and CRT display see Counting a Displayed Signal General Control Settings Introduction The following discussion provides control setup information for general measurement applications Further information can be found under Controls and Con nectors or in the discussion for a speci...

Страница 15: ...d area Each time the signal level including DC level rises above the upper hysteresis limit e2 and falls below the lower hysteresis limit e1 the trigger circuit produces a rectangular waveform as shown in Fig 2 3B This rectangular waveform is the signal actually counted by the counting circuits Generally the best point on a waveform for triggering the counter is where the slope is steep and theref...

Страница 16: ...urements and the longer intervals for measurements requiring high resolution Totalizing or counting a number of events is accom plished by counting during a time selected by the MANUAL GATE ON OFF pushbuttons The gate time is started by pressing the MANUAL GATE ON pushbutton and stopped by pressing the OFF button The manual mode is generally used to count a number of events for a rela tively long ...

Страница 17: ...he external signal to the REF FREQ CH B EXT IN connector and press the EXT IN pushbutton The function of the MEASUREMENT INTERVAL 1 ms 10 s pushbuttons is the same as when using the internal time base oscillator Ratio Measurements Ratio measurements compare the frequencies of two signals Normally the higher frequency signal is applied to Channel A via CH A INPUT connector or internal TRIG SOURCE a...

Страница 18: ...GATE STORAGE switch for the desired mode The OFF position is usually used for long gate intervals 2 Install the 7D14 in any available plug in compart ment of the Tektronix 7000 series oscilloscope 3 Turn the oscilloscope power on Allow about 20 minutes warmup 4 Advance the oscilloscope Readout control to obtain a usable readout display 5 Connect the input signal to the CH A INPUT connector 6 Set t...

Страница 19: ... vertical com partment originating the signal to be counted In addition dual trace amplifier units contain further trigger source selection This must be set to select the correct channel Signals selected in the TRIG SOURCE position are AC coupled which limits the low frequency response The high frequency response is limited by the bandwidth of the amplifier unit being used This mode of operation i...

Страница 20: ...t the Indicator Oscilloscope Vertical Mode switch to Chop 5 Adjust the Display Pos adjustment R866 to position the Trigger Indicator display as desired At higher frequencies care should be taken that the delays to the vertical plates of the CRT match reasonably well If these delays are not the same the presentation will not be a correct indication of the triggering point A delay cable between the ...

Страница 21: ...rate a uniform trigger output Clock The Clock output is switched on and off by the GATE signal from the Time Base and Control circuit to drive the First Decade Counter Also an output from the Trigger Generator prior to the gated stage is provided to the oscilloscope vertical system to be displayed on the CRT Logic Fundamentals Signal lines in this instrument are named to indicate the state at whic...

Страница 22: ... toT2 the GATE is on and the counter counts the input signal The front panel GATE indicator lamp is on during the GATE on time The GATE on time is determined by the MEASUREMENT INTERVAL switch setting see Sec tion 2 The signals which determine when the counter is allowed to count when the readout display is updated and when the counter is reset are generated in the Time Base and Control circuit Th...

Страница 23: ...Amplifier The in put coupling relay K100 is actuated by COUPLING switch S5 When the AC button is pressed K100 is actuated to pass the signal through C1 to the Input Sensitivity relays When the DC button is pressed K100 is not actuated The signal is connected directly from the CH A INPUT connec tor to the Input Sensitivity relays INPUT SENS Switch Signals to be counted are applied to the minus inpu...

Страница 24: ...W Fig 3 3 Channel A Signal Conditioning circuit detailed block diagram Circuit Description 7D14 ...

Страница 25: ...high frequency response of this stage C132 provides high frequency compensation The sum of the currents into the minus input summing point sets the Trigger Amplifier output DC level as deter mined by PRESET VAR switch S20 When the PRESET button is in the voltage level at the junction of R121 R126 R127 R128 is determined by R125 Preset R125 adjusts the current into the summing point through R128 R1...

Страница 26: ...ow impedance 7 5 volt reference level at the base of Q180 Decoupling for the 7 5 volt reference level is provided by C178 Reference zener diode VR176 estab lishes a low impedance 2 5 volt reference level at the cathode of tunnel diode CR174 Decoupling is provided by C176 Signal switching is accomplished by connecting the signal at the collector of Q270 through either Q278 or Q275 as determined by ...

Страница 27: ...s on command of the DCU RESET input from the Time Base and Control circuit These outputs reset the Binary and Quinary Counter stages to the zero count state Register Counter and Readout Encoding circuit through Q339 Also the Binary Counter output drives the Quinary Counter through the Quinary Driver stage The Quinary Driver shapes the Binary Counter output to provide a more constant amplitude outp...

Страница 28: ... of three levels and this will result in one of three voltage levels dropped across the load resistor For example the voltage dropped across load resistor B may be due to one current unit la or t j two current units la I or zero The voltage levels resulting from zero one and two current units through a load resistor are represented in Fig 3 6 B and are labelled 0 and respectively The RESET input r...

Страница 29: ... w CD Fig 3 6 A Quinary Counter simplified schematic diagram B Multivibrator current units output voltage levels chart Circuit Description 7D14 ...

Страница 30: ...er combinations result in zero or a LO output BCD Encoder BCD Encoder U420 U434 translates the Quinary Counter outputs to encode the 21 22 and 23 bits of the BCD output the 2 bit is encoded directly from the Binary Counter output The five Quinary Counter output lines are connected to the bases of five transistor 1C array U420 The transistor in this array which has the most positive base will condu...

Страница 31: ...FLOW output HI The time slot pulses from the oscilloscope readout system are connected to the Counter circuit and to the Readout Encoding circuit through the Interface Connector The time slot pulses are inverted by the Time Slot Inverters to provide time slot data to the Multiplexers Zero Cancel Logic and to the Readout Encoding circuit The BCD outputs of the Storage Registers are applied to the M...

Страница 32: ...I to LO FULL COUNT output to the input of U508B U508B inverts the transition to provide a positive going trigger to U510A This triggers U510A to transfer the HI level at the D input to the 1 output When DISPLAY goes LO Q512 provides a HI to U504B and U504C U504B then provides a LÖ to the direct clear input of U510B This clears U510B for a LO level OVERFLOW output When DCU RESET goes LO U510A is cl...

Страница 33: ... 3 13 Fig 3 11 Logic diagram for Zero Cancel Logic stage Circuit Description 7D14 ...

Страница 34: ...digit group is shown in Fig 3 12 READOUT ENCODING CIRCUIT General A discussion entitled Introduction to the Readout System following the 7D14 Circuit Description gives a brief description of the readout system used in Tektronix 7000 Series Oscilloscopes Refer to this description for more information on operation of the readout system Inputs Outputs 8th Digit BCD OVERFLOW 8th Digit Zero Cancel a LO...

Страница 35: ...Encodes z TS 7 Encodes 4th digit Not used TS 8 Encodes 3rd digit Not used TS 9 Encodes 2nd digit Not used TS 10 Encodes 1st digit Not used Time slot pulse TS 2 from the oscilloscope readout system is connected to the Over Range Indicator stage The Over Range Indicator stage encodes the Channel 1 outputs for greater then symbol on command of the OVER FLOW input The MEASUREMENT INTERVAL Switch Logic...

Страница 36: ...put for decimal point location 5 The TS 1 current through R671 and R659 is sinked to ground through satu rated transistors Q670 and Q658 respectively When the 10 ms or 10 s input is LO the CR665 CR666 NOR gate output is LO This LO level reverse biases Q663 and Q670 The collector of Q663 goes HI to provide the DP 6 output Due to reverse bias Q670 is cut off to allow the TS 1 current through R671 to...

Страница 37: ...Circuit Description 7D14 Fig 3 15 Simplified schematic diagram of the diode logic NOR gates Decimal Logic and Measurement Units Logic stages 3 17 ...

Страница 38: ...3 18 Fig 3 16 Time Base and Control circuit detailed block diagram Circuit Description 7D14 ...

Страница 39: ...e is grounded This results in a LO RESET output Manual Gate Storage The Counter and Readout Encoding circuit INTERNAL output is connected to the Display Enable stage through the off position of the Manual Gate Storage switch When the INTERNAL input is HI the switch position has no effect on the Display Enable stage DISPLAY output When the INTERNAL input is LO it can be applied to the Display Enabl...

Страница 40: ...MHz position Channel B Input Shaper The Channel B Input Shaper shapes and amplifies signals connected to the REF FREQ CH B EXT IN connector when the EXT IN button is pressed The signal connected to the EXT IN connector is AC coupled to the base of Q613 through C610 R610 and C611 Q613 and Q618 make up an emitter coupled bistable multivibrator The multivibrator shapes the input signal to provide a s...

Страница 41: ...ne of the internal gate posi tions 1 ms through 10 s This HI level inhibits the Manual External Gate Input stage by applying forward bias to saturate U729B through CR722 R722 and Q714 through R717 Due to saturation the collectors of Q714 and U729B are LO The LO at the collector of Q714 holds U708B pin 5 LO This results in a HI level output at U708B pin 4 The LO at the collector of U729B applies re...

Страница 42: ...ay Generator U729D and to the Lamp Driver Q776 to turn on the GATE indicator light DS80 When the GATE is on the collector of Q763 is LO When the GATE is turned off the LO to HI transition at the collector of Q763 is coupled through C765 R765 to momentarily turn on Q768 The collector of Q768 goes LO to provide a LO CLEAR output Display Enable The Display Enable stage consists of inverter transistor...

Страница 43: ...is with the analog waveform display The Readout System produces a pulse train consisting of ten negative going pulses called time slots These pulses represent a possible character in a readout word and each is assigned a time slot number corresponding to its position in the word Each time slot pulse is directed to one of ten output lines labelled TS 1 through TS 10 time slots one through ten which...

Страница 44: ...NOTES ...

Страница 45: ... the unit Moreover minor troubles not apparent during regular operation may be revealed and corrected TROUBLESHOOTING Cleaning Avoid the use of chemical cleaning agents which might damage the plastics in this instrument Avoid chemicals containing benzene toluene xylene ace tone or similar solvents General The following is provided to augment information con tained in other sections of this manual ...

Страница 46: ...NJ Fig 4 1 Electrode configuration for semiconductors in this instrument I ...

Страница 47: ...l connector see the Oper ating Instructions section 2 Check Associated Equipment Before proceeding with troubleshooting of the 7D14 check that the equipment used with this instrument is operating correctly If possible 4 Check Instrument Performance Check the calibration of the unit or the affected circuit by performing Part I Performance Check of Section 5 The apparent trouble may only be a result...

Страница 48: ...ith a capacitance meter or by checking whether the capacitor passes AC signals 7 Repair and Readjust the Circuit Special techniques required to replace components in this unit are given under Component Replacement Be sure to check the perform ance of any circuit that has been repaired or that has had any electrical components replaced Recalibration of the affected circuit may be necessary REPLACEM...

Страница 49: ...isconnect the associated multi pin connector s from the circuit board 9 Uniformly tighten the securing screws Recommended torque four to six inch pounds 10 Tighten the nut on the rear of the CH A INPUT connector B LOGIC AND CONTROL CIRCUIT BOARD REPLACE MENT 1 Remove the High Frequency Counter circuit board following the procedure given under A 4 Remove the defective unit 5 Disconnect the wires fr...

Страница 50: ...lacement Transistors and IC s should not be replaced unless they are actually defective If removed from their sockets during routing maintenance return them to their original sockets Special care must be given to integrated circuit leads because they can easily be damaged in removal from sockets Unnecessary replacement or switching of compo nents may affect the calibration of the instrument When a...

Страница 51: ...ent Required list pre ceding the desired portion To prevent unnecessary recali bration of other parts of the instrument readjust only if the tolerance given in the CHECK part of the step is not met If re adjustment is necessary also check the calibra tion of any steps listed in the INTERACTION part of the step Complete Performance Check Adjustment To completely check and adjust all parts of this i...

Страница 52: ...tput frequency changes For example General Radio Model 1310 B Oscillator 8 Pulse Generator 1 Pulse period 700 nanoseconds ns pulse width variable from 200 ns to 500 ns maximum risetime and falltime 500 ns trigger internal or manual output amplitude variable from two to three volts For example Tektronix Type 115 Pulse Generator 9 Time Mark Generator 1 Marker outputs one milli second to one second s...

Страница 53: ... Trigger Source Midrange Adjust for well defined display Counterclockwise Midrange As desired As desired 0 4 V 1 kHz Right A Right Vert Right Vert 26 Tuning tool 2 Handle for 003 0310 00 and 003 0334 00 inserts Tektronix Parts No 003 0307 00 27 Tuning tool insert 2 For variable capacitors Tek tronix Part No 003 0334 00 28 Tuning tool insert 2 For 5 64 inch ID hex cores Tektronix Part No 003 0310 0...

Страница 54: ...vity 10 Check External Gate 11 Check Manual Gate 12 Check External Reset 5 9 5 10 5 10 13 Check INT 1 MHz Output Page 5 11 14 Check Internal Gate Time Mark Output 5 11 15 Check Trigger Indicator 5 11 Preliminary Procedure for Performance Check NOTE The performance of this instrument can be checked at any temperature within the 0 C to 50 C range unless stated otherwise 1 Install the 7D14 in the B h...

Страница 55: ...nce frequency d Disconnect the 50 ohm in line termination from the amplifier unit input and reconnect it to the CH A INPUT connector e Set the high frequency generator for a 500 MHz out put f CHECK The readout display should show a steady count of about 500 00000 MHz Change the dial setting if necessary to obtain a count of at least 500 MHz NOTE This procedure checks the 7D14 frequency range to 50...

Страница 56: ...ertical deflection factor of 2 volts division d Set the low frequency generator for a five division display 10 volts at 10 kHz e CHECK Readout display for a steady count at about 10 kHz 4 Check TRIG SOURCE Sensitivity a Change the following control settings 7D14 INPUT SENS TRIG SOURCE COUPLING DC b Set the low frequency generator for a 1 5 division dis play 3 volts at 10 kHz c CHECK Readout displa...

Страница 57: ... for a five division display 1 volt of a 50 kHz signal e Set the time base unit for a sweep rate of 20 µs division f Set the time base unit to trigger at the center of the positive slope region g Rotate the 7D14 LEVEL SLOPE control throughout the positive slope range from the 6 00 o clock to 12 00 o clock positions while observing the Trigger Indicator and sine wave generator displays h CHECK Trig...

Страница 58: ...put connector e Set the time base unit for a sweep rate of 5 µs division externally triggered on the frequency standard signal f Set the Indicator Oscilloscope intensity control as necessary to observe the one second intensity modulation of the CRT display g CHECK CRT display the movement of the INT 1 MHz markers across the CRT should not exceed one divi sion in one second h CALIBRATION See step 6...

Страница 59: ...indicator light should blink on and off and the readout display should show a count of about 0 500 MHz i Set the time base unit for a sweep rate of 0 5 second division j Set the low frequency generator for a four division display 0 8 volt at 10 hertz k Press the RESET button to turn off the GATE indi cator and reset the readout display to zero count l CHECK Release the RESET button the GATE indi c...

Страница 60: ...ector Connect the output of the T connector to the amplifier unit input through the 18 inch BNC cable c Set the time base unit for a sweep rate of two seconds division d Set the time mark generator for one second markers e Momentarily press the RESET button f Press the MANUAL GATE ON button count ten time marks on the CRT then press the MANUAL GATE OFF button g CHECK Readout display for a count of...

Страница 61: ... amplifier unit input through the BSM to BNC female adapter and 18 inch BNC cable c Set the time base unit for a sweep rate of 0 2 ms division d CHECK CRT display for vertical deflection of five divisions 0 5 division Positive gate duration should be about five divisions e Disconnect the cable and adapter 15 Check Trigger Indicator a Change the following control settings Indicator Oscilloscope Ver...

Страница 62: ...djustment 7 Adjust Trigger Indicator Display Post 5 17 tioning R866 Preliminary Procedure for Adjustment NOTE This instrument should be adjusted at an ambient temperature of 25 C 5 C for best overall accuracy 1 Remove the right side shield from the 7D14 and the right side panel from the Indicator Oscilloscope 2 Install the 7D14 in the B horizontal plug in compart ment of the Indicator Oscilloscope...

Страница 63: ... 15 Three inch screwdriver Control Settings Set the controls as given under Preliminary Control Settings Location of Adjustments and Test Points The locations of the Channel A Adjustments and Test Points are shown in Fig 5 2 1 Adjust Input Zero a Set the INPUT SENS control to 50 Ω 100 mV b Connect the digital voltmeter between test point 118 and chassis ground c CHECK Voltmeter reading zero volt 0...

Страница 64: ...er unit input h Connect the 10X probe tip to test point 254 and connect the probe ground to chassis ground i Center the CRT display with the amplifier unit posi tion control j CHECK CRT display for the trigger switching points to be centered on the sine wave as shown in Fig 5 3 k ADJUST Preset adjustment R125 to center the trigger switching points on the sine wave display l CHECK Digital voltmeter...

Страница 65: ...Hz count note the voltmeter reading l ADJUST Ref Voltage adjustment R320 for a volt meter reading halfway between the readings obtained in parts i and j of this step For example if the upper volt meter reading is 3 70 volts and the lower voltmeter reading is 2 90 volts the difference between the two is 0 80 volt Adjust R320 for the lower reading plus one half the difference or 3 30 volts m Disconn...

Страница 66: ...e screw Fig 5 4 Location of Measurement Interval and Output Signal Adjustments on left side of instrument e Connect the frequency standard one megahertz out put to the CH A INPUT f Press the MEASUREMENT INTERVAL 10 s button and the BW 5 MHz button g Place the 7D14 with the left side on the bench so the crystal oscillator is facing downward Allow the unit to warm up in this position for about 15 mi...

Страница 67: ... division d Connect the medium frequency constant amplitude sine wave generator to the amplifier unit input through the five nanosecond GR cable and 50 ohm in line termination e Set the medium frequency generator for a three division display 150 millivolts at the 50 kilohertz refer ence frequency f Disconnect the generator from the amplifier unit input g Connect the medium frequency generator to t...

Страница 68: ...NOTES ...

Страница 69: ...lystyrene EMC electrolytic metal cased prec precision EMT electrolytic metal tubular PT paper tubular ext external PTM paper or plastic tubular molded F 1 focus and intensity RHB round head brass FHB flat head brass RHS round head steel FHS flat head steel SE single end Fil HB fillister head brass SN or S N serial number Fil HS fillister head steel S or SW switch h height or high TC temperature co...

Страница 70: ...g information in your order Part number instrument type or number serial or model number and modification number if applicable If a part you have ordered has been replaced with a new or improved part your local Tektronix Inc Field Office or representative will contact you concerning any change in part number SPECIAL NOTES AND SYMBOLS xooo Part first added at this serial number 00 X Part removed af...

Страница 71: ... Board Assembly 6 1 A2 LOGIC Circuit Board Assembly 6 12 A3 TRIGGER SWITCH Circuit Board Assembly 6 21 A4 BANDWIDTH SWITCH Circuit Board Assembly 6 21 A5 COUPLING SWITCH Circuit Board Assembly 6 21 A6 REF FREQ SWITCH Circuit Board Assembly 6 22 A7 INTERVAL SWITCH Circuit Board Assembly 6 22 ...

Страница 72: ...tact J62 136 0387 00 Socket pin term Resistors Resistors are fixed composition 10 unless otherwise indicated R221 311 0991 00 R70 311 1114 00 125 kΩ Var 2 5 MΩ Var S10 Wired or Unwired 260 1219 00 Switch Rotary INPUT SENS Al HIGH FREQ COUNTER Circuit Board Assembly 670 0993 00 Complete Board Tolerance 20 unless otherwise indicated Capacitors C1 283 0187 00 0 047 µF Cer 400 V C100 283 0000 00 0 001...

Страница 73: ...150 V C195 290 0135 00 15 µF Elect 20 V C196 290 0135 00 15 µF Elect 20 V C197 283 0003 00 0 01 µF Cer 150 V C199 290 0135 00 15 µF Elect 20 V C203 283 0000 00 0 001 µF Cer 500 V C209 283 0000 00 0 001 µF Cer 500 V C210 283 0111 00 0 1 µF Cer 50 V C212 290 0114 00 47 µF Elect 6V C214 281 0653 00 3 3 pF Cer 200 V 1 pF C219 281 0609 00 1 pF Cer 200 V 10 C220 281 0613 00 10 pF Cer 200 V 10 C221 281 0...

Страница 74: ...r 150 V C446 283 0003 00 0 01 µF Cer 150 V C450 283 0003 00 0 01 µF Cer 150 V C457 283 0003 00 0 01 µF Cer 150 V C463 283 0003 00 0 01 µF Cer 150 V Semiconductor Device Diodes CR100 152 0185 00 Silicon Replaceable by 1N4152 CR114 152 0323 00 Silicon Tek Spec CR115 152 0322 00 Silicon Tek Spec CR116 152 0322 00 Silicon Tek Spec CR117 152 0323 00 Silicon Tek Spec CR135 152 0185 00 Silicon Replaceabl...

Страница 75: ...ceable by 1N4152 CR411 152 0322 00 Silicon Tek Spec CR412 152 0322 00 Silicon Tek Spec VR176 152 0279 00 Zener 1N751A 400 mW 5 1 V 5 VR178 152 0127 00 Zener 1N755A 400 mW 7 5 V 5 VR210 152 0149 00 Zener 1N961B 400 mW 10V 5 VR331 VR335 VR348 VR364 VR376 VR384 VR392 VR402 153 0048 00 Zener Set of 8 400 mW 6 2 V VR413 152 0278 00 Zener 1N4372A 400 mW 3 V 5 Relays K100 148 0070 00 B010100 B010189 Arma...

Страница 76: ...r LR269 103 0407 00 20 nH wound on a 51 Ω W 5 resistor LR279 108 0407 00 20 nH wound on a 51 Ω W 5 resistor Transistors Q130 151 1031 00 Silicon FET N channel junction type Q1322 153 0589 00 Silicon NPN 70 72 2N5652 Q136 151 0190 00 Silicon NPN TO 92 2N3904 Q1413 153 0589 00 Silicon NPN 70 72 2N5652 Q147 151 0271 00 Silicon PNP TO 18 Tek Spec Q152 151 0345 00 Silicon PNP Micro Tee very High Freq Q...

Страница 77: ...0230 00 B010100 B010359 Silicon NPN TO 105 Selected from RCA 40235 Q364 151 0259 00 B010360 Silicon NPN TO 106 Selected from 2N3563 Q374 151 0230 00 B010100 B010359 Silicon NPN TO 105 Selected from RCA 40235 Q374 151 0282 00 B010360 Silicon NPN TO 72 2N5179 Q376 151 0230 00 B010100 B010359 Silicon NPN TO 105 Selected from RCA 40235 Q376 151 0259 00 B010360 Silicon NPN TO 106 Selected from 2N3563 Q...

Страница 78: ...0184 00 806 Ω W Prec 17 R135 321 0086 00 76 8 Ω W Prec 1 R136 317 0274 00 270 kΩ W 57 R137 317 0105 00 1 MΩ W 57 R138 321 0126 00 200 Ω w Prec 17 R140 321 0085 00 75 Ω W Prec 17 R142 317 0221 00 220 Ω W 57 R144 321 0126 00 200 Ω W Prec 17 R145 321 0114 00 150 Ω W Prec 17 R148 315 0820 00 82 Ω W 57 R149 321 0055 00 36 5 Ω w Prec 17 R151 317 0100 00 B010100 B010102X 10Ω W 57 R151 317 0750 00 75 Ω W ...

Страница 79: ... 00 2 7 kΩ w 5 R220 317 0201 00 200 Ω w 5 R222 321 0085 00 75 Ω W Prec 1 R225 311 0613 00 100 kΩ Var R226 317 0105 00 1 MΩ w 5 R227 317 0512 00 5 1 kΩ w 5 R228 317 0474 00 470 kΩ w 5 R230 317 0471 00 470 Ω w 5 R231 321 0239 00 3 01 kΩ W Prec 1 R232 317 0510 00 51 Ω W 5 R233 323 0181 00 750 Ω W Prec 1 R234 321 0184 00 806 Ω w Prec 1 R235 321 0086 00 76 8 Ω w Prec 1 R236 317 0274 00 270 kΩ W 5 R237 ...

Страница 80: ...2 00 20 3 kΩ W Prec R304 317 0333 00 33 kΩ W 5 R306 317 0123 00 12 kΩ W 5 R308 317 0273 00 27 kΩ W 5 R310 317 0102 00 1 kΩ W 5 R312 317 0622 00 6 2 kΩ W 5 R314 317 0432 00 4 3 kΩ w 5 R316 317 0182 00 1 8 kΩ w 5 R318 303 0360 00 36 Ω 1 w 5 R320 311 0634 00 500 Ω Var R321 317 0302 00 3 kΩ w 5 R324 317 0103 00 10 kΩ W 5 R327 317 0222 00 2 2 kΩ W 5 R331 317 0510 00 51 Ω W 5 R332 315 0102 00 1 kΩ W 5 R...

Страница 81: ... kΩ W 5 R371 317 0392 00 3 9 kΩ W 5 R372 321 0114 00 B010100 B010359 150 Ω W Prec 1 R372 321 0097 00 B010360 100Ω W Prec 1 R373 317 0392 00 3 9 kΩ w 5 R375 321 0199 00 B010100 B010359 1 15 kΩ W Prec 1 R375 321 0175 00 B010360 649 Ω W Prec 1 R377 321 0239 00 3 01 kΩ W Prec 1 R379 317 0392 00 3 9 kΩ W 5 R380 321 0114 00 B010100 B010359 150 Ω W Prec 1 R380 321 0097 00 B010360 100 Ω W Prec 1 R381 317 ...

Страница 82: ...5 turns bifilar Toroid 5 turns bifilar Integrated Circuits U161 156 0067 00 Op amp Replaceable by Fairchild µA741C U305 156 0048 00 Linear Replaceable by RCA CA3046 U329 155 0046 00 Monolithic U420 156 0048 00 Linear Replaceable by RCA CA3046 U434 156 0030 00 Quad 2 input gate Replaceable by T l SN7400N U440 156 0097 00 U442 156 0097 00 U444 156 0091 00 U446 156 0091 00 U448 156 0091 00 U450 156 0...

Страница 83: ...92A A2 LOGIC Circuit Board Assembly 670 0992 00 670 0992 01 670 0992 02 B010100 B010129 B010130 B010214 B010215 Complete Board Complete Board Complete Board Capacitors Tolerance 20 unless otherwise indicated C520 283 0003 00 0 001 µF Cer 150 V C540 283 0003 00 0 01 µF Cer 150 V C588 283 0003 00 0 01 µF Cer 150 V C604 283 0076 00 27 pF Cer 500 V 10 C610 283 0076 00 27 pF Cer 500 V 10 C611 283 0212 ...

Страница 84: ...Replaceable by 1N4152 CR665 152 0185 00 Silicon Replaceable by 1N4152 CR666 152 0185 00 Silicon Replaceable by 1N4152 CR671 152 0185 00 Silicon Replaceable by 1N4152 CR676 152 0185 00 Silicon Replaceable by 1N4152 CR677 152 0185 00 Silicon Replaceable by 1N4152 CR678 152 0185 00 Silicon Replaceable by 1N4152 CR681 152 0185 00 Silicon Replaceable by 1N4152 CR701 152 0185 00 Silicon Replaceable by 1...

Страница 85: ...RCA 40235 Q512 151 0333 00 B010360 Silicon NPN TO 92 Selected from MPS 918 Q515 151 0190 00 Silicon NPN TO 92 2N3904 Q570 151 0220 00 Silicon PNP TO 18 2N4122 Q581 151 0190 00 Silicon NPN TO 92 2N3904 Q591 151 0190 00 Silicon NPN TO 92 2N3904 Q606 151 0190 00 Silicon NPN TO 92 2N3904 Q613 151 0192 00 Silicon NPN TO 92 Replaceable by MPS6521 Q618 151 0192 00 Silicon NPN TO 92 Replaceable by MPS6521...

Страница 86: ... 00 1 kΩ w 5 R516 315 0473 00 47 kΩ w 5 R517 315 0473 00 47 kΩ w 5 R518 315 0473 00 47 kΩ w 5 R519 315 0473 00 47 kΩ W 5 R521 317 0101 00 100 Ω W 5 R522 315 0163 00 16 kΩ w 5 R523 315 0472 00 4 7 kΩ W 5 R525 317 0101 00 100 Ω w 5 R526 315 0163 00 16 kΩ w 5 R527 315 0472 00 4 7 k w 5 R529 317 0101 00 100 Ω w 5 R530 315 0163 00 16 kΩ W 5 R531 315 0472 00 4 7 kΩ w 5 R533 317 0101 00 100 Ω w 5 R534 31...

Страница 87: ...3 00 10 kΩ W 5 R575 317 0273 00 27 kΩ W 5 R576 315 0333 00 33 kΩ W 5 R580 315 0123 00 12 kΩ W 5 R582 315 0104 00 100 kΩ w 5 R583 315 0562 00 5 6 kΩ W 5 R584 315 0123 00 12 kΩ W 5 R586 315 0154 00 150kΩ w 5 R588 315 0221 00 220 Ω W 5 R590 321 0305 00 14 7 kΩ w Prec 1 R592 315 0104 00 lOOkΩ W 5 R593 315 0562 00 5 6 kΩ W 5 R594 315 0123 00 12 kΩ W 5 R596 315 0473 00 47 kΩ W 5 R602 315 0473 00 47 kΩ W...

Страница 88: ...Ω W 5 R668 315 0822 00 8 2 kΩ w 5 R669 315 0154 00 150kΩ w 5 R671 315 0154 00 150 kΩ w 5 R673 321 0335 00 30 1 kΩ W Prec 1 R674 321 0327 00 24 9 kΩ w Prec 1 R677 315 0153 00 15 kΩ W 5 R678 315 0153 00 15 kΩ W 5 R679 315 0154 00 150 kΩ w 5 R681 315 0154 00 150 kΩ W 5 R682 315 0103 00 10 kΩ W 5 R683 321 0327 00 24 9 kΩ W Prec 1 R684 321 0356 00 49 9 kΩ W Prec 1 R686 321 0335 00 30 1 kΩ W Prec 1 R687...

Страница 89: ...5 0102 00 1 kΩ w 5 5 5 5 5 R747 315 0472 00 4 7 kΩ w R749 315 0103 00 10 kΩ w R750 315 0101 00 100 Ω w R752 322 0189 00 909 Ω w Prec R754 315 0101 00 100 Ω W 5 5 5 1 5 R757 315 0102 00 1 kΩ w R758 315 0102 00 1 kΩ w R759 315 0473 00 47 kΩ w R760 315 0222 00 2 2 kΩ w R761 315 0102 00 1 kΩ w 5 5 5 5 5 R763 315 0102 00 1 kΩ w 5 R765 315 0102 00 1 kΩ w 5 R766 315 0473 00 47 kΩ W 5 R768 315 0223 00 22 ...

Страница 90: ...2 00 1 5 kΩ AW 5 R862 317 0121 00 120 Ω AW 5 R863 315 0471 00 470 Ω AW 5 R864 315 0152 00 1 5 kΩ AW 5 R866 311 0607 00 10 kΩ Var R868 317 0510 00 51 Ω A W 5 R869 317 0510 00 51 Ω AW 5 R871 315 0510 00 51 Ω AW 5 R982 315 0101 00 100 Ω AW 5 S70 Wired or Unwired 260 0723 00 Switch Slide Transformers T755 120 0286 00 T859 120 0286 00 T870 120 0444 00 Toroid 2 turns bifilar Toroid 2 turns bifilar Toroi...

Страница 91: ...1N U548 156 0057 00 Quad 2 input NAND gate w open coll Replaceable by T l SN7401N U560 155 0038 01 D A converter U602 156 0091 00 Presettable low pwr decade counter Replaceable by Signetics N8292A U628 156 0091 00 Presettable low pwr decade counter Replaceable by Signetics N8292A U630 156 0091 00 Presettable low pwr decade counter Replaceable by Signetics N8292A U632 156 0091 00 Presettable low pw...

Страница 92: ...s Pushbutton VAR PRESET A4 BANDWIDTH SWITCH Circuit Board Assembly 670 1327 00 670 1327 01 B010100 B010130 B010129 Complete Complete Board Board Bulb DS8 150 0048 01 Incandescent 683 selected Wired or Unwired Switch S84 670 1327 00 B010100 B010129 Pushbutton BANDWIDTH S84 670 1327 01 B010130 Pushbutton BANDWIDTH A5 COUPLING SWITCH Circuit Board Assembly 670 1328 00 Complete Board Bulb DS5 150 0048...

Страница 93: ...EXT IN A7 INTERVAL SWITCH Circuit Board Assembly 670 1326 00 670 1326 01 B010100 B010129 Complete Board B010130 Complete Board DS60 150 0048 01 DS61 150 0048 01 Bulbs Incandescent 683 selected Incandescent 683 selected Resistor Resistors are fixed composition 10 unless otherwise indicated R61 315 0102 00 1 kΩ W 5 See Mechanical Parts List for replacement parts Wired or Unwired Switches S60A P S60B...

Страница 94: ... in hexagon Connection soldered to circuit board Connection made to circuit board with interconnecting pin Blue tint encloses components located on circuit board P O circuit board The following prefix letters are used as reference designators to identify components or assemblies on the diagrams A Assembly separable or repairable circuit board etc AT Attenuator fixed or variable B Motor BT Battery ...

Страница 95: ...ontal compartment Level Slope Triggering Mode Coupling Source Magnifier Variable Ext Trig In connector Centered on positive slope Norm AC Ext f 10 X1 Cal In No connection for voltage measurements For waveforms see waveform note on each Diagram Vertical Mode Horizontal Mode A Intensity B Intensity Calibrator Volts Rate A Trigger Source 7704 Right A Optimum Counterclockwise 40 mV DC Right Vert Wavef...

Страница 96: ... 7DI 4 DIGITAL COUNTER UNIT ...

Страница 97: ...Q4O7 Q4I7 IQ BCD STORAGE REGISTERS U45S U457 U459 U4fcl U4 3 U4fo5 U4G7 U4G9 MULTIPLEXERS U52O U524 U528 US32 U53G U54O US44 US48 IO io o3 IO4 IO IO6 IÖ7 DCU RESET FROM TIME BASE AND CONTROL RESET DRIVER Q353 Q3Sfo Q359 DISPLAY GENERATOR U729D Q79I DCU RESET DRIVER 079t 0796 I DISPLAY TIME I R7O S70 OVERFLOW REGISTER 512 U5O40 SO4C USO6B USIOA USIOB OVERFLOW REFERENCE FREQUENCY GATE U73ID U729E TI...

Страница 98: ...GRS 0371 BLOCK DIAGRAM ...

Страница 99: ......

Страница 100: ...203 CR100 1C197 R121 L138 C463 ÎC450 R196 ter Ê R108 C yV A P1F R120 X jlcR209 T2 CR208 W r MCR O V SSJ 4 CR2OÏ FTr CR200 1109 jillcF1205SU SSF C CR2O3 1I SCR206 R210 ï fKSSR127 vr R126sff PC 127 fei 181 ...

Страница 101: ...376 Q154 IC178 tat 7R184 Q180 C402l 2J ET 4a Q390lul JT1831Qi88j8l 0280 7SVLWu290 few Jt SiciäöS Ico J22 f R38 9 J Ä R383 J 03841384 7J R385 h R375 Jr VR384Û Q364 C376l 765 V 3 jj R36r 4ijk J Si R 332 g VR331j R331 J 11 03741 1 152 152 0252j 4jK252 ç yR 404 A R403jf R369 1VR364 R 367 Tr365 sJR371 JKR363 R372 J 4R373IÜ BiR349 347 _N R347 li MR345 A1 High Frequency Counter Circuit Board Assembly 670...

Страница 102: ...orange on brown yellow on brown mk A4 BANDWIDTH Switch gray on white black violet on white orange on brown yellow on brown brown A5 COUPLING Switch brown brown orange yellow orange on white red ...

Страница 103: ...0 0 I 200 mV 500 µs 0 001 200 mV 500 µs 0 001 MHz 00 mV E 00 µs 0 001 MHz ...

Страница 104: ...CPL R 134 cri b az H i K O3 140 M R 11Z K 7 28 1 CRT Ofc R 1 ttn C19fc T 70 f OOMHtl I5V P 0 A4 BANDWIDTH BC UI dI DCFLi I5v s r rr ÇPCPQ 7SO OCPtΔ 7DI4 R 1I1 51 7 VR1IO IOV cV H a w RIM 1 7K O 5T5 cm 1 7 Qua I mm I I T I I I b1 P 0 Al HIGH FREQ COUNTER BOARD DETA L ...

Страница 105: ...D C 157 o I WAVEFORMS obtained under conditions given on page 7 2 MEASUREMENT INTERVAL set to 1 ms position Time base unit externally triggered from oscilloscope CALIBRATOR waveform SATE GATE Y J FR OM T755 GI O 4 33 UICI jjlA14IC 0 29 dc pL i5v riig j__ L_ R n 3 tr iOO Cl4fe l5p_F C AIG5 VRI7Ö 7 5 RI75 T 855 JlOOy Tia law CLOCkJ ST rmr j j R277 BZO WV RÎ 71 SEE PARTS LIST FOR SEMICONDUCTOR TYPES ...

Страница 106: ...1 ...

Страница 107: ...SI R541 4 73 R3S R 5 1 U3ObE 3044 3 01 K R fol 5 4 k T0 f UMS U305D 3O44 R IT IK U305C A304 L 7DI4 R 3OI 4 0SSK Q Co U305A Ç4 3044 m U4Ô5B 14 H R b l 0 58 r 7 a 1 R IO1 U32 1 004 w 8 0 b C u RW 410 B Sv TO PIN IT J RV73 RVH SK 3 SK R 377 3 01k IBV ...

Страница 108: ...MEASUREMENT INTERVAL set to 10 s position Time base unit externally triggered from test point 418 S 5V TO PIM 11 J IC SOCKET DETAIL o a f4 Ö U30S U42O ïSv 1oa a 14 e I 7 a ta a es Ej U434 R V72 10 BCD TO U455 Ü41O R 42 3 VK413 R B t R4 VR4O2 ooi___ R 4O4 3 01k Bv 1 mo IK vw R373 R 7 1 4K 4K QS74 Olk 414 R4 n 470 C AR R V NOTE SEE PARTS LIST FOR SEMICONDUCTOR TYPES First Decade Counter 0371 ...

Страница 109: ...541 U560 U504 U510 U506 U531 U628 U602 U733 U735 Y 600 R864 S1 i9 JT859 R860 AiSO T OiSPlAr R866 cc r75 nnç W j RSgi jX R519 R517 R518 R550 R542 R534 R526 R546 R538 R576 R530 R522 R539 R531 R527 Located under Y600 ...

Страница 110: ...A2 Logic Circuit Board Assembly jQ798i 798 jc743 CR744t uni R724 R742 JL744S FrR796 ...

Страница 111: ...OA U453 1 o 9 8 9292A 4 S 410 2 9 IO 2 RG 4 22 2 3 R J 12 II l 2S 5O4C 10 11 74lON T U44fe 82 92A U463 n 2 2 ____________ 4 lO 2 9 IO RG 4 a2 R 23 2 3 12 11 rl J 23 U45O T B292A 8292 A l_ O 2 2 4 2 9 IO 22 2 3 R 2s 2 II 2 J U4fe7 9292A UA52 7DI4 U5iOA 747AN U5O4B A14ION t5V P 0 Al HIGH FREQ COUNTER BOARD 6 440 44fe 0450 6457 C 4G3 L S2O L 54O USà U54 5V RG 4 ...

Страница 112: ...3046 TO s Zh 2 23 2 2 zty T TTVie U463 B2 S2A U4fc7 IM69 U528 PH a 74OtSi I U54O U548 ZE s3Z 1 x DIGIT BCD 4 io t U53IA v 304fc U53IG V5 3O4fo U54IA s3O4fc U53ID S 3046 U5 4IG 3O fa T5 YR545 2 U504A T41ON U506B X Vj ïaiON W Δ U5I4D A 74OIN J5O8A 74Û2N 3 09 uboec 74O2N U514C 74OIN COUNTER 3 orn ...

Страница 113: ......

Страница 114: ...P 0 A2 LOGIC BOARD ...

Страница 115: ...OPS TO usoa e DPb TO usoa 3 B37 CHANNEL I ROW cRc a A31 S3Q TS 8 RfoQB 243 K CHANNEL 2 ROW CHANNEL 2 COLUMN INTERNAL TO 5 INTERVAL BOARD RbG 8 B 2K 0 53 I5OK Q680 Rb84 49 9 K Rfe74 24 9K Raes A3O TS T5 IO B29 A29 ZK GRS READOUT ENCODING Q 0371 ...

Страница 116: ...n green on blue on violet on white white white white white white white white white white white white white brown on white red on white orange on white yellow on white green on white blue on white T o P8 brown on white red on white orange on white yellow on white green on white To P6 A7 INTERVAL Switch ...

Страница 117: ...Ëwïl UL Ï Z9 l 9101 aQLV l QXINOW VabZVW O 9H VZbT N 9 n osr Ho traax jaa Ini xxa o MOI Lira Δ O iitr 9ÖO rot nwiji V tn I fax b xxal 1 MQXINOH 1 w_z iXAuaxt IxNaHaiinsv a cmvoQ iwaaiNi VXbZBN 0 9H VZbXWN 9 9n YXbZWN 90 VXbTSb VO 5 WOSd TVN axNi G C xno iNW I VlbX8 h zo n zHhS r S J WHO À l I 009A ASI ...

Страница 118: ... 4 3 C R744 R7 7 Q742 CRT 3 s U708A 74 740IN U73IB Æ7400N U7O8B 4 740IN Q74 3 4 4 8 U73JC 74 7400N DISPLAT TÔ GATE TO QL7S o GATE U7ÏIK T03 7474ÔON Q7 ie 4 0 73 Q7R4 MftNURL ATft U73I D 740ON U733A 4747feN U72 1D R7S 76 3044 47 K L713 4 0 15 4 0 8M U7 5 74S4I2M U72 5Ä 76 04C R714 fO 4 0 7 4 U7 8B A S04G U723C V 04t S7TO MANUAL GATE STORAGE 0371 yx Time Base Control x z 0747 ...

Страница 119: ...N TO TÔ7O LR164 2OOJJ H so 4 I5V LIGHTS COMMON ND e o 8 7 4 5 4 3 K P 0 Al HIGH FREQ COUNTER BOARD 3 f 5OV c 4 15V 4 5V TRIG OUT FROM RBGS SIG OUT FROM R8bO V LIGHTS 5v SWEEF fh GATE ROO àH j T sv îxSxa Xc44a Xm Lc4W r T C4fe 01 P 0 A3 TRIGGER SW BOARD P 0 A7 INTERVAL BOARD P 0 A6 REF FREQ SW BOARD D52O BANDWIDTH S8 COUPLING SE TRIGGER 20 iNTE R VAL 5GO ...

Страница 120: ... COUPLING SW BOARD UTE R VAL CoO 510 BKMP lDTH 58 COUPLING 55 1 Jz t dsio rV Dse H oss 11 tq S50 1 HIGH FREQ COUNTER BOARD P 0 A4 BANDWIDTH BOARD Digitally signed byD http www aa4df com Connector to Main Frame 037 ...

Страница 121: ... A B D t F H J NPR Tj ZWX V A AC M AEA HUM qAZ DEF HJ N P R S T J V V7X y ABM APAI AA 7DI4 ...

Страница 122: ... HlGiM FREQ COUNT BO 5T3 vwx yz Daaac apaeafaaXmaj ak alaman I5v AR 56V I5v AS MP 5V Q Al AW A V AU INTERCONNECTION PINS 0371 ...

Страница 123: ...must be purchased separately unless otherwise specified PARTS ORDERING INFORMATION Replacement parts are available from or through your local Tektronix Inc Field Office or representative Changes to Tektronix instruments are sometimes made to accommodate improved components as they become available and to give you the benefit of the latest circuit improvements developed in our engineering departmen...

Страница 124: ...7D14 INDEX OF MECHANICAL PARTS LIST ILLUSTRATIONS Title Page Nos of Parts List Figure 1 Exploded Standard Accessories 8 1 thru 8 4 Figure 2 Repackaging parts list combined with illustration ...

Страница 125: ...280 00 1 SPRING helical compression 9 214 1054 00 1 SPRING flat latch detent 10 105 0075 00 1 BOLT latch detent 11 333 1376 00 1 PANEL front 12 348 0235 00 2 SHIELDING GASKET electrical 13 352 0157 00 1 HOLDER lamp 14 378 0602 00 1 LENS indicator light green 15 200 0935 00 1 CAP lamp holder 16 131 0282 00 2 CONNECTOR receptacle 1 contact w hardware 17 136 0387 00 1 JACK TIP panel mounted 1 RESISTO...

Страница 126: ...FHS CIRCUIT BOARD ASSEMBLY switch COUPLING A5 mounting hardware not included w circuit board assembly SCREW 1 72x0 25 inch 82 csk FHS 35 386 1447 49 36 213 0192 00 1 SUBPANEL front mounting hardware not included w subpanel 4 SCREW thread forming 6 32x0 50 inch Fil HS 37 670 0993 00 1 CIRCUIT BOARD ASSEMBLY HIGH FREQ COUNTER Al circuit board assembly includes 388 1825 00 1 CIRCUIT BOARD 38 131 0608...

Страница 127: ...rofile 65 136 0350 00 17 66 214 0579 00 3 PIN test point 67 260 0723 00 1 SWITCH slide S70 68 351 0225 00 5 GUIDE POST lock 0 775 inch long mounting hardware not included w circuit board assembly 69 211 0105 00 6 SCREW 4 40x0 188 inch 100 csk FHS 70 220 0547 01 6 NUT block 0 25x0 282x0 38 inch 71 211 0116 00 6 SCREW sems 4 40x0 312 inch PHB 72 214 1140 00 5 SPRING helical compression 73 337 1409 0...

Страница 128: ...nches long ft WIRE electrical 5 wire ribbon 3 inches long ft WIRE electrical 6 wire ribbon 5 50 inches long ft WIRE electrical 7 wire ribbon 2 75 inches long 33 CONNECTOR terminal 1 HOLDER terminal connector 3 wire orange 1 HOLDER terminal connector 5 wire blue 1 HOLDER terminal connector 6 wire yellow 1 HOLDER terminal connector 6 wire gray 1 HOLDER terminal connector 6 wire white 1 HOLDER termin...

Страница 129: ......

Страница 130: ...4 7D14 DIGITAL COUNTER ...

Страница 131: ...ektronix No Part No Serial Model No EH Disc Q t Y 1 2 3 4 5 Description 065 0125 00 1 004 0241 00 2 004 0242 00 3 004 0243 00 4 004 0748 00 1 ASSEMBLY carton assembly includes 2 CASE HALF 1 END CAP rear 1 END CAP front 1 CARTON 7D14 DIGITAL COUNTER ...

Страница 132: ...mmediately into printed manuals Hence your manual may contain new change information on following pages A single change may affect several sections Sections of the manual are often printed at different times so some of the information on the change pages may already be in your manual Since the change information sheets are carried in the manual until ALL changes are permanently entered some duplic...

Страница 133: ...SKA6516 Q376 151 0367 00 Silicon NPN SKA6516 Q384 151 0367 00 Silicon NPN SKA6516 Q392 151 0367 00 Silicon NPN SKA6516 Q402 151 0367 00 Silicon NPN SKA6516 R332 315 0132 00 1 3 kΩ 1 4 W 5 ADD L364 276 0569 00 Core toroid ferrite L376 276 0569 00 Core toroid ferrite L384 276 0569 00 Core toroid ferrite L392 276 0569 00 Core toroid ferrite L402 276 0569 00 Core toroid ferrite PARTIAL FIRST DECADE CO...

Отзывы: