31
Test
Number
Method
Image
1.
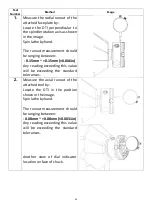
Measure the radial runout of the
attached faceplate by:
Locate the DTI perpendicular to
the spindle rotation axis as shown
in the image.
Spin lathe by hand.
The runout measurement should
be ranging between:
-0.15mm ~ +0.15mm (±0.006in)
Any reading exceeding this value
will be exceeding the standard
tolerances.
2.
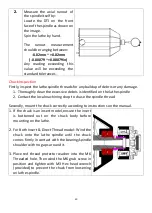
Measure the axial runout of the
attached tool by:
Locate the DTI in the position
shown in the image.
Spin lathe by hand.
The runout measurement should
be ranging between:
-0.08mm ~ +0.08mm (±0.0031in)
Any reading exceeding this value
will be exceeding the standard
tolerances.
Another view of dial indicator
location on face of chuck.
Содержание nova PRO-TEK SUPERNOVA2
Страница 11: ...11 PRO TEK SUPERNOVA2 Chuck Parts View ...

