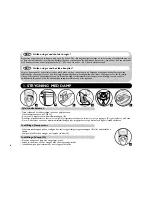
background image

5

FOR YOUR  SAFETY

• This appliance complies with the technical rules and standards for safety currently in force (Electromagnetic Compatibility, Low Voltage,
Environnement).
• This appliance is not designed to be used by people (including children) with a physical, sensory or mental impairment, or people without kno-
wledge or experience, unless they are supervised or given prior instructions concerning the use of the appliance by someone responsible for
their safety. Children must be supervised to ensure that they do not play with the appliance.
• Warning ! The voltage of your electrical installation must correspond to that of the iron (220V-240V or 127V depending on model). Connecting
to the wrong voltage may cause irreversible damage to the iron and will invalidate the guarantee.
• This iron must always be plugged into an earthed socket. If using a mains extension lead, ensure that it is correctly rated (10A or 13A, depen-
ding on model), with an earth connection.
• If the electrical cord becomes damaged, it must be immediately replaced by an Approved Service Centre to avoid any danger.
• The appliance should not be used if it has fallen, if it has obvious damage, if it leaks or has functional anomalies. Never dismantle your appliance :
have it inspected by an Approved Service Centre, so as to avoid any danger.
• Never immerse your iron in water !
• Do not unplug your appliance by pulling on the cord.Always unplug your appliance: before filling or rinsing the reservoir, before cleaning it, after
each use.
• Never leave the appliance unattended when it is connected to a power source; if it has not cooled down for approximately 1 hour.
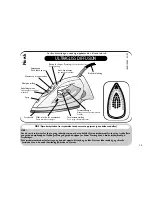
• Your appliance gives off steam, which may cause burns, especially when you are ironing on a corner of your ironing board. Never direct the
steam towards people or animals.
• Your iron should be used and placed on a stable surface.When you put your iron onto its iron rest, make sure that the surface on which you
put it is stable.
• This product has been designed solely for domestic use.Any inappropriate use or use contrary to the instructions releases the brand from all
responsibility and renders the guarantee invalid.

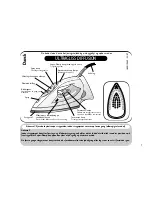
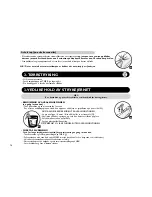
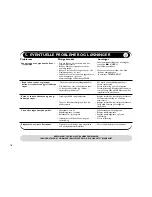
4- STORING YOUR IRON

- Unplug it and wait until the sole plate has cooled off.
- Empty the water tank and set the steam control to DRY.
- Store the iron on its heel.

- Raise the anti-calc valve without removing it completely.
- Shake the iron gently, over the sink, until all of the water in the water tank (with the impurities) has flowed out via the soleplate.
- At the end of the operation, push the anti-calc valve back into position.
- Turn the iron back on for 2 minutes, setting it on its heel, to dry the soleplate.
- Unplug the iron, and when the sole plate is just warm, wipe it with a soft cloth.

• CLEANING THE SOLE PLATE 

- While the soleplate is still just warm, clean it by rubbing it with a moist, non-metallic pad.

Recommendation :

The self-cleaning function helps to delay the scaling of your iron.

Содержание FV31 Series

Страница 1: ...ctric power cord Water tank maximum fill line Do not exceed this limit Sole plate Thermostat indicator light Goes out when the temperature has been reached Warning Before using your iron with the stea...

Страница 2: ...tteries or air conditioners pure distilled water or rain water 1 STEAM IRONING Unplug your iron before filling it Set the steam control on DRY A Fill the beaker up to the lower line indicated B Open t...

Страница 3: ...tures then go on to those requiring a higher temperature If you turn down the thermostat wait until the thermostat light comes back on before beginning to iron again When ironing fabrics with mixed fi...

Страница 4: ...your iron and empty the water tank To remove the anti calc valve pull it up using the tabs located on each side N NEVER TOUCH THE END OF THE VALVE Soak the rod in a cup of white spirit vinegar or pla...

Страница 5: ...iance by pulling on the cord Always unplug your appliance before filling or rinsing the reservoir before cleaning it after each use Never leave the appliance unattended when it is connected to a power...

Страница 6: ...n a metallic rest plate You have ironed over a zip Restart the iron by lightly moving it Set the thermostat control to the required fabric to be ironed Set the thermostat in the coloured zone from to...

Страница 7: ...ing Maksimums afm rkning p vandbeholderen Der m ikke fyldes vand over denne streg Stryges l Termostat lampe Slukker n r strygejernet er n et op p den indstillede temperatur Advarsel Inden strygejernet...

Страница 8: ...parfumeret vand bl dgjort vand vand fra k leskabet batterivand vand fra aircondition anl g destilleret vand eller regnvand 1 STRYGNING MED DAMP Tr k stikket ud af stikkontakten inden der p fyldes vand...

Страница 9: ...der skrues ned for termostaten skal man vente med at stryge til lampen t nder igen Hvis der stryges stof med blandede fibre skal strygetemperaturen indstilles p den mest sarte stoftype H N r der stryg...

Страница 10: ...end 30 sekunder Der t ndes for strygejernet igen ved at ryste det lidt indtil lampen holder op med at blinke NB N r det automatiske stop er i funktion er det normalt at termostatlampen er slukket 2 S...

Страница 11: ...efter hver brug Efterlad aldrig strygejernet uden opsyn n r stikket er sat i og s l nge det ikke har k let af i ca 1 time Stryges len kan blive meget varm lad altid strygejernet k le af inden det s tt...

Страница 12: ...eren er tom Kalkmagneten er kalket til Strygejernet er kalket til Strygejernet har v ret brugt for l nge uden vand Strygejernet har v ret anbragt p en metalholder p stryges len Stil termostaten p det...

Страница 13: ...ks merke for vanntanken Dette m ikke overstiges Strykes le Termostatlampe Slukker n r nsket temperatur er n dd OBS F r du tar i bruk jernet for f rste gang i dampposisjon er det anbefalt fjerne stryke...

Страница 14: ...nstallasjon vann fra luftfukter vann fra t rketrommel vann fra kj leskap destillert vann parfymert vann batterivann regnvann 1 DAMPSTRYKING Ta ut kontakten f r du fyller tanken med vann Plasser dampin...

Страница 15: ...strykes p lave temperaturer og avslutt med de som kan t le h yere temperaturer Hvis du senker termostaten vent med stryke til lampen lyser p nytt Dersom du skal stryke blandingsstoffer still stryketem...

Страница 16: ...N en gang i m neden Ta ut kontakten og t m vanntanken for vann For fjerne avkalkingspinnen trekk den oppover ved hjelp av gripeflatene p hver side N DU M ALDRI BER RE ENDEN P AVKALKINGSPINNEN La pinne...

Страница 17: ...lse Aldri la apparatet st uten tilsyn mens det er tilkoblet og under avkj ling i 1 time etter frakobling Strykes len kan bli veldig varm derfor m du Aldri ber re den med bare fingre s rge for at s len...

Страница 18: ...velse Vanntanken er tom Avkalkingspinnen er skitten Kalkdannelse i strykejernet Strykejernet er blitt brukt for lenge p t rrstryking Strykejernet er blitt lagt med strykes len ned p strykebrettets met...

Страница 19: ...kens maxstreck Denna gr ns f r inte verskridas Stryksula Termostatlampa Slocknar n r beg rd temperatur r n dd Observera Innan ni f r f rsta g ngen anv nder strykj rnet i ngl ge rekommenderar vi att l...

Страница 20: ...n luktvatten avh rdat vatten kylsk psvatten batterivatten vatten fr n luftkonditionerings anl ggningar destillerat vatten regnvatten 1 NGSTRYKNING Koppla ur strykj rnet innan du fyller p S tt ngreglag...

Страница 21: ...tryka de plagg som kr ver l g stryktemperatur och avsluta med att stryka de plagg som t l h gre stryktemperatur Om ni s nker temperaturen p termostaten v nta tills termostatlampan lyser upp innan ni f...

Страница 22: ...RING AV KALKSTICKAN en g ng i m naden Koppla ur j rnet och t m vattentanken F r att ta ut kalkstickan dra den upp t med hj lp av tv grepp som sitter p vardera sidan N VIDR R ALDRIG KALKSTICKANS NDA L...

Страница 23: ...je anv ndning L mna aldrig apparaten utan tillsyn n r kontakten r i s l nge den inte svalnat i ca 1 timme Stryksulan kan bli mycket het Vidr r den aldrig och l t alltid j rnet svalna innan det st lls...

Страница 24: ...Vattentanken r tom Kalkstickan r smutsig Strykj rnet r belagd med pannsten J rnet har anv nts f r l nge till torrstrykning J rnet har st tt platt p l ngkanten p ett metallst ll S tt termostaten inom...

Страница 25: ...n enimm ist yt n merkki l ylit MAX merkki Pohja L mp tilan merkkivalo Valo sammuu kun silitysrauta on kuumentunut valittuun l mp tilaan Huomio Kun k yt t silitysraudan h yrytoimintoa ensimm ist kertaa...

Страница 26: ...skoneiden vesi hajustettu vesi pehmennetty vesi j kaappien pattereiden ja tuulettimien vesi tislattu vesi ja sadevesi 1 H YRYSILITYS Irrota virtajohto pistorasiasta ennen s ili n t ytt mist Aseta h yr...

Страница 27: ...a vaatteista ja silit lopuksi kuumempaa l mp tilaa vaativat vaatteet Kun muutat l mp tilan s t odota valon syttymist ennen kuin jatkat silityst Kun silit t erilaisia kuituja sis lt v kangasta s d sili...

Страница 28: ...irran uudelleen liikuta sit kevyesti kunnes merkkivalo lakkaa vilkkumasta HUOM Kun automaattinen turvakytkin on kytkeytynyt p lle l mp tilanvalitsimen merkkivalo ei pala 2 KUIVASILITYS S d l mp tila A...

Страница 29: ...mista ja k yt n j lkeen l koskaan j t laitetta ilman valvontaa jos siin on virta p ll ja k yt n j lkeen varmista ett laite on j htynyt ennenkuin l hdet kotoa Silitysraudan pohja voi olla hyvin kuuma l...

Страница 30: ...huuhdeltu tai siin on t rkki Vesis ili on tyhj Kalkinpoistopuikko on likainen Silitysrauta on kalkkeutunut Silitysrautaa on k ytetty liian kauan kuivana Silitysrauta on laskettu silityslaudan metallip...

Страница 31: ...e alimentaci n Nivel m ximo del dep sito No exceda de ese l mite Suela Indicador luminoso del termostato Se apaga cuando se alcanza la temperatura deseada Atenci n Antes de utilizar la plancha por pri...

Страница 32: ...as agua de las secadoras agua perfumada agua descalci ficada agua de las neveras agua de las bater as agua de los aires acondicionados agua destilada agua de lluvia 1 PLANCHADO CON VAPOR Desconecte l...

Страница 33: ...una temperatura baja y luego los que requieren una temperatura m s elevada Si baja el termostato espere a que el indicador luminoso vuelva a encenderse antes de volver a planchar Si debe planchar un...

Страница 34: ...dor luminoso ya no vuelva a parpadear Nota Cuando la parada autom tica de seguridad est activada es normal que el indicador luminoso del termostato permanezca apagado 2 PLANCHADO EN SECO Ajuste la tem...

Страница 35: ...n cuando est conectado a la alimentaci n el ctrica y cuando a n est caliente aprox 1 hora La suela de la plancha puede estar muy caliente no la toque nunca y deje que la plancha se enfr e antes de gua...

Страница 36: ...a plancha se ha utilizado demasiado tiempo en posici n en seco Ha guardado la plancha con la suela hacia abajo sobre un reposa planchas met lico Coloque el termostato en la zona coloreada de a MAX Esp...

Страница 37: ...AGLISS DIFFUSION Cabo de alimenta o Marca do n vel m ximo do dep sito de gua N o ultrapassar este limite Base Luz piloto do termostato Apaga se ao atingir a temperatura desejada Aten o Antes da primei...

Страница 38: ...misturar 50 de gua da torneira e 50 de gua desmineralizada dispon vel no mercado Que tipo de gua evitar Durante a evapora o o calor concentra os elementos contidos na gua As guas abaixo indicadas pod...

Страница 39: ...engomados a baixas temperaturas e termine com os tecidos resistentes a temperaturas elevadas Se diminuir a temperatura espere que a luz piloto do termostato volte a acender para engomar novamente Se d...

Страница 40: ...asta agit lo ligeiramente at que a luz piloto deixe de estar intermitente NB Sempre que a seguran a de paragem autom tica activada normal que a luz piloto do termostato se mantenha apagada 2 ENGOMAR A...

Страница 41: ...ligue sempre o aparelho antes de encher ou enxaguar o reservat rio de gua antes de o limpar e ap s cada utiliza o Nunca deixe o aparelho sem vigil ncia quando este estiver ligado cor rente se ainda n...

Страница 42: ...sito est vazio A vareta anti calc rio est suja O ferro tem calc rio Utilizou o ferro a seco durante demasiado tempo Pousou o ferro num suporte met lico Coloque o termostato na zona colorida de at M X...

Страница 43: ...43 1800110849 23 07...

Страница 44: ...44 G F E D C B A C D E F B G...

Страница 45: ...45 L K J I H H J K L I...

Страница 46: ...46 O N M N O...

Страница 47: ...47...

Страница 48: ...48...

Страница 49: ...49 1800110849 23 07...

Страница 50: ...50 G F E D C A C D E F B G...

Страница 51: ...51 L K J I H H J K L I...

Страница 52: ...52 O N M N O...

Страница 53: ...53...

Страница 54: ...54...

Страница 55: ...55 1800110849 23 07...

Страница 56: ...56 C D F A C D E F B G...

Страница 57: ...57 H J K L I...

Страница 58: ...58 O N M N O...

Страница 59: ...59...

Страница 60: ...60...

Страница 61: ...toplam n n alt dan fazla olmas unsurlar n n yan s ra bu ar zalar n r nden yararlanma may s rekli k lmas Tamiri i in gereken azami s renin a lmas Servis istasyonunun mevcut olmamas halinde s ras yla s...

Страница 62: ...G Dette produktet inneholder verdifulle materialer som kan gjenvinnes eller gjenbrukes Lev r det inn p en egnet oppsamlingsplass eller til en forhandler av denne type produkter BIDRATILLATT SKYDDA MIL...

Страница 63: ...Entr guelo al final de su vida til en un Centro de Recogida Espec fico o en uno de nuestros Servicios Oficiales PostVenta donde ser tratado de forma adecuada PROTEC O DO AMBIENTE EM PRIMEIRO LUGAR O...

Страница 64: ...1800110849 23 07...

Отзывы: