background image

TS1001 Touch Screen Arming Station Installation Manual 

15 


7- 

LCD Brightness


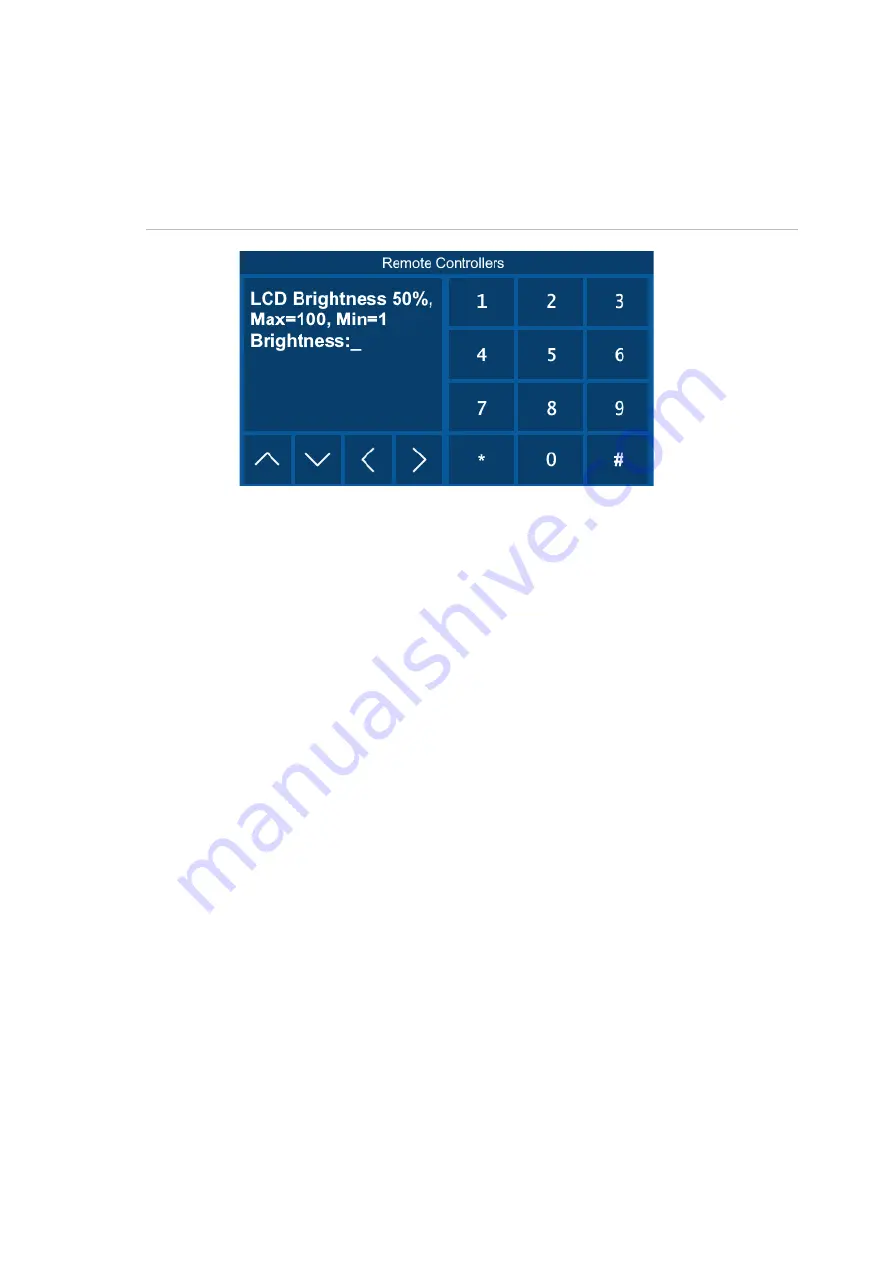
The LCD screen (Figure  8 below) displays  the currently selected  value, and the 
range of acceptable values,  of LCD screen brightness  during  activity (when either 
the LCD screen or a button  is pressed). 


Figure 8: LCD Brightness screen


Press the buttons  that correspond  to the desired  value from 1% to 100% levels, 
and then press  the # button  (or press  Enter # key) to apply the new value. 

Note: 

We recommend using  smaller values  in order  to minimise  power use in 

mains fail conditions. 


8- 

Button Brightness


The LCD screen displays  the currently selected  value,  and the range of  
acceptable  values, levels  of button brightness  during  activity (when either the 
LCD screen or a button  is pressed). 

Press  the buttons  that correspond  to the desired  value from 0% to 100%,  and 
then press  the # button  (or press Enter # key) to apply the new value. 

Note: 

We recommend using  smaller values  in order  to minimise  power use in 

mains fail conditions. 


9- 

Button Inactive Brightness


The LCD screen displays  the currently selected  value,  and the range of  
acceptable  values of button  brightness  following  the period  of inactivity defined in 
“10-Inactivity Period”  below. 

Press  the buttons  that correspond  to the desired  value from 0% to 100%,  and 
then press  the # button  (or press Enter # key) to apply the new value. 

Note: 

We recommend using  smaller values  in order  to minimise  power use in 

mains fail conditions. 


Содержание TS1001

Страница 1: ...TS1001 Touch Screen Arming Station Installation Manual P N MAINST TS1001 REV 06 ISS 01AUG21 ...

Страница 2: ...rs or vendors of the respective products Manufacturer Carrier Fire Security Australia Pty Ltd A Carrier company 10 Ferntree Place Notting Hill Victoria 3168 Australia Agency compliance N4131 This product conforms to the standards set by Standards Australia on behalf of the Australian Communications and Media Authority ACMA Notice This is a Class A product In a domestic environment this product may...

Страница 3: ...hes 8 Connecting the RAS 9 Adjusting LCD and button brightness 12 Programming RAS menu options 13 1 RTE Egress Control 14 2 Tamper Control 14 3 Scramble Keypad 14 4 Open Button 14 5 Classic Button 14 6 Automation Button 14 7 LCD Brightness 15 8 Button Brightness 15 9 Button Inactive Brightness 15 10 Inactivity Period 15 11 Volume 16 12 Area LED Configuration 16 13 Factory Defaults 16 Troubleshooti...

Страница 4: ... liability forconsequential or incidental damages the preceding limitation may not apply to you In any event the total liability of Carrier shall not exceed the purchase price of the product The foregoing limitation will apply to the maximum extent permitted by applicable law regardless of whether Carrier has been advised of the possibility of such damages and regardless of whether any remedy fail...

Страница 5: ...een Arming Station User Manual for details about using the Touch Screen RAS The Touch Screen RAS may be used on the Challenger series control panels ChallengerPlus Challenger10 or a Challenger V8 Refer to the appropriate Challenger manual for details about operating the Challenger system Care and cleaning instructions The touch screen display panel Figure 1 on page 1 item 1 is an LCD module consis...

Страница 6: ......

Страница 7: ...ght Emitting Diodes LEDs One open collector output is provided to drive a small relay or LED for example One input is provided for an egress function User interface details A touch screen RAS provides a graphical mode of operating a Challenger system In addition to the graphical mode s advanced user interface the touch screen also has a classic mode that mimics a conventional LCD keypad Note Diffe...

Страница 8: ...d by a door code is used to open the RAS s door If door codes are used and you enter an alarm code then the button works the same as the Arm button Alternatively an alarm code can used to open the RAS s door if Door event flag on alarm codes is set to Yes in Install menu option 3 RAS Database The optional Classic button item 4 is used to access the login code prompt for mimicking a conventional LC...

Страница 9: ...the menu option 12 Area LED Configuration on page 16 to configure the area LEDs to be numbered 1 to 8 or 9 to 16 When connected to a Challenger10 system you can use the Install menu option RAS Database to assign any area numbers to the eight LEDs The LED indications are as follows The LED illuminates when its corresponding area is armed The LED flashes slowly when a fault is detected or when an al...

Страница 10: ...6mm Phillips head screws 1 Plasterboard mounting bracket 2 6 gauge x 20mm self tapping Phillips head screws 1 TS1001 Touch Screen Arming Station User Manual 1 TS1001 Touch Screen Arming Station Installation Manual Inspect the package and contents for visible damage If any components are damaged or missing do not use the unit contact the supplier immediately If you need to return the unit you must ...

Страница 11: ...witch 4 Body assembly 5 Base assembly 6 Surface mount screw locations 7 Flush mount screw locations 8 Earthing point for internal or external connection 9 Tx and Rx LED access 10 Configuration DIP switch access 11 Rear cable entry Figure 4 Locations of features in rear of body assembly 1 Tamper switch 2 Configuration DIP switches 3 Tx and Rx LEDs 4 Terminal block 5 USB 2 0 port ...

Страница 12: ... for cable access 6 Use suitable screws to mount the base assembly to the surface 7 Set the RAS address using DIP switches 1 through 4 see DIP switches on page 8 8 Set the LAN termination using DIP switch 8 if required see DIP switches on page 8 9 Terminate the cabling Note All power should be turned off to the Challenger panel before wiring the RAS 10 Hook the top of the body onto the mounting ta...

Страница 13: ...s Figure 1 on page 1 item 7 and set aside for reuse 5 Pull the bottom of the body away from the base to disengage the tabs at the top and then remove the body assembly from the base assembly 6 Set the RAS address using DIP switches 1 through 4 see DIP switches on page 8 7 Set the LAN termination using DIP switch 8 if required see DIP switches on page 8 8 Terminate the cabling Note All power should...

Страница 14: ...de and must always be set to OFF LAN address RASs must be addressed in the range 1 to 16 Use the first four segments of the DIP switch to set the LAN address Refer to Table 2 below Table 2 RAS address DIP switch settings LAN Address Polled as SW1 SW2 SW3 SW4 LAN 1 RAS 01 RAS 01 O O O O LAN 1 RAS 02 RAS 02 I O O O LAN 1 RAS 03 RAS 03 O I O O LAN 1 RAS 04 RAS 04 I I O O LAN 1 RAS 05 RAS 05 O O I O L...

Страница 15: ...e eighth segment of the DIP switch to set TERM to ON if needed If the RAS is the last device on the RS 485 LAN the LAN termination should be ON In a star wiring configuration the RS 485 LAN may consist of a number of cable runs branches LAN termination should be set to ON only for the devices at the far ends of the two longest branches A star LAN that has multiple branches in excess of 100 m may n...

Страница 16: ... the LAN data bus D is the data negative connection of the LAN data bus LAN cable shield The LAN cable shield must be connected to system earth at one end only If the LAN is daisy chained to the RAS ensure that the shield of the cable is jointed to provide continuity of data cable shield Power connection 12V and GND to Challenger panel The RAS can be powered using the RS 485 LAN and power from the...

Страница 17: ...thed via the earthing point on the base assembly Figure 3 on page 5 item 8 or via the RAS mounting screws if the RAS is attached to an earthed metal fixture assuming there is a good electrical connection between the mounting screws and the fixture Consider the following cases Case 1 The RAS is mounted to a non conductive fixture such as a plasterboard wall Connect the RAS s earth point to the Chal...

Страница 18: ...s off touch the screen or a key to activate the display Note Adjust the active mode brightness of the RAS s LCD screen and the physical keys to suit the ambient lighting of the environment You can dynamically configure the touch screen RAS s LCD display and physical buttons via the Install menu option This RAS Configuration not available in classic mode Figure 7 Configuration screen Use the Enter ...

Страница 19: ...nd using smaller values in order to minimise power use in mains fail conditions Volume Tap the slider bar to select from 0 to 100 levels of beeper volume The volume changes dynamically as you change the settings Programming RAS menu options Touch Screen RASs have a number of options that are programmable at the time of installation to help integrate the RAS into the local environment Note If you a...

Страница 20: ...ves the numbered buttons to different positions after every login to avoid providing visual clues to the numbers used This option is disabled by default 4 Open Button The Home screen s optional Open button Figure 2 on page 2 item 3 is used to open the RAS s door If disabled the Open button does not display on the Home screen 5 Classic Button The Home screen s optional Classic button Figure 2 on pa...

Страница 21: ...alue and the range of acceptable values levels of button brightness during activity when either the LCD screen or a button is pressed Press the buttons that correspond to the desired value from 0 to 100 and then press the button or press Enter key to apply the new value Note We recommend using smaller values in order to minimise power use in mains fail conditions 9 Button Inactive Brightness The L...

Страница 22: ...rently selected value and the range of acceptable values of beeper volume Press the buttons that correspond to the desired value from 0 to 100 and then press the button or press Enter key to apply the new value 12 Area LED Configuration By default the RAS s eight area LEDs are numbered 1 to 8 and indicate the state of areas 1 to 8 or as otherwise assigned in the Challenger10 RAS database Alternati...

Страница 23: ... and hold the Menu Home and Enter keys simultaneously until a message Performing touch screen calibration displays and then release 2 Press the touch screen to begin calibration A filled red circle displays near the corner of the screen 3 Touch the filled red circle to display a new filled red circle in another corner Repeat for each corner 4 When finished a message To repeat calibration displays ...

Страница 24: ... Firmware upgrade procedures This section describes how to upgrade the Touch Screen RAS firmware and or images via the RAS s USB port Figure 4 on page 5 item 5 and the Tecom Firmware Loader application This is typically the quickest way to upgrade the RAS Note Titan management software can also be used to upgrade the Touch Screen RAS firmware and images Refer to Titan help for details To upgrade t...

Страница 25: ...tton and then browse to include the location of the Tecom Firmware Loader application in the search for example C Program Files Tecom Firmware Loader inf_driver 7 Run Tecom Firmware Loader for example double click the file C Program Files Tecom Firmware Loader tecom fw loader_Vn n exe When you run it will tell you if the device is ready otherwise you can t select a file 8 Click Select File and the...

Страница 26: ...se to include the location of the Tecom Firmware Loader application in the search for example C Program Files Tecom Firmware Loader inf_driver 7 Run Tecom Firmware Loader for example double click the file C Program Files Tecom Firmware Loader tecom fw loader_Vn n exe When you run it will tell you if the device is ready otherwise you can t select a file 8 Click Select File and then browse to the lo...

Страница 27: ...TS1001 Touch Screen Arming Station Installation Manual 21 Mounting templates Copy these pages as needed Figure 9 Surface mount template ...

Страница 28: ...22 TS1001 Touch Screen Arming Station Installation Manual Figure 10 Flush mount template ...

Отзывы: