


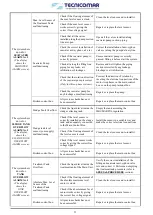
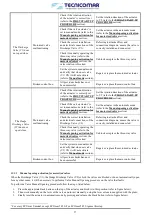


64
Make sure to correct re-connect the Multimedia Filter Station to the system (refer to
INSTALLATION
section);
Perform a “RINSE” procedure (refer to the
FIRST START UP PROCEDURE
section);
Set Multimedia Filter Station into “OPERATION” configuration (refer to
FIRST START UP PROCEDURE
section);
Moreover, the pressure gauge, installed on the inlet of the Multimedia Filter Station, is maintenance free, but tests should be
carried out on regular basis, using a reference instrument, to guarantee the measuring accuracy of the pressure gauge.
If a pressure gauge does not work properly, it is recommended to clean it. To perform a pressure gauge cleaning procedure,
perform the steps listed below:
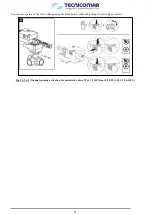
•
Unscrew the pressure gauge from its fittings to remove it from the Multimedia Filter Station.
•
Clean the pressure gauge orifice, using a suitable tool and paying attention to not damage the inner part of the gauge as
this can cause the internal fluid spillage and gauge breakage.
•
Re-install the pressure gauge on the Multimedia Filter Station.
If after performing a pressure gauge cleaning procedure; the pressure gauge is still malfunctioning, replace it.
14.2.10
U.V. Sterilizing System instructions
The operation of the U.V Sterilizer is completely automatic and very little maintenance is required. The only vital operations
are the regular replacement of the germicide lamps and the cleaning of the protective quartz, according to requirements. In fact,
with the time and the use, the U.V. lamps inside the sterilizer may wear out, in this cases, it is advisable to replace the lamps.
The real duration of the lamps depends on various factors, such as the number of times the sterilizer is switched on every day
and shifts from rated voltage. Under normal operating conditions, the useful life of the lamps can be estimated at between 7,000
and 9,000 hours. However, it is advisable to replace the lamp at least once a year.
During the normal operation of the system, substances contained in suspension in the water or incrustations due to the
precipitation of salts may form on the quartz tube. These deposits prevent the passage of the UV rays and reduce the
performance of the system. Therefore you must regularly clean the quartz.
It is not possible to indicate the frequency of cleaning. This depends essentially on the quality of incoming water. Should it
become necessary to clean the quartz too frequently, consider the use of a pre-treatment process (filtering and/or softening).
However, it is advisable to check the surface of the protective quartz tube at least once a quarter, cleaning it if necessary, to
guarantee maximum efficiency of irradiation inside the sterilization chamber at all times.
14.3
System Settings
Some electronic components of the ECOmar S STP may need to be set. For the correct setting procedure of each device follow
the instructions reported on the setting instructions section of the specific device, reported below.
14.3.1
H
2
O
2
Dosing pump setting
Before operating the H
2
O
2
dosing system, it is recommended to check the correct setting of its dosing pump, verifying that the
pump flow regulation matches the value reported on the attached Test Report. If the pump flow regulation need adjustment,
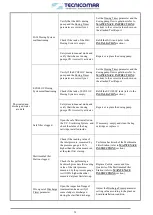
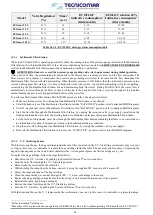
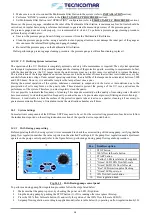
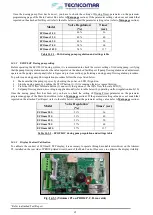
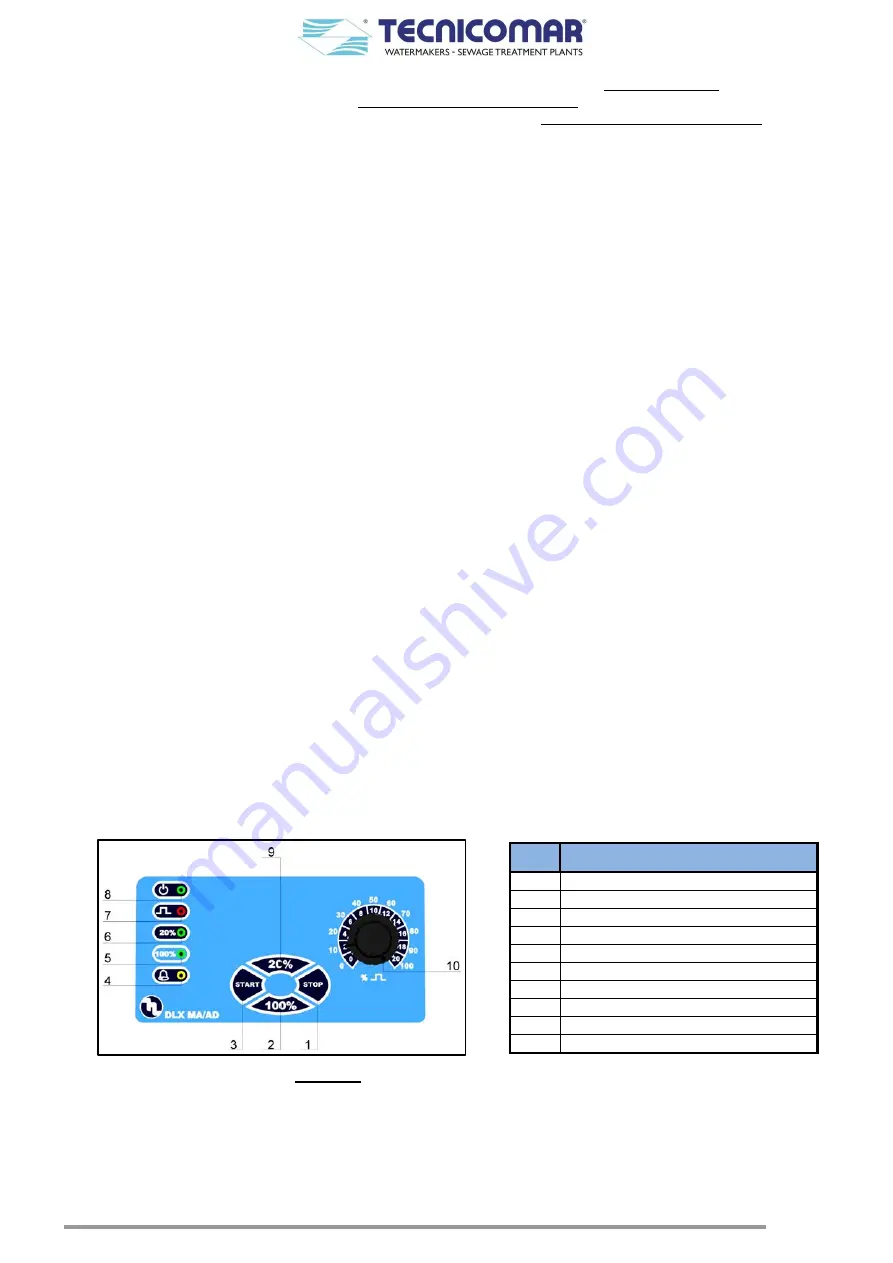
operate on the pump control panel (refer to the figure below); performing a dosing pump flow regulation procedure.
Fig. 14.3.1 – H
2
O
2
Dosing pump control panel
To perform a dosing pump flow regulation procedure follow the steps listed below:
Make sure that the pump is power, by checking the power on LED (8) ignition;
Stop the dosing pump by pushing the STOP button (1), if it is running otherwise ignore this step;
Press the 100% flow full-scale button (2) and verify the ignition of the 100% flow full-scale LED (5);
Set pump flow regulation, according to supplied model (refer to table below) by operating on flow regulation knob (10).
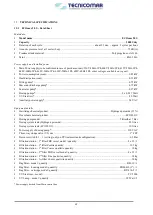
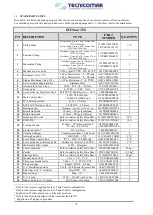
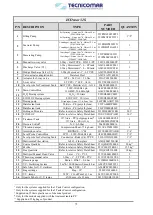
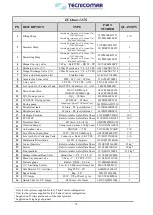
Pos.
Item Description
1
STOP button
2
100% flow full-scale button
3
START button
4
“Yellow” LED level alarm (if supplied)
5
“Green” LED 100% flow full-scale
8
“Green” LED 20% flow full-scale
7
“Red” LED injection pulse flashing
8
“Green” LED power on
9
20% flow full-scale button
10
Flow regulation knob
Содержание ECOmar 145 S
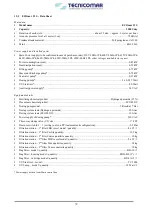
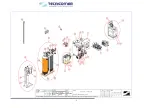
Страница 45: ...45 12 1 1 Macerating Discharge pumps performance curves Fig 12 1 1 1 C30 50Hz performances ECOmar 20 32 S ...
Страница 46: ...46 Fig 12 1 1 2 C30 60Hz performances ECOmar 20 32 S ...
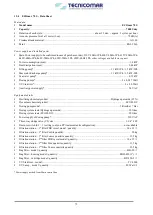
Страница 47: ...47 Fig 12 1 1 3 S42 50Hz performances ECOmar 45 70 145 S ...
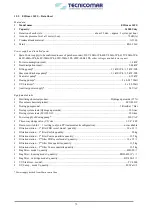
Страница 48: ...48 Fig 12 1 1 4 S42 60Hz performances ECOmar 45 70 145 S ...
Страница 79: ...79 ...