


21
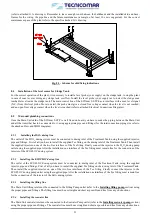
(refer to attached G.A. drawings). Remember to leave enough room between the bulkheads and the installed skid and base-
frames for the wiring, the pipeline and the future maintenance (a margin of at least 10 cm is suggested). For the correct
maintenance space of the plant refer to the specific attached G.A. drawing.
Fig. 8.3 - Scheme for skid fixing indications
8.4
Installation of the level sensor for Sludge Tank
For the correct operation of the plant, it is necessary to install a level probe (your supply) on the sludge tank, to stop the plant
in case of max level avoiding any sludge tank overflow. Install the level probe (your supply) as to detect the sludge max
reachable level inside the sludge tank. The main control box of the ECOmar S STP has to interface with a max level signal
(N.C.) from this level probe. More in detail, the probe must give a closed free voltage contact when the level is not reached;
and an open free voltage contact when the level is reached (refer to attached Electrical Connections Diagrams).
8.5
Main unit plumbing connections
Once the Main Unit skid of the ECOmar S STP is well fixed on board, you have to make the piping between the Main Unit
and all the items that has to be connected to it, using appropriate pipes and fittings (for the interconnection piping size refer to
the attached Flow and P&ID diagrams).
8.5.1
Installing the H
2
O
2
dosing line
The outlet of the H2O
2
dosing system must be connected to dosing inlet of the Treatment Tank, using the supplied injector,
pipe and fittings. First of all you have to install the supplied Tee fitting on the dosing inlet of the Treatment Tank. Then install
the supplied injector on one of the two free interfaces of the Tee fitting. Finally connect the injector to the H
2
O
2
dosing pump
outlet using the supplied pipe. After the installation one interface of the Tee fitting must remain free for the connection of the
injector of the ECOFLOC dosing system.
8.5.2
Installing the ECOFLOC dosing line
The outlet of the ECOFLOC dosing system must be connected to dosing inlet of the Treatment Tank, using the supplied
injector, pipe and fittings. First of all you have to install the supplied Tee fitting on the dosing inlet of the Treatment Tank.
Then install the supplied injector on one of the two free interfaces of the Tee fitting. Finally connect the injector to the
ECOFLOC dosing pump outlet using the supplied pipe. After the installation one interface of the Tee fitting must remain free
for the connection of the injector of the H
2
O
2
dosing system.
8.5.3
Installing the filling line
The Main Unit filling inlet must be connected to the Filling Pump outlet (refer to the
Installing filling pump
section) using
the proper pipes and fittings. The filling line must be as straight and short as possible and free from any obstructions.
8.5.4
Installing the seawater line
The Main Unit seawater inlet must be connected to the Seawater Pump outlet (refer to the
Installing seawater pump
section)
using the proper pipes and fittings. The seawater line must be as straight and short as possible and free from any obstructions.
Содержание ECOmar 145 S
Страница 45: ...45 12 1 1 Macerating Discharge pumps performance curves Fig 12 1 1 1 C30 50Hz performances ECOmar 20 32 S ...
Страница 46: ...46 Fig 12 1 1 2 C30 60Hz performances ECOmar 20 32 S ...
Страница 47: ...47 Fig 12 1 1 3 S42 50Hz performances ECOmar 45 70 145 S ...
Страница 48: ...48 Fig 12 1 1 4 S42 60Hz performances ECOmar 45 70 145 S ...
Страница 79: ...79 ...