background image


Event Reminders


If you set an Event Reminders, an Event Reminder icon will appear in the 


Notification Bar

 when the time is due.

9.3) Calculator

The calculator can be used to perform basic arithmetic or scientific calculations.


1. Touch the 

Menu

 icon > 

Calculator

 to open the calculator interface.


2. Use the keypad to perform your calculation.


3. Touch the 

Options

 button to open the submenu. 


4. Select the 

Advanced panel

 to perform scientific calculations.

Page: 62

Содержание 25

Страница 1: ...You 25 User Manual Dual SIM 1 2 DUALSIM ...

Страница 2: ......

Страница 3: ... 3 2 Home Screen Interface 21 4 Phone Settings 26 4 1 Settings menu 26 4 2 Security settings 27 4 3 Phone calls 29 4 4 Memory card 33 5 Managing Contacts 35 5 1 Importing contact from the SIM card 35 5 2 Creating contacts 35 6 Messaging 38 6 1 SMS and MMS 38 6 2 Using Email 43 7 Getting Connected 45 7 1 GPRS WCDMA 45 7 2 Establishing a New AP Access point 46 7 3 WI FI 46 7 4 Using Bluetooth 49 7 5...

Страница 4: ...9 1 Alarm clock 60 9 2 Calendar 61 9 3 Calculator 62 10 Legal Information 63 11 Health and Safety 66 12 Declaration of Conformity 73 ...

Страница 5: ...3 Volume Down button 4 Options button 5 Home button 6 Back button 7 Touch screen 8 Front camera 9 Back camera 10 Micro USB Charger port 11 3 5mm audio jack 12 Speaker 13 Earpiece 1 1 Overview 1 Introduction Page 5 7 6 1 13 11 8 9 5 2 3 4 12 10 ...

Страница 6: ...ox contents Please check the box includes the following components If there are any items missing please contact your supplier Handset Headset Power Adaptor User Manual Data Cable Quick Start Up Guide Page 6 ...

Страница 7: ...ume Up button During an active call press to increase the volume on the earpiece When not in call press to increase the ringer volume Whilst watching videos or listening to the FM radio press to increase the volume Volume Down button During an active call press to decrease the volume on the earpiece When not in call press to decrease the ringer volume Whilst watching videos or listening to the FM ...

Страница 8: ...o back to the Home Screen Back button Touch to revert to the previous screen or to go back to the Home Screen Options button In standby mode press to select Add Manage apps Wallpaper Search Notifications and Settings Page 8 ...

Страница 9: ...inal batteries and accessories Battery performance depends on many factors including network configuration signal strength the temperature of the environment in which you operate your phone the features and or settings you select and use items attached to connecting ports and your voice data and other program usage patterns Removing and replacing the back cover 2 Getting Started Page 9 ...

Страница 10: ... slot 2 With the phone turned off hold your phone securely with the front facing down Press down firmly with your thumb or finger whilst sliding the back cover down until you hear a click To replace the back cover 1 Push the back cover up towards the top of the phone until it is securely locked into place Page 10 ...

Страница 11: ...move the back cover Refer to Removing the back cover 2 Insert the contacts side of the battery first and then gently push the battery into place 3 Always ensure that the handset is Powered OFF before removing the battery Page 11 ...

Страница 12: ...Removing the battery 1 Remove the back cover Refer to Removing the back cover 2 Lift out the battery from the notch near the bottom of the phone Page 12 ...

Страница 13: ... charging the battery Charging the battery with the Power Adaptor and USB data cable 1 Install the battery correctly into the phone 2 Connect one end of the data cable into the charger port on the phone 3 Attach the other end to the Power adaptor 4 Connect the charger to a standard AC wall outlet 5 When charging is complete unplug the charger from the AC wall outlet and disconnect the cables from ...

Страница 14: ...ected by issues such as your wireless service providers system configuration the functions performed by the network signal strength the ambient temperature cell phones or the number of external devices connected to the phone and your usage patterns for voice data content and implementation procedures To reduce risk of accident or damage Do not attempt to open disassemble or service the battery pac...

Страница 15: ...IM cards For detailed information please contact your network operator Note The phone s Android system supports Dual SIM Dual Standby and Single Pass Mode WCDMA 3G SIM cards must be inserted into the SIM1 card slot to work with a 3G network The SIM2 card slot is for standard GSM SIM cards on a 2G network Inserting the SIM card Page 15 SIM ...

Страница 16: ... the battery 3 Insert the SIM card with its gold contacts facing down and push the SIM card all the way in Removing the SIM card 1 Remove the back cover Refer to Removing the back cover 2 If the battery is installed remove the battery Refer to Removing the battery 3 Pull slide down the SIM card out from the slot Page 16 SIM ...

Страница 17: ...installed on your phone Inserting the Memory card 1 Remove the back cover Refer to Removing the back cover 2 If the battery is installed remove the battery Refer to Removing the battery 3 Insert the micro SD card into the slot with its gold contacts facing down and push it in until it fits into place Page 17 ...

Страница 18: ...ng the Memory card 1 Remove the back cover Refer to Removing the back cover 2 If the battery is installed remove the battery Refer to Removing the battery 3 Pull slide the memory card from the holder Page 18 ...

Страница 19: ...mes the SIM card will be blocked Please contact your network operator for a PUK code PIN Unblocking Key Powering OFF If you do not need to use your phone you can turn the power OFF to save battery life 1 If the display is OFF press the Power ON OFF button for a few seconds to turn the display back ON 2 Slide the padlock to the right to unlock the screen 3 Press and hold the Power ON OFF button for...

Страница 20: ...r left to right Touch and drag an item to move it or to perform other operations You can also switch the phones screen such as text input screen gallery screen between portrait and landscape mode by orientating the phone in the upright or sideways position Lock and unlocking the screen You can lock the touch screen and the buttons to prevent accidental operations When the phone is powered ON press...

Страница 21: ...ted to input a PIN Code when you first insert it into your phone The PIN Code may be supplied by your network operator along with the SIM card If you lose your PIN Code please contact your network operator for further information 3 2 Home Screen Interface You can add or remove shortcuts in your Home Screen Touch and drag the Application icon and place it where you require it on the screen You can ...

Страница 22: ...an access information of the calendar events new messages new SMS and on going activities such as incoming calls or status of the current call You can also open the Notification Panel to view the network operator or open messages warning or activities Page 22 ...

Страница 23: ...e your finger upwards Extended Home Screen Interface The Home Screen extends to the left and right beyond the display On the Home Screen page touch and slide your finger horizontally This provides more space to add shortcuts gadgets and other items Customising your Home Screen wallpaper 1 On the Home Screen press the Options button Wallpaper 2 Select the desired image you want to use for your wall...

Страница 24: ... desired shortcut When the phone vibrates the icon will appear on your Home screen Deleting an Application icon from the Home Screen 1 On the Home Screen touch and hold down the application icon you want to remove 2 When the icon enlarges and the phone vibrates drag the icon into the recycle bin Then you can remove your finger from the screen Creating a Folder in the Home Screen You can create and...

Страница 25: ...use the screen s keyboard to input select copy or cut the text and then paste the text into the text box in the same or different applications 1 When a dialog box appears touch the word and drag the cursor to select the text The text will highlight with a background colour 2 Select ALL to highlight all the contents in the text column 3 Touch and hold the selected text to Copy or Cut from on the di...

Страница 26: ...gs Allows you to set voice and video calls plus other features such as voicemail broadcast messages call barring waiting and forwarding Sound Enables you to select different profiles and set the call ringtones and Alerts Display Enables you to set the brightness of the screen and associated screen backlight delay Location security Enables you to select a GPS location source and set the screen unlo...

Страница 27: ...preferred keyboard to compose messages Voice input output Allows you to access the TTS settings Accessibility Allows you to change the setting of the Power button Time date Allows you to set the date time time zone and date or time format About phone Enables you to check the status legal Information and software version information 4 2 Security settings Using a PIN code to protect your SIM card Yo...

Страница 28: ...e screen press the Power ON OFF button then slide the padlock icon to the right Creating and enabling the screen unlock pattern 1 Press the Menu icon Settings Location security Set screen lock Pattern to enter into the settings options 2 Follow the instructions on the screen and connect at least four points together the phone will record the pattern select Confirm 3 To unlock your phone draw the s...

Страница 29: ...4 3 Phone calls 1 Phone icon 2 Contacts icon 3 Messaging icon 4 Menu icon Page 29 2 3 4 1 ...

Страница 30: ...n to make the call Making a call from Contacts 1 From the Home Screen touch the Contacts icon so the Contact List appears 2 Touch the desired Contact from the list and press the Call button You can also search for a contact from your Contact List 1 On the Home Screen touch the Contacts icon and press the Options button select Search and input a contact name or other keywords of the contact you wis...

Страница 31: ...appears 2 Input the contact number or the name of the contact you want to call 3 Touch the Video Call icon to make the call Note For video calling feature to work a WCDMA 3G SIM card must be inserted into the SIM1 card slot Please contact your network operator for further information Making a Conference call You can create a phone session between yourself and two or more other parties This feature...

Страница 32: ...all the phone will display the information on the screen 2 Slide the Answer Tab to the right to answer the phone 3 When the call is finished touch the End icon to end the call Adjusting the volume This enables you to adjust the volume of the ringtone or multimedia application 1 Press the Volume Up or Volume Down button on the left hand side of your phone to display the volume on the screen 2 If it...

Страница 33: ...tching videos use the Volume Up button and Volume Down button to increase or decrease the volume 4 4 Memory card Check your phone and storage card capacity by pressing the Menu icon Settings Storage to access the storage settings submenu Using the phone as a USB storage device In order to transfer music and pictures from your computer to your phone s Memory card connect your phone using the USB ca...

Страница 34: ... and email attachments to the Memory card 2 Clear all temporary Internet Files and History information in the Browser 3 Uninstall the applications which you do not wish to use any longer 4 Restore Factory settings Note Resetting the phone will delete all the data including downloaded applications and the phone will be re set back to its original Factory settings You must back up important data fro...

Страница 35: ...re several ways to create contacts including the use of Dial up pad SMS selecting Contacts and using Call Records You can add new contacts with additional personal information Setting this up will allow you to call the person quickly or browse the information more efficiently Contacts are saved in the phones memory or in the SIM card If you store the information on the SIM card you can fill the na...

Страница 36: ... internal memory or on the SIM card 2 Select the desired location and input the contact information in the fields 3 Touch Done to save the entry Adding Contacts to Favourites You can select specific contacts in the Contact List to add to your favourites to manage your contacts more conveniently 1 On the Home Screen touch the Contacts icon The Contact List will display the name of the Contacts Sele...

Страница 37: ...contact list matches will be displayed on the screen Editing Contact information You can always change the stored information of the contact person 1 On the Home Screen touch the Contacts icon 2 Select the contact you wish to edit 3 Press the Options button Edit contact to amend the details of the contact person 4 Touch Save when finished or touch the Back button twice to ignore all changes and ex...

Страница 38: ...s Multimedia Messaging and can contain Text Pictures Audio Recording or Audio Files Note When you add a subject title or attachment the phone will convert a SMS to MMS message automatically Composing an SMS 1 On the home screen press the Messaging icon New Message Compose new message 2 Enter a contact number or select the desired recipient from the Contact List 3 Enter the message in the Type to c...

Страница 39: ...d select SIM1 or SIM2 to send the MMS message Save the information as a Draft When composing a message the MMS or SMS message can be saved to the Draft box by pressing the Return Back button To edit the message touch the Messaging icon on the Home Screen and select the draft message to edit the information and then touch the Send icon to complete the process Reading and replying to a message Depen...

Страница 40: ... are sent and received by you and your contacts on the screen SMS conversations will be listed in the order of the time they are received The latest messages will be on the bottom of the conversation list Forwarding Messages 1 On the Home Screen touch the Messaging icon and scroll to the desired message 2 Touch and hold the message and an options menu will pop up Select Forward on the options menu...

Страница 41: ...y reports for each message that you send Manage SIM1 Card messages Manages the messages stored in the SIM1 Manage SIM2 Card messages Manages the messages stored in the SIM2 Multimedia message MMS settings Delivery Report Select this option to receive Delivery reports for each message that you send Read Report Select this option to receive Read reports for each message that you send Auto retrieve S...

Страница 42: ... displayed on the Notification Bar when new SMS are received Select ringtone Assigns a ringtone to be played when a new SMS or MMS is received Note The ringtone will be played for a short period of time after it is selected Vibration Allows you to enable or disable the vibration function when a new SMS or MMS is received SIM2 Notification settings Notifications A notification will be displayed on ...

Страница 43: ...l function for the first time 1 On the Home Screen Touch the Menu icon Email to enter into the Set Up Email screen 2 Input your email account and password details and touch Next or Manual setup to setup the email server 3 Select the POP3 account or IMAP account after checking your Email parameters 4 Set up the Receiving Server and Sending Server for the email account if required 5 Touch Finish whe...

Страница 44: ...ail 6 Touch Send to send the email Reading an Email Touch the Email after the Account has been established Then you will be able to Log into the Mailbox directly and read the Inbox touch the title to view the email information Receiving New Email Log into the Mailbox then press the Options button and touch Refresh to receive a New Email Deleting an Email On the email account Inbox press and hold t...

Страница 45: ... the SIM card and Power ON it will be set to use GPRS WCDMA service operator automatically 1 Touch the Menu icon Settings Wireless network Mobile networks to enter into the Mobile network settings panel 2 Select either Network Operator or Access Point Name APN for a network connection Note The Access Point of the SIM card is normally detected by the phone automatically Do not modify the parameter ...

Страница 46: ...7 3 WI FI Wi Fi provides wireless internet access over distances of up to 100 meters To use Wi Fi on your phone you need access to a Wireless Access Point Turn on WI FI and connecting to a Wi Fi network Touch the Menu icon Settings Wireless networks Wi Fi settings to set up and manage your wireless access points Select the Wi Fi check box to turn Wi Fi ON The phone will scan for available wireless...

Страница 47: ...s enabled this icon appears in the Notification Bar whenever the phone detects an available wireless network within range Next time you use your phone to detect Wi Fi Networks you will not be prompted to enter the Network Key of the previously accessed Wi Fi Network unless you perform a Hard Reset which will erase any custom settings on your phone Using the Browser You can start up the Browser to ...

Страница 48: ...face and use the keypad to enter a Web address As you enter the address matching web page addresses will appear on the screen Select an address to go directly to that web page or continue to enter the web page address Browsing the Web Slide your finger on the screen to navigate and view other areas of the web page You can also use your fingers to pinch or spread the screen to zoom IN and OUT Manag...

Страница 49: ...indow to open a new browser window You can open multiple browser windows to access multiple sites Browser settings 1 Touch the Menu icon Browser to open the Browser window 2 Press the Options button More Settings to adjust the parameters of your browser settings 7 4 Using Bluetooth Bluetooth is a short range wireless communications technology that allows devices to exchange information over a dist...

Страница 50: ...ne visible for 119 seconds to pair with another Bluetooth device Pairing with a Bluetooth device You can pair your phone with another Bluetooth device 1 Make sure the phone is Bluetooth enabled 2 Touch the Menu icon Settings Wireless networks Bluetooth settings to access the Bluetooth Setting options 3 Select Scan for devices then your phone will start searching for Bluetooth devices within range ...

Страница 51: ...nd another Bluetooth enabled device such as a phone or computer The first time you transfer information between your phone and another device you need to enter or confirm a security passcode Once the device is paired with your phone you will not need to set up the pairing process again unless you delete the device from your phone 7 5 Synchronising information You can set up your phone to synchroni...

Страница 52: ...e normal operation of the phone When Syncing the Data Synchronisation icon will be displayed in the panel Auto sync Enable this to automatically sync data and all Applications Note By default whenever you make changes or receive new information all Personal Data in the Calendar or Contacts will be synchronised Synchronizing your phone with your computer with a USB data cable 1 Connect your phone t...

Страница 53: ...der to play any audio files Opening the Music Player and Music Library 1 Touch the Menu icon Music to access the Music Library Interface Your list of music is stored in the phone and is divided into the following categories Artists Albums Songs and Playlists in the Music Library Interface 2 Select the desired category to display the list of music files Note When music is played in the background y...

Страница 54: ...usic to access the Music Library Interface 2 Select Playlist on the Music Library Interface Touch and hold the song in the Playlist allows you to Play Edit Delete or Rename your playlist Radio The phone supports a FM Radio function Plug in your headset before use as this will function as an antenna as well as a headphone for you to listen to the radio The broadcast reception quality may be affecte...

Страница 55: ...nce finished you can Playback the recording or Pause and Resume 8 2 Photos and Video The camera application can automatically locate photos and videos stored on the phone and memory card You can use the camera application to View and Edit Photos and set the photos as backgrounds or contact images and watch videos stored on mobile phones and the memory card Note Ensure that you install the memory c...

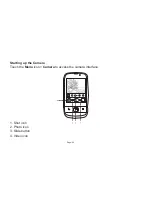
Страница 56: ...Starting up the Camera Touch the Menu icon Camera to access the camera interface 1 Shot icon 2 Photo icon 3 Slide button 4 Video icon Page 56 ...

Страница 57: ...e horizontally Use the slide button to switch between Photo and Video Mode After entering Photo or Video Mode press the Portrait icon 5 to switch between front or back camera 6 Page 57 6 A W Back Front 5 Back Front ...

Страница 58: ... mode and press the icon again to stop shooting 8 3 Gallery 1 After taking the picture or video press the Menu icon Gallery to display the list of pictures taken or video recordings 2 To view pictures in full screen mode select the image and touch the screen again to enlarge the picture 3 Press the Options button again to access more options Page 58 ...

Страница 59: ... Rotate left Rotates the picture left Rotate right Rotates the picture right The phone will classify the Photo and Video according to the storage Location and then Save these files to the Folder You can touch a Folder to View Photo or View Video 1 Touch the desired Folder to View the Pictures it contains 2 Touch the desired Pictures and View Pictures in Full screen Mode When Viewing Pictures in Fu...

Страница 60: ... 1 Touch the Menu icon Alarm to access the alarm interface 2 Press the Options button and select Add alarm to display the Set Alarm panel 3 Edit the following to set your alarms Turn on alarm Activate or de actives your alarm Label Edit and give your alarm a title Time Adjust to set the time of the alarm Repeat Select what days of the week to sound the alarm Vibrate Enables or disable the vibratin...

Страница 61: ...Touch More New event to open the Event Details interface 4 Input the details and set different reminders for this events Calendar View You can set all Day Week Month Agenda or Today Mode for the Display Mode of the phone To Change the Calendar Mode 1 Touch the Menu icon Calendar to open the calendar 2 Press the Options button to open the display options 3 Select to view the calendar by Day Week Mo...

Страница 62: ... 9 3 Calculator The calculator can be used to perform basic arithmetic or scientific calculations 1 Touch the Menu icon Calculator to open the calculator interface 2 Use the keypad to perform your calculation 3 Touch the Options button to open the submenu 4 Select the Advanced panel to perform scientific calculations Page 62 ...

Страница 63: ...s or in any form photographically mechanically or electronically without the written permission of Tecmobile International Ltd Trademarks and Permissions The Bluetooth trademark and logos are owned by the Bluetooth SIG Google Mail is a trademark of Google Inc Wi Fi Wi Fi Protected Access Wi Fi Protected setup and WPA are trademarks of the Wi Fi Alliance Microsoft Hotmail Outlook Windows Live and W...

Страница 64: ...cular use or satisfactory quality are made in relation to the contents accuracy or reliability of this manual Tecmobile reserves the right to modify change specifications or information in this manual without any consequential liability or prior notice Under no circumstances except as required by applicable law will Tecmobile or any of its licensors be responsible for indirect damages or consequen...

Страница 65: ...ot be used without the express permission of the service provider or content owner and unless given specific permission by them you should not transmit upload publish modify copy or distribute in any way the services or content displayed through this device The device may contain technology software or commodities which are subject to regulations and export laws from the US and other countries Div...

Страница 66: ...ed using standard operating positions with the phone transmitting at its highest certified power level however the actual SAR level of the phone while operating can be well below the maximum value In general the closer you are to a base station the lower the power output of the phone The SAR values may vary depending on different models of phones To ensure the safety and health of the users the ph...

Страница 67: ...charge the type of battery and the charger used The battery can be charged and discharged hundreds of times but it will gradually wear out When the operation time is noticeably shorter than normal it is time to replace the battery with a new one Use only original or approved chargers and batteries Unplug the charger from the electrical plug and the device when not in use Do not over charge as this...

Страница 68: ... operation of the equipment and for the safety of personnel Do not expose the equipment to temperature below 10 or above 50 centigrade Keep the phone in an appropriate holder while you are driving Do not put it on a seat or places where it could fall when driving To ensure safe driving and avoid accidents DO NOT use the phone when driving Medical Devices Ensure that you switch OFF your phone in ar...

Страница 69: ...e fitted with a pacemaker should note the following Always keep a distance at least 6 inches between the phone and the pacemaker when the phone is switched ON Do not carry the phone in a breast pocket Listen to the phone using the ear which is farther from the pacemaker Caution Please switch OFF your phone if you feel there is interference and consult the doctor as soon as you can Page 69 ...

Страница 70: ... phone cases that have magnetic closures These can affect the performance and life of the phone and its components If you or your family have a medical record of dizziness or epilepsy please consult your doctor first if you want to play phone games or use the torch Emergency Calls This phone like any wireless phone operates using radio signals which cannot guarantee connection in all conditions Th...

Страница 71: ...n and pets They may accidentally damage the phone or choke on small parts Keep the phone dry and avoid liquids that corrode the phone Do not use the phone with a wet hand which may cause an electric shock Do not store the phone in hot areas which can shorten the life of electronic devices damage batteries or melt accessories Do not store the phone in cold areas When the phone warms up to its norma...

Страница 72: ... use a dry or static cloth Do not use chemicals such as cleaning solvents to clean the surface Switch OFF the phone first before cleaning Do not paint the phone Paint can prevent proper operation If your phone has a torch do not use it too close to the eyes This may cause damage to your eyes If the phone or battery gets wet and the label on the phone are damaged phone repairs are no longer guarant...

Страница 73: ...he accessories are in compliance with the appropriate standards EN 301511 EN 300328 EN 301489 1 7 17 EN 60950 1 EN 50360 EN 50332 1 EN 50371 EN 62311 following the provisions of Radio Equipment and Telecommunication Terminal Equipment directive 1999 5 EC 12 Declaration of Conformity Page 73 ...

Страница 74: ... www tecmobile com Tecmobile reserves the rights to change specifications and parameters of the products without prior notice 0700 MODEL NO TEC YOU25 ...

Отзывы: