background image

29

7.3 AV source

> Press 

the 

AV 

button to open the 

AV sources 

selection window to select a device 

connected to the HDMI inputs (

HDMI 1/2

), component input (

YPbPr)

, Scart socket 

(

EuroAV

), VGA port (

VGA

), video port (

Video

) or S-Video port (

S-Video

).

Select the source you want using the 

up/down arrow keys 

and confirm by 

pressing the

 OK 

button to switch over to the selected input.


To do this also note points 7.2.1 and 7.2.3 in the quick start manual.

7.4 Channel/Source information
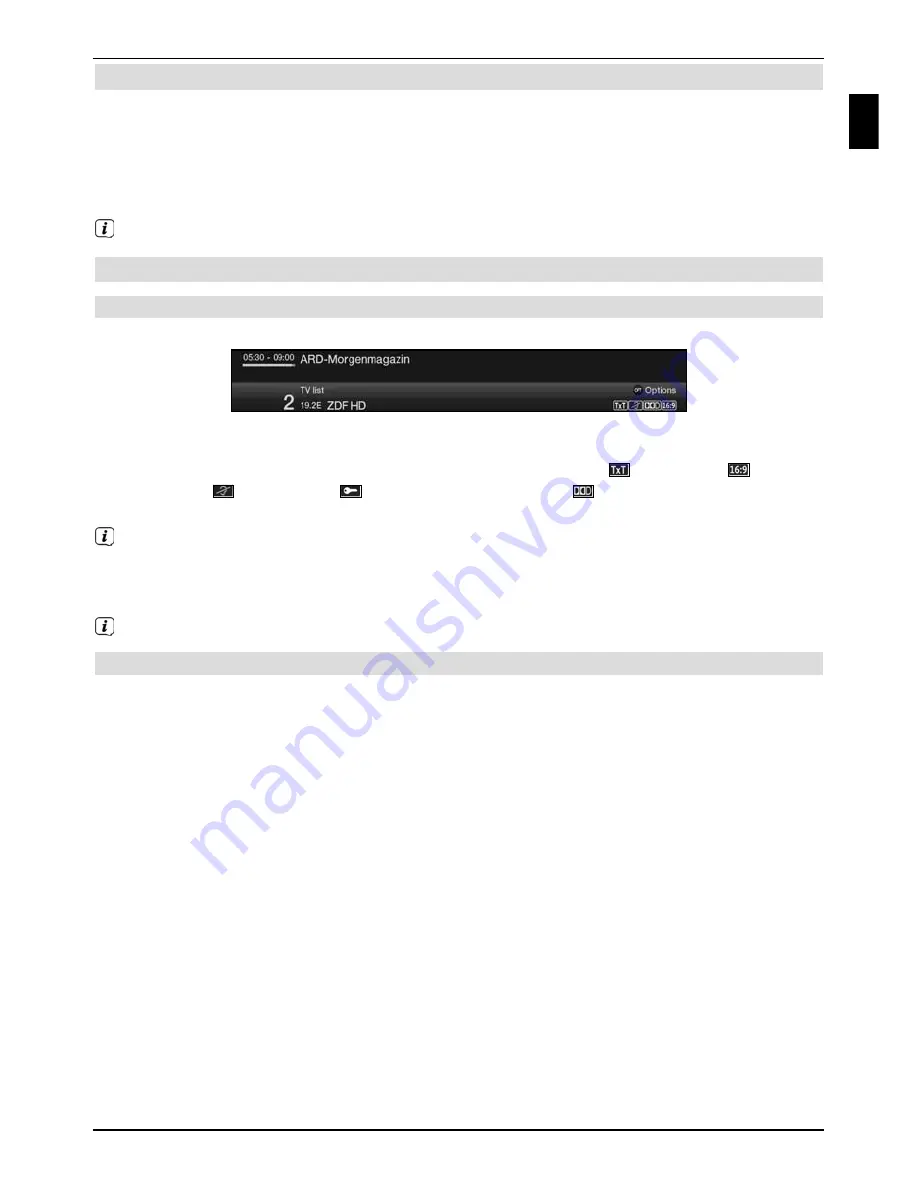
7.4.1 Infobox

An Infobox appears on the screen for the set period every time you change channels.

The channel slot and name as well as the source of the channel selected, the channel list in 
which the channel is located and the title of the current programme with the start/end time 
and the progress bar, as well as further channel information (e.g. 

 for teletext, 

 for 16:9 

transmissions, 

 for subtitles, 

 for encrypted channels or 

 for Dolby Digital broadcasts) 

are shown in this Info box.


The progress bars are coloured yellow according to the amount of transmission time 
already expired for the current programme. If the beginning of the progress bar is coloured 
red the transmission started too early and if the end of the progress bar is coloured red the 
current programme has overrun.


The current time is shown in the upper right-hand corner of the screen.

7.4.2 Displaying the clock and channel information

This function allows you to see channel information about the channel being watched.

> Pressing 

the 

Info

 button allows the information mentioned in point 7.4.1 of the 

quick start manual to be displayed again for the set period.

Operating the unit

EN

Содержание TechniVision 22 HD

Страница 1: ...Quick start manual and warranty documentation TechniVision 22 26 32 HD...

Страница 2: ...t 5 DC socket 6 S Video input 7 Audio input R L S Video Video and component input 8 Video input 9 Component input 10 Cable guide 11 Stand attachment cover 12 HDMI input 2 13 HDMI input 1 14 Audio outp...

Страница 3: ...o input R L S Video Video and component input 7 Video input 8 Component input 9 Mains power switch 10 Mains power connection 11 Stand attachment cover 12 HDMI input 2 13 HDMI input 1 14 Audio output d...

Страница 4: ...ys Recording SFI Page up Back TV Radio mode Rewind Info Fast forward Programme Volume Menu Zoom Format Function keys Stop Arrow keys Pause playback Function selection Option selection Page down DVR mo...

Страница 5: ...5 Front of TV Display Front of TV Display Display IR receiver LED EN...

Страница 6: ...nly for the reception and playback of picture and sound signals The TV is only suitable for connection to audio and video devices antenna units and computers that meet DIN standards and have a CE mark...

Страница 7: ...remove the mains and antenna plugs from the set Overvoltage can damage the TV In the event of a noticeable defect on the set if a smell is produced or if smoke comes out if there are severe malfuncti...

Страница 8: ...eration depends on the settings you select the functions you use and the devices inserted attached such as CI modules or USB storage media Thus you can reduce power consumption during operation by e g...

Страница 9: ...gain 3 2 Remote control code By switching over the remote control option it is possible to use this remote control to operate a TechniSat television and two TechniSat receivers using the same coding H...

Страница 10: ...al and or analogue or the DVB T antenna to the antenna input on the television c Connecting the television to a BluRay DVD player using an HDMI cable or a cinch components cable with the cable adapter...

Страница 11: ...sound or Hi Fi amplifier to obtain the best possible sound quality d If your amplifier has an appropriate electrical input S P DIF connect the Audio output digital electrical to the input on your ampl...

Страница 12: ...trol are shown with their current functions In this instruction manual the terms shown in the OSD as well as the buttons to be pressed are highlighted from the rest of the text by the display format u...

Страница 13: ...h the main menu and call up a submenu The objective of the example is to call up the Picture settings menu Press the Menu button The main menu appears on the screen Select the Settings menu item by mo...

Страница 14: ...move the highlight from line to line and to move upwards and downwards page by page using the page up down buttons You will see the so called menu path in the uppermost line of the menu This shows yo...

Страница 15: ...o and confirm with the OK button According to your selection the changes are now saved or rejected and you return to the next menu level up Alternatively Press the Menu button to leave the menu direct...

Страница 16: ...ing the selection list Press the OK button to open the selection list Highlight the setting you want using the up down arrow keys By pressing the up down arrow keys it is possible to move the highligh...

Страница 17: ...S keyboard can also be used at any time The functionality of the QWERTY keyboard is identical to that of the alphabetic keyboard They only differ in the arrangement of the various letters numbers char...

Страница 18: ...additional press of the same numeric keypad key Press as often as necessary to reach the desired character This will be added to the entered term after a short delay The various numeric pad keys are a...

Страница 19: ...mber of subordinate selection options are located in the option groups Highlighting one of these option groups automatically opens another window on the left You can use the up down arrow keys within...

Страница 20: ...creen carefully Menu language Use the up down arrow keys to highlight the menu language you want and confirm by pressing the OK button The preferred audio language will be set automatically according...

Страница 21: ...note the message s that appear and confirm by pressing the OK button Selection of reception signals Use the up down arrow keys to select the available reception signals DVB S for digital satellite cha...

Страница 22: ...ion of your reception equipment does not match the default setting you can open the antenna configuration by pressing the Option button and adjust the setting on your reception equipment Antenna confi...

Страница 23: ...arch you can skip this step by pressing the Info button The ISIPRO service list update item can only be selected if you have activated the DVB S source in Selecting the reception signals After the ser...

Страница 24: ...regional programme for a programme provider as per point 7 2 4 this will be saved in the same way for this programme provider Software update If you do not want to wait for a search for new software...

Страница 25: ...t want to wait for the SFI data to be downloaded you can skip this process by pressing the Info button If the SFI update has been skipped your TV will download the SFI data automatically at the set ti...

Страница 26: ...list is available This process takes several seconds to complete The LCD panel is already switched off during the test The device switches completely into standby mode after completion of the test Th...

Страница 27: ...complete the entry If you wish to enter a one two or three digit number you can accelerate the switching process by holding down the last digit for longer or by pressing the OK button 7 2 3 Using the...

Страница 28: ...uring the initial installation you selected your preferred regional programmes If you now pick one of these regional programmes a note appears stating that further regional programmes are available fo...

Страница 29: ...urrent programme with the start end time and the progress bar as well as further channel information e g for teletext for 16 9 transmissions for subtitles for encrypted channels or for Dolby Digital b...

Страница 30: ...und settings menu To adjust the volume of your TV press Volume to increase the volume and Volume to decrease it 7 6 1 Using mute To switch the sound off mute press the Sound on off button press the ke...

Страница 31: ...option selection under the Subtitles menu item you can select Subtitles when you want to display them 7 10 Teletext Your TV can display teletext information on channels that broadcast teletext data T...

Страница 32: ...he switch off time of your TV using the sleep timer You can set the sleep timer by pressing the Sleep timer button multiple times 15 minutes to 2 hours or switch it off You will see a display on the s...

Страница 33: ...o be shown Time line a graphical display of the viewing time in the form of progress bars 2 Channel name with the corresponding channel slot within the active favourites list 3 Progress bars or the st...

Страница 34: ...n you are out You can do this by programming the timer either manually or automatically using the SFI 3 Timeshift recording Timeshift recording enables time shifted TV viewing You can start to play ba...

Страница 35: ...es to an attached USB storage device when you are out for example To do this timers can be programmed in the main menu under Timer organiser 8 2 DVR playback You can access your DVR recordings using t...

Страница 36: ...you get to the place you want in the recording you can return to normal playing mode by pressing the Play Pause button 8 2 4 Jogshuttle function To quickly and accurately navigate to a position in th...

Страница 37: ...37 EN...

Страница 38: ...device To be sure of enjoying your guarantee in full make absolutely sure that only original TechniSat accessories such as cables plugs etc are used during installation Invalidation of the warranty c...

Страница 39: ...etc but not smartcards and CI modules that are not included with delivery in the original packaging along with a proof of purchase copy of invoice or till receipt and the completed Service Report The...

Страница 40: ...hone optional First name Service Report Note please cut here TechniSat registration card 5 year guarantee By submitting a fully completed and signed TechniSat registration card your two year legal war...

Страница 41: ...and in doing so consent to the use of my address for the purposes of TechniSat communications via post Yes I want to receive communications via email as well optional please cut here Service Report i...

Страница 42: ...42...

Страница 43: ...43 EN...

Страница 44: ...ion only with the publisher s approval TechniVision 22 HD TechniVision 26 HD TechniVision 32 HD and TechniSat are registered trademarks of TechniSat Digital GmbH PO Box 560 54541 Daun www technisat co...

Отзывы: