Teatronics Lighting Controls 224 Скачать руководство пользователя страница 32

PRODUCER 3

06/18/97

Lighting Control Console

page

TEATRONICS LIGHTING CONTROLS,

TEATRONICS LIGHTING CONTROLS, 

 INC.

INC.

25

OPERATION 

(continued)

PLAY MODE

 (continued)

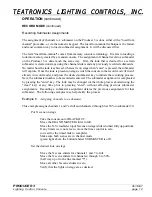
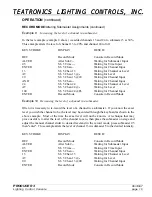
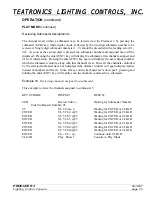
Reviewing Submaster Assignments

The channel levels within a submaster may be reviewed on the Producer 3 by pressing the
submaster (SUB) key, while in play mode, followed by the two digit submaster number to be
reviewed.  Single digit submaster numbers (1 - 9) should be preceded with a leading zero (01 -
09).  As soon as the second digit is pressed, the submaster number and assigned time will be
displayed.  Pressing the enter (ENT) key will display the submaster, first channel assigned, and
it's level information.  Pressing the enter (ENT) key again will display the next channel number
which the submaster controls, along with that channel's level.  Once all the channels controlled
by the selected submaster have been displayed the dimmer window will again display dashes
instead of numbers and levels.  Since all keys on the keyboard are "auto repeat", pressing and
holding the enter (ENT) key will rapidly scan the channels contained in a submaster.
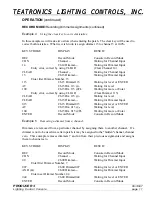
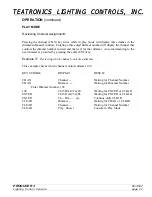
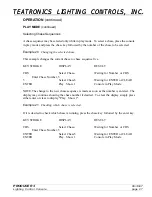
Example 18

Reviewing channels assigned to a submaster.

This example reviews the channels assigned to submaster 5.

KEY STROKE

DISPLAY

RESULT

SUB

Review Sub# --

Waiting for Submaster Number

Enter Submaster Number, 05

05

Sb  5 Time   2

Waiting for ENTER or CLEAR

ENTER

Sb  5 Ch 4 @25

Waiting for ENTER or CLEAR

ENTER

Sb  5 Ch 5 @25

Waiting for ENTER or CLEAR

ENTER

Sb  5 Ch 6 @25

Waiting for ENTER or CLEAR

ENTER

Sb  5 Ch12@25

Waiting for ENTER or CLEAR

ENTER

Sb  5 Ch13@25

Waiting for ENTER or CLEAR

ENTER

Sb  5 Ch24@25

Waiting for ENTER or CLEAR

ENTER

Sb -- Ch -- @--

Continue until CLEAR

CLEAR

Play   Show 1

Console in Play Mode

Содержание 224

Страница 1: ...NC INC TEATRONICS LIGHTING CONTROLS INC 1236 Los Osos Valley Road Suite G 1236 Los Osos Valley Road Suite G Los Osos California 93402 Los Osos California 93402 Phone 805 528 6900 Phone 805 528 6900 FA...

Страница 2: ...he carrier immediately to file a claim for damages When the equipment left the factory it was in good condition and properly packed If you find the equipment to be in accordance with your order and th...

Страница 3: ...s and some mechanical assemblies Replacement parts should be ordered from the factory and will be shipped by United Parcel Service Tested replacement circuit boards carry a 90 day warranty Defective c...

Страница 4: ...t you in becoming familiar with your Producer 3 its installation operation troubleshooting and maintenance Ownership of a sophisticated piece of electronic equipment involves more than just buy it and...

Страница 5: ...l Installation 1 Interface to Dimmers 2 Grounding 3 OPERATION 4 Getting Up and Running 4 Understanding the Patch 6 Record Mode 8 Recording Dimmer Assignments 8 Recording Submaster Assignments 12 Alter...

Страница 6: ...4 Clearing a Single Submaster 35 Initializing the Chase 35 One Scene 48 Channel Operation 35 One Scene 96 Channel Operation 35 IN CASE OF TROUBLE 36 Trouble Shooting 36 Self Diagnostic Techniques 39 S...

Страница 7: ...aster 13 8 Adding channels to a previously recorded submaster 14 9 Increasing the level of a channel in a submaster 16 10 Decreasing the level of a channel in a submaster 16 Programming Chases 11 Reco...

Страница 8: ...rd intensity lamps Use of high intensity quartz lamps will overload the internal power supply A high intensity quartz work light option is available from Teatronics Lighting controls Inc ELECTRICAL IN...

Страница 9: ...gnals using Strand s CD 80 pinouts Screening on the back of your Producer 3 will identify which signals are supplied to the 5 pin connector Analog Multiplex Pinouts Four Pin Standard Pinouts USITT AMX...

Страница 10: ...he ground is to shield the components of a system from radiating or receiving electrical noise by shunting the noise to ground With equipment sensitive to noise such as audio dimming and microcomputin...

Страница 11: ...ducer 3 that resemble those of a standard two scene console are the Grand Master control and the Blackout switch The Grand Master slider will bring up and down the levels of all the lights on stage in...

Страница 12: ...sed to back up or abort the process Remember the picture isn t taken until enter is pressed The analogy of a snap shot of the console at an instant in time is a good way to visualize how the submaster...

Страница 13: ...cover all the console s features We recommend that the entire manual be read to learn all the functions and features of the console Please note if this section of the manual has been confusing the ex...

Страница 14: ...56 70 times 80 is 56 SAMPLE PATCH TABLE As you can see from the table each dimmer may be assigned to only one channel but each channel may have more than one dimmer assigned to it You may also notice...

Страница 15: ...ow CH02 DIMMER indicating that a dimmer number is to be entered Enter the three digit number reperesenting the dimmer you wish to assign to this channel leading zeros are allowed but not required in t...

Страница 16: ...s being 100 of the channel level setting KEY STROKE DISPLAY RESULT REC Record Mode Console in Record Mode CHN Channel Waiting for Channel Input 15 Ch15 Dimmer Waiting for Dimmer Input Enter first Dimm...

Страница 17: ...ting for more or Enter AND Ch15 Dimmer Waiting for Dimmer Input Enter next Dimmer Number 190 190 Ch15 Dimmer190 Waiting for level or ENTER THRU Ch15 Dimmer Waiting for Dimmer Input 192 Ch15 Dimmer192...

Страница 18: ...ng for more or Enter Entry error correct by using CLEAR Clear Dimmer 115 CLEAR Ch15 Dm 115 Waiting for level CLEAR Ch15 Dimmer Waiting for Dimmer Input 015 Ch15 Dimmer015 Waiting for level or ENTER AT...

Страница 19: ...e desired submaster key to initiate the recording process Next the submaster number to be recorded is entered The submaster assignment is compleated by pressing the enter key The look may be changed o...

Страница 20: ...to assign channels 1 and 7 at 50 channels 4 through 6 at 25 and channel 12 at full to submaster 5 Set the desired look on stage Since submaster 30 was recorded with channels 1 and 7 at full and channe...

Страница 21: ...rs Move the Y crossfader slider to put the Y scene on stage as well as the X scene Put X scene in submaster mode Press the SUBMASTER button for scene X The green LED above the button will light to sig...

Страница 22: ...ents Enter the channel number to add or the channel whose level you wish to alter After entering a channel number you may use the AND AND or and thru THRU or keys to enter additional channels or group...

Страница 23: ...Chan 24 FL Waiting for Channel Input ENTER Record Mode Console in Record Mode Example 10 Decreasing the level of a channel in a submaster Often it is necessary to re record the level of a channel in a...

Страница 24: ...been selected it remains selected until changed Upon selecting a chase to be recorded the chase type defaults to a channel chase unless changed Once the sequence has been entered the chase is recorde...

Страница 25: ...Record Mode Console in Record Mode CHASE Alter Chase Waiting for ChaseNumber Input 1 Chase 1 c Waiting for Channel Input Enter first Channel Number 1 1 Chase 1 c1 Waiting for next or ENTER Enter next...

Страница 26: ...xt or ENTER Enter last Channel Number 6 in sequence THRU Chase 1 c 2 Waiting for Channel Input 6 Chase 1 c6 Waiting for next or ENTER Enter Submaster Number 20 AND Chase 1 c Waiting for next or ENTER...

Страница 27: ...blackout step Assume Submaster 34 has already been recorded KEY STROKE DISPLAY RESULT REC Record Mode Console in Record Mode CHASE Alter Chase Waiting for ChaseNumber Input 5 Chase 5 c Waiting for Ch...

Страница 28: ...for Channel Input Enter first Dimmer Number 1 CHS Chase 7 d Waiting for Dimmer Number 1 Chase 7 d1 Waiting for next or ENTER Enter next Dimmer Number 92 THRU Chase 7 d 1 Waiting for Dimmer Number 92...

Страница 29: ...n record mode The Producer 3 displays Play Show 1 or number of Show when it is in play mode PLAY MODE Reviewing Dimmer Assignments The dimmer to channel assignments may be reviewed on the Producer 3 b...

Страница 30: ...iting for ENTER or CLEAR ENTER Ch15 Dm150 FL Waiting for ENTER or CLEAR ENTER Ch15 Dm151 FL Waiting for ENTER or CLEAR ENTER Ch15 Dm190 FL Waiting for ENTER or CLEAR ENTER Ch15 Dm192 FL Waiting for EN...

Страница 31: ...d and the level for that dimmer Auto incrementing to the next dimmer is provided by pressing the enter ENT key Example 17 Reviewing which channel controls a dimmer This example checks which channel co...

Страница 32: ...ster controls along with that channel s level Once all the channels controlled by the selected submaster have been displayed the dimmer window will again display dashes instead of numbers and levels S...

Страница 33: ...mer or submaster selected in the first step Pressing the enter key will cause the second step to be displayed in the window Continuing to press enter will sequence through the chase steps When the las...

Страница 34: ...SULT CHS Select Chase Waiting for Number or CHS Enter Chase Number 5 5 Select Chase5 Waiting for ENTER or CLEAR ENTER Play Show 1 Console in Play Mode NOTE The change to the new chase sequence is made...

Страница 35: ...le in and out of build mode When in build mode a chase will add each programmed step without extinguishing the previous step until the end of the sequence is reached For example a chase sequence progr...

Страница 36: ...ter is up at the time or if the patch is different between the two shows a sudden change will occur on stage We recommend that changes of shows be made during a blackout if possible If it is not possi...

Страница 37: ...rves a special function in record mode it is used to initiate the special initialize submasters function CHS In record mode the chase key is used to initiate the recording of a chase sequence Once the...

Страница 38: ...in and out of blackout When in blackout all dimmer levels are taken to zero The flashing red LED next to the key indicates when the console is blacked out SUBMASTER The SUBMASTER keys one in each scen...

Страница 39: ...o problems The only limitation on operating the console in record mode is that the chase sequence may not be changed RECORD LOCKOUT KEYSWITCH On the top ledge of the Producer 3 is a keyswitch In the l...

Страница 40: ...e press HOLD To manually take over a held Cue use the manual fade handle GO The GO key advances the Cue through the time fade that is either programed into the submaster or set with the manual time se...

Страница 41: ...ems 100 plus dimmers it is usually easiest to start with no dimmers assigned to any channel on small systems a good starting point is a one to one assignment with dimmer one assigned to channel one di...

Страница 42: ...chase CHS key followed by a single zero and completed by pressing alter ALT This erases all of the chases in the present show ONE SCENE 48 CHANNEL OPERATION On all PRODUCER 3 consoles the submasters a...

Страница 43: ...oupling where a console control handle will also bring up the next adjacent channel dimmer channel jumping where a dimmer will normally be controlled properly but periodically the next higher numbered...

Страница 44: ...one control handle the problem is probably a bad slider You can try blowing the slider clean with compressed air but the best solution is to not patch any dimmers to the problem channel until the con...

Страница 45: ...2 may work fine but dimmers 97 through 108 may jump This failure mode is caused by excessive noise on the multiplex cable This can be caused by a broken shield in the cable or by running the cable too...

Страница 46: ...ero removing them from use causes the stage to go black the output section is probably working If the outputs stay on even though they are patched to channel zero then the fault is in the output secti...

Страница 47: ...in connector but may be on pin 2 CD 80 pinouts or anywhere else if the connectors are miswired As a result of finding COMMON we will also find DATA which should be on pin 3 but may be on pin 4 CD 80 T...

Страница 48: ...ve lead on COMMON and the positive lead on DATA Move the grand master up and down The voltage should follow the grand master level to some degree The next step is to sort out the other two pins One is...

Страница 49: ...during a save Data is only being copied to disk Changes are only made to levels when reading from disk The Producer 3 will lock up if no disk is in the drive when a request to save to disk is made LOA...

Страница 50: ...splay and bring up the STAGE DISPLAY PATCH DISPLAY The PATCH DISPLAY shows the dimmers that are patched to a given channel along with the proportional level if it is other than full It is brought up b...

Страница 51: ...masters for the user to photo copy if desired They provide a standard method of documenting the information used to program the Producer 3 for a particular show Even if a show is not expected to be r...

Страница 52: ...71 272 273 274 275 276 277 278 279 280 281 282 283 284 285 286 287 288 289 290 291 292 293 294 295 296 297 298 299 300 301 302 303 304 305 306 307 308 309 310 311 312 313 314 315 316 317 318 319 320 3...

Страница 53: ...Lighting Control Console page TEATRONICS LIGHTING CONTROLS TEATRONICS LIGHTING CONTROLS INC INC 46 Appendix 2 SOFTPATCH CROSS REFERENCE TABLE SHOW NAME DISK NUMBER SHOW NUMBER PATCH NAME DIMMER PATCH...

Страница 54: ...Ch____at_______ Ch____at_______ Ch____at_______ Ch____at_______ Ch____at_______ Ch____at_______ Ch____at_______ Ch____at_______ Ch____at_______ Ch____at_______ Submaster______ ________________ Ch____...

Страница 55: ...d To Record a Dimmer Channel Assignment 1 Place console in record mode 2 Press CHN 3 Enter a channel number 0 through 48 4 Enter a dimmer number 1 through 512 if DMX 1 through 192 if AMX 5 Optionally...

Страница 56: ...tail customer FREIGHT TERMS ON WARRANTY REPAIRS ARE FOB TLC FACTORY OR DESIGNATED REPAIR FACILITY Collect shipments or freight allowances shall not be acceptable TLC does not assume responsibility for...

Отзывы: