background image

IMPORTANT SAFETY INSTRUCTIONS

– 2 –

CAUTION:

Read all of these Instructions.

Save these Instructions for later use.

Follow all Warnings and Instructions marked on the audio             

equipment.

1) Read Instructions — All the safety and operating instructions should     be
read before the product is operated.
2) Retain Instructions — The safety and operating instructions should
be retained for future reference.
3) Heed Warnings — All warnings on the product and in the operating
instructions should be adhered to.
4) Follow Instructions — All operating and use instructions should be
followed.
5) Cleaning — Unplug this product from the wall outlet before cleaning.
Do not use liquid cleaners or aerosol cleaners. Use a damp cloth for
cleaning.
6) Attachments — Do not use attachments not recommended by the
product manufacturer as they may cause hazards.
7) Water and Moisture — Do not use this product near water _ for
example, near a bath tub, wash bowl, kitchen sink, or laundry tub; in a  wet
basement; or near a swimming pool; and the like.
8) Accessories — Do not place this product on an unstable cart, stand,
tripod, bracket, or table. The product may fall, causing serious injury to a
child or adult, and serious damage to the product. Use only with a cart,
stand, tripod, bracket, or table recommended by the manufacturer, or  sold
with the product. Any mounting of the product should follow the
manufacturer’s instructions, and should use a mounting accessory
recommended by the manufacturer.
9) A product and cart combination should be moved with care. Quick
stops, excessive force, and uneven surfaces may cause the product and
cart combination to overturn.

10) Ventilation — Slots and openings in the cabinet are provided for
ventilation and to ensure reliable operation of the product  and to protect
it from overheating, and these openings must not be blocked or covered.
The openings should never be blocked by placing the product on a bed,
sofa, rug, or other similar surface. This product should not be placed in a
built-in installation such as a bookcase or rack unless proper ventilation is
provided or the manufacturer’s instructions have been adhered to.
11) Power Sources — This product should be operated only from the
type of power source indicated on the marking label. If you are not sure of
the type of power supply to your home, consult your product dealer or
local power company. For products intended to operate from battery
power, or other sources, refer to the operating instructions.
12) Grounding or Polarization — This product may be equipped with a
polarized alternating-current line plug (a plug having one blade wider  than
the other). This plug will fit into the power outlet only one way. This            is
a safety feature. If you are unable to insert the plug fully into the outlet, try
reversing the plug. If the plug should still fail to fit, contact your electrician
to replace your obsolete outlet. Do not defeat the safety purpose of the
polarized plug.
13) Power-Cord Protection — Power-supply cords should be routed so
that they are not likely to be walked on or pinched by items placed upon or
against them, paying particular attention to cords at plugs, conve-nience
receptacles, and the point where they exit from the product.
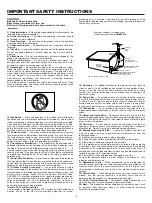
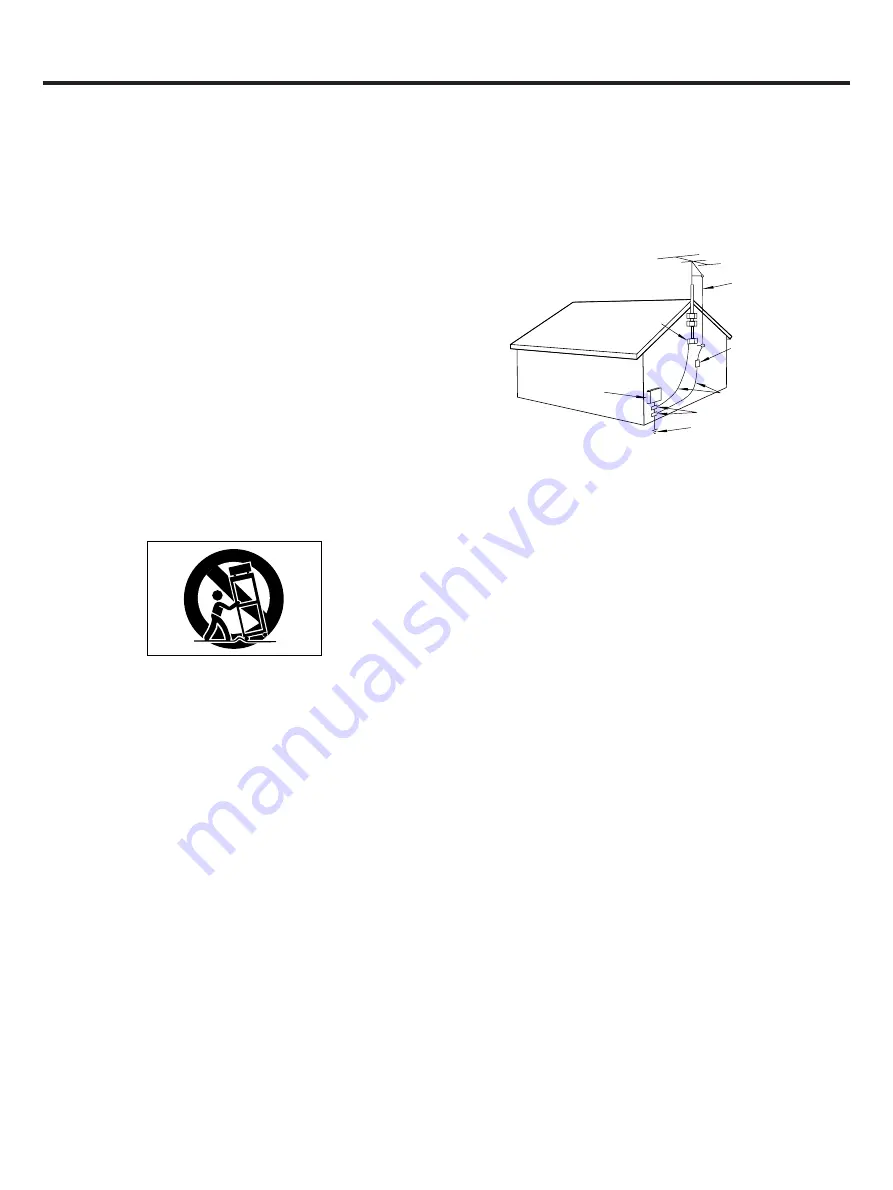
14) Outdoor Antenna Grounding — If an outside antenna or cable
system is connected to the product, be  sure the antenna or cable system
is grounded so as to provide some protection against voltage surges    and
built-up static charges. Article 810 of the National Electrical Code,
ANSI/NFPA 70, provides information with regard to proper grounding of
the mast and supporting structure, grounding of the lead-in wire to an
antenna discharge unit, size of grounding conductors, location of
antenna-discharge unit, connection to grounding electrodes, and re-
quirements for the grounding electrode.
"Note to CATV system installer:
This reminder is provided to call the CATV system installer’s attention to
Section 820-40 of the NEC which provides guidelines for proper

grounding and, in particular, specifies that the cable ground shall be
connected to the grounding system of the building, as close to the point of
cable entry as practical.

ANTENNA
LEAD IN
WIRE

ANTENNA
DISCHARGE UNIT
(NEC SECTION 810-20)

G

ROUNDING CONDUCTORS

(NEC SECTION 810-21)

GROUND CLAMPS

POWER SERVICE GROUNDING
ELECTRODE SYSTEM
(NEC ART 250. PART H)

NEC - NATIONAL ELECTRICAL CODE

ELECTRIC
SERVICE
EQUIPMENT

Example of Antenna Grounding as per
National Electrical Code, 

ANSI/NFPA 70

GROUND
CLAMP

15) Lightning — For added protection for this product during a lightning
storm, or when it is left unattended and unused for long periods of time,
unplug it from the wall outlet and disconnect the antenna or cable
system. This will prevent damage to the product due to lightning and
power-line surges.
16) Power Lines — An outside antenna system should not be located in
the vicinity of overhead power lines or other electric light or power  circuits,
or where it can fall into such power lines or circuits. When installing an
outside antenna system, extreme care should be taken to keep from
touching such power lines or circuits as contact with them might be fatal.
17) Overloading  — Do not overload wall outlets, extension cords, or
integral convenience receptacles as this can result in risk of fire or  electric
shock.
18) Object and Liquid Entry — Never push objects of any kind into this
product through openings as they may touch dangerous voltage points   or
short-out parts that could result in a fire or electric shock. Never spill liquid
of any kind on the product.
19) Servicing — Do not attempt to service this product yourself as
opening or removing covers may expose you to dangerous voltage or
other hazards. Refer all servicing to qualified service personnel.
20) Damage Requiring Service — Unplug this product from the wall
outlet and refer servicing to qualified service personnel under the
following conditions:
a) when the power-supply cord or plug is damaged.
b) if liquid has been spilled, or objects have fallen into the product.
c) if the product has been exposed to rain or water.
d) if the product does not operate normally by following the operating
instructions. Adjust only those controls that are covered by the operating
instructions as an improper adjustment of other controls may result in
damage and will often require extensive work by a qualified technician to
restore the product to its normal operation.
e) if the product has been dropped or damaged in any way.
f ) when the product exhibits a distinct change in performance _  this
indicates a need for service.
21) Replacement Parts — When replacement  parts are required, be
sure the service technician has used replacement parts specified by the
manufacturer or have the same characteristics as the original part.
Unauthorized substitutions may result in fire, electric shock, or other
hazards.
22) Safety Check — Upon completion of any service or repairs to this
product, ask the service technician to perform safety checks to
determine that the product is in proper operating condition.
23) Wall or Ceiling Mounting — The product should be mounted to a
wall or ceiling only  as recommended by the manufacturer.
24) Heat — The product should be situated away from heat sources  such
as radiators, heat registers, stoves, or other products (including
amplifiers) that produce heat.

Содержание MD-5

Страница 1: ...N TO REDUCE THE RISK OF ELECTRIC SHOCK DO NOT REMOVE COVER OR BACK NO USER SERVICEABLE PARTS INSIDE REFER SERVICING TO QUALIFIED SERVICE PERSONNEL Thanks for buying a TEAC Read this manual carefully t...

Страница 2: ...the mast and supporting structure grounding of the lead in wire to an antenna discharge unit size of grounding conductors location of antenna discharge unit connection to grounding electrodes and re...

Страница 3: ...D LASERKOMPONENT 1DETTE M RKAT ER ANBRAGT SOM VIST I ILLUSTRATIONEN FOR AT ADVARE BRUGEREN OM AT APPARATET INDEHOLDER EN LASERKOMPONENT 2DETTE M RKAT ER SOM VIST P ILLUSTRATIONEN ANBRAGT P INDERSIDEN...

Страница 4: ...unction 16 AssigningTitles TITLE Function 17 AssigningTitles to the Disc and AllTracks Successively TITLE AUTO INC Function 17 18 Changing entered characters 18 Copying aTitle TITLE COPY Function 18 C...

Страница 5: ...may not be written correctly on the MD If the power is turned off with the MD left in the deck lights up after recording the UTOC cannot be recorded Turn the power back on within 3 or 4 days and ejec...

Страница 6: ...ER e EDIT NO button r YES button t INPUT SELECTOR switch y PHONES jack u LEVEL control i Display window o STOP button p PLAY button a PAUSE button s DIGITAL IN 2 terminal d KEYBOARD terminal f Numeric...

Страница 7: ...ls to connect the deck to a digital component such as a CD player DAT deck digital amplifier or another MD deck Use a digital optical TOS cable optional for digital recording Connect the DIGITAL IN 2...

Страница 8: ...cording the track number increases by one To eject the MD Press the EJECT button If the power is turned off with the MD left in the deck lights up after recording the UTOC cannot be recorded Turn the...

Страница 9: ...just been recorded from the beginning If ten seconds or more have passed after recording is stopped or if the PLAY button is pressed after pressing the STOP button playback starts from the first trac...

Страница 10: ...ly according to the CD or MD data Once the Auto Track function is ON this mode will not be released even after the power is turned off Press the YES button after selecting A_TRACK OFF to release it To...

Страница 11: ...been recorded will be played from the beginning To play from the first track of the MD after recording Press the STOP button again immediately after stopping recording then press the PLAY button PLAY...

Страница 12: ...press the SKIP buttons on the remote control unit during playback to skip to a track located after or before the current track To search a desired section During playback press and hold the or SEARCH...

Страница 13: ...layback when no programmed data is entered normal playback will start after PGM Empty is displayed To check the program contents In the Play or Play Pause mode turn the TRACK dial or press the or butt...

Страница 14: ...unavailable in the SHUFFLE MODE or PGM MODE To repeat a section within a track A B repeat A specified portion between A and B of a track can be played repeatedly 1 During playback press the A B butto...

Страница 15: ...he record protect tab to close the hole While UTOC Writing is blinking This message indicates that the recorded data is being written on the MD Do not pull out the power cord or vibrate the deck Other...

Страница 16: ...moved by turning the TRACK dial 2 Press the EDIT NO button until MOVE is displayed 3 Press the YES button Move to 001 is displayed 001 blinks Track number Destination track to be moved number 4 Selec...

Страница 17: ...SHUFFLE MODE or PGM MODE 17 Titles can be assigned to each disc or each track using uppercase and lowercase letters numbers Katakana and symbols 1 Press the EDIT NO button so that TITLE is displayed...

Страница 18: ...ht after selecting a character Deck Press PUSH ENTER on the dial Remote Control Unit Press the ENTER button To erase all the characters at once Deck Unavailable Remote Control Unit Press the CLEAR but...

Страница 19: ...e unoperational 19 ENGLISH System Restrictions Because of the different recording systems used by Compact Cassette DAT etc the MD Mini Disc is subjected to some system restrictions These restrictions...

Страница 20: ...noise Since recording is performed on a 6 cluster basis approx 12 seconds overwriting a noisy track may erase a part of the track It is not possible to assign a track title during overwrite recording...

Страница 21: ...ital to digital connection Record ing DAT deck MD deck or Record ing DAT deck MD deck or Play ing DAT deck MD deck or Digital output jack Digital output jack Line analog output jacks Audio connec ting...

Страница 22: ...another disc Playback will not start Check if power is supplied Blank Disc is displayed if the MD contains no record ed data No Track is displayed if no tracks have been recorded on the disc Replace t...

Страница 23: ...34 Remarques sur le montage 34 Effacement de plage s Fonction ERASE 34 Division d une plage Fonction DIVIDE 35 Combinaison de plages Fonction COMBINE 35 D placement d une plage Fonction MOVE 35 Affec...

Страница 24: ...pas tirer sur le cordon d alimentation ni faire vibrer la platine Sinon les donn es enregistrer peuvent ne pas tre crites correctement sur le MD Si l alimentation est coup e avec le MD laiss dans la p...

Страница 25: ...he EDIT NO r Touche YES t S lecteur d entr e INPUT SELECTOR y Prise de casque PHONES u Commande de niveau LEVEL i Fen tre d affichage o Touche d arr t STOP p Touche de lecture PLAY a Touche de pause P...

Страница 26: ...teur st r o Prises LINE ANALOG IN OUT Raccorder l amplificateur aux prises LINE IN OUT en utilisant le cordon fiche broche fourni en s assurant de respecter les couleurs des fiches sur les appareils b...

Страница 27: ...le MD Appuyer sur la touche EJECT Si l alimentation est coup e avec le MD laiss dans la platine est allum apr s l enregistrement l UTOC ne peut pas tre enregistr e Remettre l alimentation dans les 3...

Страница 28: ...du d but Si dix secondes ou plus se sont coul es depuis l arr t de l enregistrement ou si la touche PLAY est press e apr s avoir appuy sur la touche STOP la lecture commence partir de la premi re pla...

Страница 29: ...age sont avanc s automatiquement en fonction des donn es du CD ou du MD Une fois que la fonction de plage automatique est ON en marche ce mode ne sera pas lib r m meapr savoircouperl alimentation Appu...

Страница 30: ...Pour lire partir de la premi re plage du MD apr s enregistrement Appuyer de nouveau sur la touche STOP imm diatement apr s avoir arr t l enregistrement puis appuyer sur la touche PLAY button PLAY STO...

Страница 31: ...ner la molette TRACK dans un sens ou l autre ou appuyer sur les touches SKIP de la t l commande pendant la lecture pour sauter une plage localis e apr s ou avant la plage courante Pour chercher une se...

Страница 32: ...rs qu aucune donn e programm e n est entr e la lecture normale commencera apr s l affichage de PGM Empty Pour v rifier le contenu du programme En mode de lecture ou de pause de lecture tourner la mole...

Страница 33: ...p tition d une seule plage n est pas possible dans le mode SHUFFLE MODE ou PGM MODE Pour r p ter une partie d une plage R p tition A B Une partie sp cifi e entre A et B d une plage peut tre lue de fa...

Страница 34: ...gistrement ou montage possible faire coulisser la languette de protection contre l enregistrement pour fermer le trou Alors que UTOC Writing clignote Ce message indique que les donn es enregistr es so...

Страница 35: ...la touche EDIT NO jusqu ce que MOVE soit affich 3 Appuyer sur la touche YES Move to 001 est affich 001 clignote Num ro de plage Num ro de plage d placer destination 4 S lectionner le num ro de plage d...

Страница 36: ...TLE soit affich 2 Appuyer sur la touche YES Appuyer sur la touche TITLE EDIT si vous utilisez la t l commande 3 S lectionner DSC ou un num ro de plage en utilisant la molette TRACK Pour affecter un ti...

Страница 37: ...la position du curseur Platine Appuyer sur la touche EDIT NO T l commande Appuyer soit sur la touche DELETE ou sur la touche EDIT NO Pour d placer le curseur droite apr s s lection d un caract re Pla...

Страница 38: ...e le clavier non op rationnel A cause des diff rents syst mes d enregistrement utilis s par la cassette compacte DAT etc le MD Mini Disc est soumis certaines restrictions syst me Ces restrictions peuv...

Страница 39: ...fectu sur une base de 6 faisceaux 12 secondes environ sur crire une plage bruit e peut effacer une partie de la plage Il n est pas possible d affecter un titre de plage pendant l enregistrement de sur...

Страница 40: ...ecture Platine DAT Platine MD ou Prise de sortie num rique Prise de sortie num rique Prise de sortie ligne analogique Cordon de raccordement audio Prise d entr e ligne analogique Prise d entr e num ri...

Страница 41: ...c e V rifier si l alimentation est fournie Blank Disc est affich si le MD ne contient pas de donn es No Track est affich si aucune plage n a t enregistr e sur le disque Remplacer le MD par un MD pr en...

Страница 42: ...ren 53 Spurenl schung ERASE 53 Spurenteilung DIVIDE 54 Spurenzusammenlegung COMBINE 54 Spurenversetzung MOVE 54 Titelzuweisung TITLE 55 DurchgehendeTitelzuweisung f r MD und Spuren TITLE AUTO INC 55 T...

Страница 43: ...Netzkabel abziehen oder das Deck mechanischen Einfl ssen Vibrationen etc aussetzen Andernfalls werden die Indexdaten nicht einwandfrei auf die MD geschrieben Wenn das Deck nach der Aufnahme mit eingel...

Страница 44: ...TER e Editier Nein Taste EDIT NO r Ja Taste YES t Eingangsw hlter INPUT SELECTOR y Kopfh rerbuchse PHONES u Pegelregler LEVEL i Displayfeld o Stopptaste STOP p Wiedergabetaste PLAY a Pausentaste PAUSE...

Страница 45: ...Ausgang Mit einer digitalen Signalquelle wie CD Spieler DAT Recorder Digitalverst rker oder zweites MD Deck verbinden F r Digitalaufnahmen ein digitales Lichtleiterkabel TOS nicht mitgeliefert verwen...

Страница 46: ...en Wird das Deck nach der Aufnahme bei eingelegter MD ausgeschaltet leuchtet auf kann der UTOC Index nicht aktualisiert werden Das Deck innerhalb von 3 bis 4 Tagen wieder einschalten und die MD auswer...

Страница 47: ...n nach dem Aufnahmestopp mehr als 10 Sekunden oder wird Taste PLAY nach Bet tigen von Taste STOP gedr ckt erfolgt die Wiedergabe ab der ersten Spur der MD 4 Zum Wiedergabestopp die Stopptaste STOP bet...

Страница 48: ...pielnummern auf der Zuspiel MD CD zugewiesen Der aktive ON Status der Auto Track Funktion wird auch bei Ger teausschaltung beibehalten Nach Anwahl von Anzeige A_TRACK OFF die Taste YES dr cken um die...

Страница 49: ...estopp Unmittelbar nach dem Aufnahmestopp nochmals die Stopptaste STOP und dann die Wiedergabetaste PLAY dr cken PLAY STOP STOP Aufnahme PLAY STOP Aufnahme Aufnahme berpr fung berpr fung der MD Restau...

Страница 50: ...vorw rts r ckw rts Zur Anwahl der n chsten oder vorhergehenden Spur den Drehknopf TRACK im oder gegen den Uhrzeigersinn drehen oder Taste SKIP der Fernbedieneinheit dr cken Suchlauf Bei Wiedergabe di...

Страница 51: ...die normale Wiedergabe startet berpr fung der programmierten Abspielfolge Bei Wiedergabe oder Wiedergabepause den Drehknopf TRACK im oder gegen den Uhrzeigersinn drehen oder die Taste der Fernbedienei...

Страница 52: ...immbarer Abschnitt innerhalb einer Spur kann wiederholt abgespielt werden 1 Bei Wiedergabe am vorgesehenen Startpunkt A der Wiederholung die Taste A B der Fernbedieneinheit dr cken Die Meldung REPEAT...

Страница 53: ...iereignung besteht nur wenn der Aufnahmeschutzschieber geschlossen Bei blinkender Meldung U TOC Writing Hierbei erfolgt die Aktualisierung der U TOC Indexdaten auf der MD Zu diesem Zeitpunkt niemals d...

Страница 54: ...men 2 Die Taste EDIT NO dr cken bis die Meldung MOVE erscheint 3 Die Taste YES dr cken Anzeige Move to 001 erscheint 001 blinkt Zu versetzende Neue Spur Spurposition 4 Mit dem Drehknopf TRACK die neue...

Страница 55: ...in Gro oder Kleinschreibung und in japanischen Katakana Schriftzeichen erstellt werden 1 Die Taste EDIT NO bet tigen so da die Meldung TITLE erscheint 2 Die Taste YES dr cken Bei Verwendung der Fernb...

Страница 56: ...et tigen Zur Zeichenl schung an der Cursorposition Deck Die Taste EDIT NO bet tigen Fernbedienung Die Taste DELETE oder EDIT NO bet tigen Zur Cursorversetzung nach rechts nach der Zeichenanwahl Deck D...

Страница 57: ...gen am Keyboard kommen Systembesonderheiten Die Aufnahmeverfahren f r MiniDiscs Audiocassetten und DAT Cassetten wei chen voneinander ab Dementsprechend gelten f r das MD Deck einige systembe dingte A...

Страница 58: ...Sekunden erfolgt kann die Overwrite Aufnahme einen Spurabschnitt l schen Bei der Overwrite Aufnahme kann kein Spurtitel erstellt werden Selbst wenn eine MD L schung mit ERASE DISC durchgef hrt wurde...

Страница 59: ...utznorm Dementsprechend sind Digital zu Digital Kopieraufnahmen auf die erste Kopie Generation beschr nkt Die grunds tzlichen Richtlinien f r diese Norm werden im folgenden aufgef hrt Richtlinie 1 Das...

Страница 60: ...sachen berpr fen Falls hierdurch keine Abhilfe geschaffen werden kann wenden Sie sich bitte an Ihren Fachh ndler oder zust ndigen TEAC Service St rung Abhilfe Keine Funktionsausl sung Die MD ist versc...

Страница 61: ...lo funzioneTITLE COPY 75 Cancellazione revoca dell ultima operazione effettuata funzione UNDO 75 Funzioni opzionali 76 Corrispondenza fra i tasti del deck e i tasti della tastiera 76 Tasti per il mont...

Страница 62: ...ono venire perduti se il minidisco viene lasciato per lungo tempo all interno dell apparecchio spento In caso di lampeggio dell indicazione D IN UNLOCK distacco dell ingresso digitale Questa indicazio...

Страница 63: ...NTER per la memorizzazione o l avvio e Tasto per il montaggio e del numero EDIT NO r Tasto di memorizzazione YES t Selettore di ingresso INPUT SELECTOR y Presa per la cuffia PHONES u Manopola di coman...

Страница 64: ...gitale quale un lettore CD un deck DAT un amplificatore digitale o un altro deck MD Usare il cavo opzionale digitale ottico TOS per le registrazioni digitali Collegare la presa di uscita digitale DIGI...

Страница 65: ...odipausa PAUSE o sul tasto della riproduzione PLAY Dopo ogni interruzione nella registrazione il numero dei brani aumenta di una unit Espulsione del minidisco Agire sul tasto di espulsione EJECT Se si...

Страница 66: ...i Per riprodurre dall inizio il brano che stato appena registrato premere il tasto PLAY subito dopo l arresto della registrazione entro 10 secondi Trascorsi oltre 10 secondi dall arresto della registr...

Страница 67: ...ll MD Una volta attivata ON la funzione di assegnazione automatica non viene disattivata anche spegnendo l apparecchio Per disattivarla agire sul tasto YES dopo aver selezionato la posizione A_TRACK O...

Страница 68: ...to di arresto STOP e premere poi il tasto di riproduzione PLAY Collegando questo apparecchio ad un normale timer disponibile in commercio si pu avviare o arrestare il funzionamento ad Registrazione a...

Страница 69: ...edente o successivo quello in corso di riproduzione ruotare la manopola TRACK in senso rispettivamente antiorario od orario o agire sui tasti SKIP o del telecomando Ricerca di una certa sezione Se in...

Страница 70: ...rammata senza aver precedentemente inserito i dati di programmazione compare prima il messaggio PGM Empty programma vuoto ed ha poi inizio la riproduzione normale Verifica del contenuto del programma...

Страница 71: ...MODE Ripetizione di una sezione all interno di un brano ripetizione A B Si pu riprodurre ripetutamente una certa determinata porzione da A a B di un brano 1 Nel corso della riproduzione premere il tas...

Страница 72: ...one o il montaggio far scorrere la linguetta di protezione in modo che il foro presente sul contenitore del disco venga a risultare coperto In caso di lampeggio dell indicazione UTOC Writing memorizza...

Страница 73: ...a posizione 001 e la cifra 001 lampeggia Numero del brano Distination track da spostare number 4 Agire opportunamente sulla manopola TRACK per selezionare il numero della posizione a cui si vuole port...

Страница 74: ...ante compare il messaggio TITLE titolo 2 Premere il tasto YES Se si fa uso del telecomando premere il tasto TITLE EDIT 3 Per mezzo della manopola TRACK selezionare la posizione DSC o il numero del bra...

Страница 75: ...o INSERT o ENTER Per inserire una cifra Deck Ruotare la manopola TRACK Telecomando Agire direttamente sui tasti numerici Per cancellare il carattere che si trova sotto il cursore Deck Agire sul tasto...

Страница 76: ...i al sistema stesso e non sono quindi dovute a disfunzioni dell apparecchio Sul quadrante compare il messaggio Track Full spazio esaurito prima che sia stato raggiunto il tempo limite massimo 60 o 74...

Страница 77: ...vere come conseguenza la parziale cancellazione del brano Non possibile assegnare titoli di brani nel corso delle operazioni di sovraregistrazione Talvolta il tempo massimo utile per la registrazione...

Страница 78: ...o coassiale digitale Prese di uscita di linea analogiche Cavo di collegamento audio Prese di ingresso di linea analogiche Nastro DAT o disco MD di prima generazione registrati con collegamento da digi...

Страница 79: ...n risulta possibile alcuna L MD sporco o danneggiato Poich in questo caso operazione compare il messaggio Disc Error errore nel disco non si pu fare null altro che utilizzare un altro disco La riprodu...

Страница 80: ...de pista durante la grabaci n 86 Grabaci n sobre pistas grabadas sobreescritura 86 Grabaci n sincronizada 87 Comprobaci n del tiempo restante de grabaci n en el MD 87 Verificaci n de las pistas grabad...

Страница 81: ...MD No desconecte el cord n de alimentaci n ni sujete la platina a vibraciones De lo contrario los datos grabados pueden no ser correctamente escritos en el MD Si la alimentaci n es desactivada con el...

Страница 82: ...Bot n EDIT NO r Bot n YES t Conmutador INPUT SELECTOR y Jack PHONES u Mando LEVEL de los auriculares i Ventanilla de indicaci n o Bot n STOP p Bot n PLAY a Bot n PAUSE s Terminal DIGITAL IN 2 d Termin...

Страница 83: ...tos terminales para conectar la platina a un componente digital tal como un reproductor de CD platina DAT amplificador digital u otra platina MD Emplee el cable ptico digital opcional TOS para la grab...

Страница 84: ...platina se iluminar despu s de la grabaci n el UTOC no podr ser grabado Active la alimentaci n nuevamente dentro de 3 4 d as y eyecte el MD Los datos grabados se pueden perder si el MD es dejado puest...

Страница 85: ...asignado en l el n mero total de pistas y el tiempo total de reproducci n del disco aparecer n indicados N mero total de pistas T tulo de disco Calendario musical El t tulo del disco o de la pista pu...

Страница 86: ...K ON 3 Presione el bot n YES para desactivar la funci n de ajuste Con la funci n de pista autom tica activada ON el nivel de se al debe permanecer bajo durante m s de 2 segundos antes de que la unidad...

Страница 87: ...principio Para reproducir la primera pista del MD despu s de la grabaci n Presione el bot n de parada STOP otra vez inmediatamente despu s de parar la grabaci n y presione el bot n de reproducci n PLA...

Страница 88: ...presione 5 dos veces Presione el bot n CLEAR cuando TRACK NO est parpadeando para cancelarlo Salto a la pista anterior o posterior Gire hacia la derecha el disco TRACK o g relo hacia la izquierda o p...

Страница 89: ...do ingresado la reproducci n normal se iniciar despu s que PGM Empty aparezca indicado Verificaci n del contenido del programa Con el modo de reproducci n o pausa de reproducci n activado gire el disc...

Страница 90: ...ble en SHUFFLE MODE modo aleatorio o PGM MODE modo programado Repetici n de una secci n dentro de una pista repetici n A B La porci n especificada entre A y B de una pista puede ser reproducida repeti...

Страница 91: ...de protecci n de grabaci n para que cierre el orificio Cuando el mensaje UTOC Writing est parpadeando Este mensaje indica que los datos grabados est n siendo escritos en el MD No desconecte el cord n...

Страница 92: ...EDIT NO hasta que MOVE aparezca indicado 3 Presione el bot n YES Trasladar a 001 Move to 001 aparece indicado 001 parpadea N mero de pista N mero de pista a ser trasladado destino 4 Seleccione el n m...

Страница 93: ...los pueden ser asignados a cada disco o cada pista empleando letras may sculas o min sculas n meros katakana y s mbolos 1 Presione el bot n EDIT NO de manera que TITLE aparezca indicado 2 Presione el...

Страница 94: ...uier de los botones DELETE o EDIT NO Para mover el cursor hacia la derecha despu s de seleccionar un caracter Platina Presione PUSH ENTER en el disco Control remoto Presione el bot n ENTER Para borrar...

Страница 95: ...teclado no active ni desactive la alimentaci n r pidamente ya que algunas veces puede afectar el teclado dej ndolo inoperable Como hay diferentes sistemas de grabaci n empleados por los cassettes com...

Страница 96: ...ser sobreescrita contiene interferencia Como la grabaci n se efect a en base a 6 bloques 12 segundos aprox la pista con interferencia puede borrar parte de la pista No es posible asignar un t tulo de...

Страница 97: ...Jack de entrada digital Reproduciendo Sintonizador Tocadiscos Platina de cassette Micr fono amplificador Reproductor de CD Platina DAT Platina MD Jacks de salida anal gica de l nea Jacks de entrada an...

Страница 98: ...te antes de llamar al servicio de reparaci n Si el problema persiste consulte con su agente o con el agente de servicio TEAC m s cercano Si no es posible volver al funcionamiento normal desenchufe el...

Страница 99: ...echnician for additional suggestions CAUTION Changes or modifications to this equipment not expressly approved by TEAC CORPORATION for compliance could void the user s authority to operate this equipm...

Отзывы: