21
RECORDING OPERATION
Playback of Recorded Programs
1. Open the Media Browser by pressing
[REC.LIST]
in Live TV mode.
2. Press
[OK]
to preview the media file in the preview screen, press
[OK]
again to view
the file in full screen.
NOTE
: If recording is in progress, the media file that is being recorded will be marked
with a red square icon.
Media Browser Controls
Press the
[RED]
button to copy the desired
media file on the USB devices.
Press the
[GREEN]
button to select a media
file to delete, the file will be marked with a
tick icon.
Press the
[YELLOW]
button to delete the
selected media file (except the file which is
currently playing or recording).
Press the
[BLUE]
button to sort the file list
by date/name/size.
Press the
[LEFT]/[RIGHT]
buttons to switch
between views: All/Recording/Media/Photo
-
“All” view displays all programs and files.
-
“Recording” view displays all recorded
programs on all connected USB devices and
the internal HDD.
-
“Media” view displays all compatible video
and audio files on all connected USB
devices and the internal HDD.
-
“Photo” view displays all compatible image
files on all connected USB devices and the internal HDD
Press
[PLAY]
to play the selected file in full screen.
Press
[INFO]
to show playback status.
Press
[LEFT]
button to step back to a desired point during playback.
Press
[RIGHT]
button to step forward to a desired point during playback.
Press
[UP]/[DOWN]
button to skip to the next or previous recorded program.
Press
[PAUSE]
button to pause playback.
Press
[FF]
to cycle between 2X, 4X, 8X, 16X, 32X, 64X fast forward speeds, press
[PLAY]
to resume playback
Press
[REW]
to cycle between 2X, 4X, 8X, 16X, 32X, 64X fast rewind speeds,
press
[PLAY]
to resume playback
Press
[STOP]/[EXIT]
to stop playback. If a program is being recorded while you
are playing a previously recorded program, when you press
[STOP]/[EXIT]
, a
dialog will be displayed on screen to let you choose to either stop playback or stop
the recording.
Содержание HDR9650TS
Страница 1: ......
Страница 2: ......
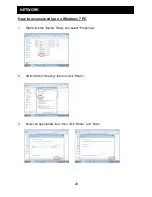
Страница 34: ...29 NETWORK 4 Select Security page and Edit 5 Select Add 6 Input guest to the box and select Check Names Apply...
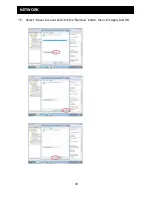
Страница 38: ...33 NETWORK 15 Select Guest account and click the Remove button then click Apply and OK...
Страница 44: ......


