background image

Содержание HDR9650TS

Страница 1: ......

Страница 2: ......

Страница 3: ...s Address Postcode Model Name No Serial No Dealer s Name Dealer s Address Postcode Authorised Service Centres in Major Australian Cities NSW 151 Arthur Street Homebush West NSW 2140 Queensland Unit 1...

Страница 4: ...return to the purchaser at a fee upon request TEAC in home service can be made available at a fee upon request Carry in Service 6 A 12 month replacement warranty is applicable to all Accessories such...

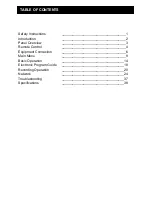
Страница 5: ...Equipment Connection ___________________________________6 Main Menu ___________________________________9 Basic Operation __________________________________14 Electronic Program Guide ________________...

Страница 6: ...not place the device in an unventilated cabinet or on top of a unit which emits heat To reduce the risk of fire or electric shock do not expose this apparatus to any liquids or extreme heat Copyright...

Страница 7: ...d three channels while watching a 4 th from same network Smart Series Record feature to record a whole series at a touch of a button 2 5 Sata Hard disk 500GB Time Shift Function Pause live TV HDMI Dig...

Страница 8: ...lume Rear Panel 1 ANT OUT RF signal output to other receivers such as a TV 2 LOOP OUT Loop Out RF signal to the second tuner 3 ETHERNET Connect to a network 4 OPTICAL Digital audio output 5 HDMI HDMI...

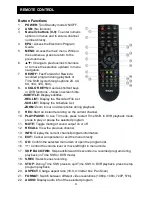
Страница 9: ...ring playback 9 REC Start an instant recording on the current channel 10 PLAY PAUSE In Live TV mode press to start Time Shift In DVR playback mode press to play or pause the selected program 11 MUTE T...

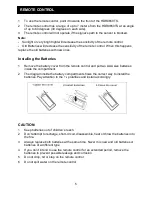
Страница 10: ...Remove the battery cover from the remote control and put two AAA size batteries inside the compartment 2 The diagram inside the battery compartment shows the correct way to install the batteries Pay...

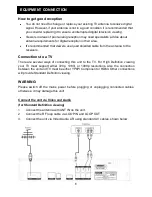
Страница 11: ...to the receivers Connections to a TV There are several ways of connecting this unit to the TV For High Definition viewing your TV must support either 720p 1080i or 1080p resolutions Also the connecti...

Страница 12: ...N on the unit 2 Connect the RF loop cable via LOOP IN and LOOP OUT 3 Connect the unit to TV with a YPbPr cable as below Connect the unit via HDMI output for high definition viewing 1 Connect the anten...

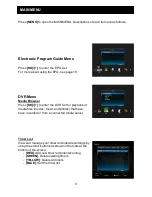
Страница 13: ...ONNECTION Audio connections via SPDIF Mixed Audio L R Output 1 Connect the antenna with ANT IN of the unit 2 Connect the RF loop cable via LOOP IN and LOOP OUT 3 Connect the unit to TV via AV cable as...

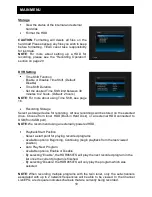
Страница 14: ...Browser Press OK to enter the DVR List for playback of media files movies music and photos that have been recorded or from a connected media server Timer List View and manage your timer reminders rec...

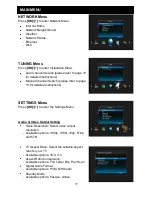
Страница 15: ...recordings will be stored on the selected drive Choose from Inner HDD Built in Hard Disk or an external HDD connected to USB front USB port NOTE We recommend using an externally powered HDD Playback S...

Страница 16: ...se refer to page 13 for detailed instructions SETTINGS Menu Press OK to enter the Settings Menu Audio Video Output Setting Video Resolution Select video output resolution Available options 1080p 1080i...

Страница 17: ...u Setting Menu DVR Menu New Password Confirm Password NOTE If you select Lock in the Installation Menu Setting Menu and DVR Menu when you select these menu options in the future you will need to enter...

Страница 18: ...IGHT and highlight Tuning 2 Press OK to enter the Tuning menu 3 Press UP DOWN to select Auto Search and press OK the unit will start to scan all available channels 4 OR you can use the Manual Search o...

Страница 19: ...rding multiple programs with the twin tuner only the sub channels associated with up to 2 network frequencies will be able to be viewed In the Channel List EPG a red square indicates channels that are...

Страница 20: ...to cycle between available options 16 9 Full 16 9 Letter Box 16 9 Pan Scan 4 3 Full 4 3 Letter Box and 4 3 Pan Scan The selection will be displayed in the top corner of the screen Audio Press AUDIO t...

Страница 21: ...SETTING 2 Select ENABLE to activate auto time shift 3 Auto Time Shift mode will begin 30 seconds after channel changes automatically 4 Press PAUSE to activate time shift function Standby Modes 1 Pres...

Страница 22: ...ta to the factory default settings 1 Press MENU to open MAIN MENU 2 Press UP DOWN to select Setting 3 Press OK to select Factory Default 4 Press OK and enter password to confirm NOTE Default password...

Страница 23: ...EPG Search 1 While viewing the EPG press FORMAT on the remote control to display the on screen keyboard 2 Input your keyword and press BLUE to start the EPG search Scheduling Recording Reminders While...

Страница 24: ...ird time will cancel the scheduled recording Setting Series Recordings Series recording allows you to record every episode in the series of the program you have selected with a single button press In...

Страница 25: ...gain to choose between 3 minutes to 24 hours 3 Alternatively you can set the recording to end when the program ends 4 Press STOP to stop recording instantly Recorded programs can be viewed from the DV...

Страница 26: ...all recorded programs on all connected USB devices and the internal HDD Media view displays all compatible video and audio files on all connected USB devices and the internal HDD Photo view displays a...

Страница 27: ...press the OK button The section will now be removed and will not be viewed during playback This section will also change from blue to purple in the progress bar when INFO is pressed Should you not wis...

Страница 28: ...ct USB to transfer files to your external USB device or HDD to copy to the internal hard disk drive CAUTION NEVER power off or disconnect the unit and USB device while file copying is in progress This...

Страница 29: ...ve TV mode 2 Select Network Internet Radio and press OK 3 Unit will scan for Internet radio stations automatically 4 Once autoscan is complete a list of genres will be displayed on the left hand side...

Страница 30: ...this folder the receiver may not be able to access them Once you have created the Media folder please follow the steps below to allow the files in this folder to be shared over your network The Networ...

Страница 31: ...26 NETWORK 3 Open Control Panel and turn on the guest account 4 Open Control Panel and double click Administrative Tools 5 Double click Local Security Policy...

Страница 32: ...work instructions on page 35 Please enter the correct IP address and folder name Enter the username and password of the computer you wish to connect to 11 If connection is successful you can access th...

Страница 33: ...28 NETWORK How to access media on a Windows 7 PC 1 Right click the Media folder and select Properties 2 Switch to the Sharing tab and click Share 3 Select an appropriate item then click Share and Done...

Страница 34: ...29 NETWORK 4 Select Security page and Edit 5 Select Add 6 Input guest to the box and select Check Names Apply...

Страница 35: ...30 NETWORK 7 Open Control panel System and Security 8 Select Administrative Tools 9 Double click Computer Management...

Страница 36: ...31 NETWORK 10 Select Local Users and Groups Users Guest 11 Unselect Account is disabled click Apply then click OK...

Страница 37: ...32 NETWORK 12 Double click Local Security Policy 13 In the left menu tree double click User Rights Assignment 14 Double click Deny access to this computer from the network...

Страница 38: ...33 NETWORK 15 Select Guest account and click the Remove button then click Apply and OK...

Страница 39: ...and password of the computer you wish to connect to 17 If connection is successful you can access the media files under this sharing folder by pressing the DVR button on the remote control 18 Once th...

Страница 40: ...ated on your PC The default in this menu is Media We recommend that the folder on the PC be named Media as stated in the PC set up instructions User Press the button to access the onscreen keyboard an...

Страница 41: ...rk status and keep a note of the IP address 2 Use DMS and DMR via relevant iOS and Android apps please refer to each app s user guide for details Suggested apps for Android smartphones Bubble UPnP and...

Страница 42: ...sting at the moment Retune to another channel Mosaic blocks in picture or picture freezes Aerial may not be compatible Check aerial Scrambled channel message Channel is scrambled Select an alternative...

Страница 43: ...ing Frequency 32 44 1 48KHz AV Output Video De emphasis CCIR REC 405 1 625 Lines Video Bandwidth 5MHz Video Output Impedance 75 Ohms Video Output Level 1 0 Vp p Audio Output Frequency 20Hz 20KHz Demul...

Страница 44: ......
Отзывы: