background image

30

DVD only

To play a disc in slow-motion, press the SLOW buttons
during playback.
Each time the SLOW buttons is pressed, the speed is
changed.

+ SLOW : slow forward playback

- SLOW : slow reverse playback

To resume normal playback, press the 

y

(PLAY).

<

The sound is muted during slow-motion playback.

<

The subtitles will not appear on the screen during
slow-motion playback.

<

This function is not available for CD and MP3.

Playback from a specific chapter/track 

Slow-Motion Playback 

Single Stepping Playback

To skip to a specific chapter/track

During playback, press the 

.

or

/

(SKIP) button

repeatedly until the desired chapter or track is found.
The selected chapter/track will be played from the
beginning.

Search for a part of a chapter/track

During playback, press and hold the 

.

or

/

(SKIP) button for more than 0.5 second until the
search function is activated.
Press the 

y

(PLAY) when the part you want to listen

to is found.

Each time the 

.

or

/

(SKIP) button is pressed

for more than 0.5 seconds during search, the search
speed is increased.

<

The sound is muted during searching playback of
DVD. The track skips during playback of MP3.

<

The subtitles will not appear on the screen.

<

This function may not work with some discs.

To play a disc frame by frame, press the 

J

(

PAUSE/STEP) during playback. 
Each time the 

J

( PAUSE/STEP) is pressed, the picture

advances by one frame.

To resume normal playback, press the 

y

(PLAY ).

<

This function is not available for CD and MP3.

PLAY
- CH/FREQ +(SKIP)

SLOW

TUNING MODE(PAUSE/STEP)

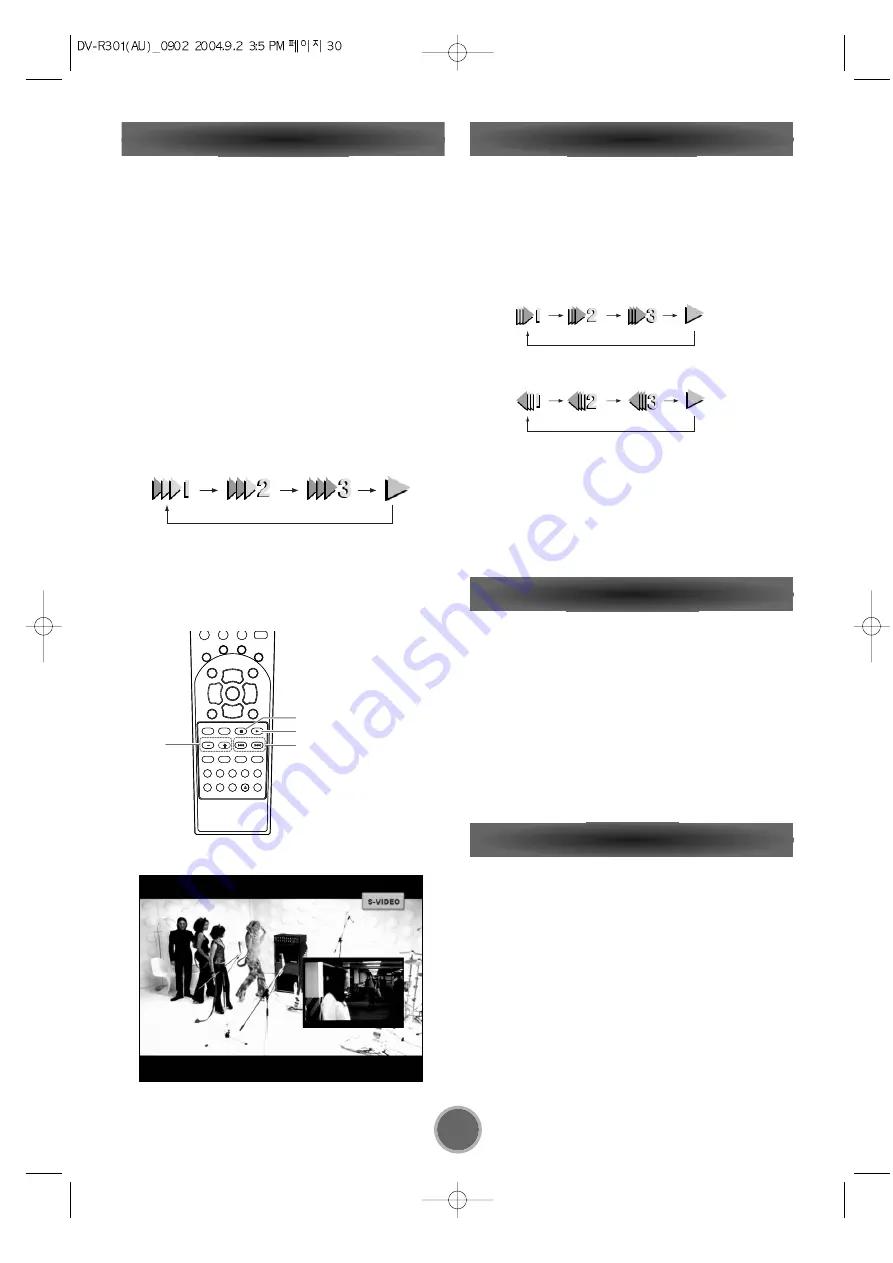
PIP function only works in the DVD mode.

Picture in Picture enables you to view a TV channel
while you are watching a video or listening to music.
Press PIP on the remote control unit, and then a small
screen appears in the bottom right of the TV screen.
Use the Input to select the desired video input.
Press PIP again to close the picture in picture. 

Note: 

You cannot record while in PIP mode.

PIP

Содержание DV-R301

Страница 1: ...Z USER MANUAL DV R301 DVD RW Receiver IMPORTANT WARRANTY INFORMATION INSIDE PLEASE READ FOR INQUIRIES CALL 1800 656 700 OR WWW TEAC COM AU...

Страница 2: ...ce In all cases of in transit damages or loss a claim must be filed against the carrier by the purchaser 7 In home service will only be provided as part of this warranty if all the following condition...

Страница 3: ...e your purchase receipt as your proof of purchase and the following details completed for a valid Warranty 4 Please ensure that your product is packed appropriately upon return to the service centre I...

Страница 4: ...SULT A COMPETENT ELECTRI CIAN CAUTION The product shall not be exposed to dripping or splashing and that no object filled with liquids such as vases shall be placed on the product Do not install this...

Страница 5: ...SSWORD 38 RECORDING ABOUT RECORDING 39 FORMAT AND FINALISING 40 RECORDING FROM TV 42 RECORDING FROM EXTERNAL INPUT 43 TIMER RECORDING 44 EDITING THE DISC 46 EDITING IN VR MODE 48 RECORDING OPTIONS 49...

Страница 6: ...the finish Use a clean dry cloth Keep this User Guide in a safe place for future refer ence DO NOT MOVE THE UNIT DURING PLAYBACK During playback the disc rotates at high speed Do NOT lift or move the...

Страница 7: ...warp the disc Do not play any disc that is warped deformed or damaged Playing such discs may cause irreparable harm to the playing mechanisms Recordable discs are more sensitive to the effects of hea...

Страница 8: ...r a long time more than a month remove the batteries from the remote control unit to prevent them from leaking If they leak wipe away the liquid inside the battery compartment and replace the batterie...

Страница 9: ...ding VPS Video Program system PDC Program Delivery Control Not available in Australia PIP Picture in Picture PIP enables you to view a TV channel while you are watching a video Easy navigation of reco...

Страница 10: ...VD Recorder to the antenna in jack on the TV using the 75 ohm Coaxial Cable 2 1 Audio Video Connections Connect the VIDEO OUT MONTOR jack on the VIDEO INPUTjackontheTVusingthevideocablesupplied Connec...

Страница 11: ...he TV using the video cable supplied DVD S Video connection Connect the VIDEO OUT DVD S VIDEO jack on the DVD Recorder to the S VIDEO INPUT on the TV using the S Video cable Component Video connection...

Страница 12: ...AL OUT DVD CD etc DIGITAL OUT w DIGITAL IN DVD CD R MD etc Connect any one of the DIGITAL IN terminals OPTI CAL or COAXIAL When using DIGITAL OPTICAL IN terminals remove the caps from the terminals Wh...

Страница 13: ...onnections have been finished plug the AC power cord into an AC wall socket To reset the unit In the following cases function buttons may not work properly Press the reset button on the back of the DV...

Страница 14: ...he side of the speaker cable is marked to make it dis tinguishable from the side of the cable Connect this marked side to the red terminal and the unmarked side to the black terminal Prepare the speak...

Страница 15: ...eans to reduce the risk of damage or injury resulting from the speaker falling from the TV in the event of external shocks such as earthquakes Surround speakers Install these speakers above the level...

Страница 16: ...that good reception is received FM Outdoor Antenna In an area where FM signals are weak it may be neces sary to use an outdoor FM antenna Generally a 3 ele ment antenna will be sufficient if you live...

Страница 17: ...In DVD mode use these buttons to skip chapters or tracks During PBC playback of a VCD these buttons are used to advance the menu page In TUNER mode use these buttons to tune in a station I H G F E D...

Страница 18: ...SKIP indicator Record MODE MUTE Indicates when the ANALOG input function has been selected Indicates when the DIGITAL input function has been selected Record indicator Indicates when the recorder is i...

Страница 19: ...nect to the digital audio output of an external digital device DIGTAL IN COAXIAL AV1 Connect to the digital audio output of an external digital device S VIDEO OUT Connect to the S VIDEO input of the T...

Страница 20: ...lume buttons In TV mode to adjust the volume level MENU Bring up the disc menu when you re playing a disc DIRECTION g g t t 5 5 b b buttons Use these buttons to select an item in a menu SET UP Enter o...

Страница 21: ...EEN display SLOW buttons In DVD mode these buttons are used for slow for ward and slow reverse FM MODE STOP H H Press this button to select stereo monaural mode while listening to FM broadcasts Stops...

Страница 22: ...buttons to select the General Set and press the t or ENTER General Set menu will be displayed 1 Select OSD Language menu by pressing the b b 5 5 buttons 2 Press thet button repeatedly to select desire...

Страница 23: ...set MINUTE 3 Press the ENTER button to complete Input the DATE by pressing the numeric buttons Example Setting the clock to the imaginary current date 25 June 2004 1 Press the 2 5 buttons to set DAY...

Страница 24: ...en Press the t button to enter a free channel between 21 and 68 Note If the RF output from the DVD recorder causes inter ference to or is inteferred by a local broadcast channel the RF output channel...

Страница 25: ...s TO DELETE A CHANNEL After setting channels in the memory you can delete any unwanted channels Select the PR ERASE menu by pressing the b b 5 5 buttons then press the t t or ENTER button Select a cha...

Страница 26: ...he TV SETUP by pressing the b 5 buttons 2 The list of channels will be displayed Change the existing setting 3 Select the channel which you want to change and press the ENTER button 4 A new dialogue w...

Страница 27: ...a Disc is loaded the playback may start auto matically and the Music screen opens listing all the tracks in the selected album To start playback In the stop mode select desired track by pressing the...

Страница 28: ...screens Some discs might not respond to zoom Viewing Images You can view JPEG pictures as a single image or one after the other automatically To view single picture press the ENTER To view all the ima...

Страница 29: ...ressed for 5 seconds search mode will be cancelled Use the g g t tbuttons to move to desired search mechanism Use the 5 5 b b buttons to move to desired value for the search mechanism and press ENTER...

Страница 30: ...ivated Press the y PLAY when the part you want to listen to is found Each time the or SKIP button is pressed for more than 0 5 seconds during search the search speed is increased The sound is muted du...

Страница 31: ...01 46 31 Current status The current data and time Current Total Title number Audio channel Angle mark and angle number Subtitle language Elapsed time of title Total time of title Current Total Chapte...

Страница 32: ...press ENTER Action bar is highlighted Use the g g t t buttons to move to Skip item on the Action bar and press ENTER Use the 5 5 b b buttons to move to skip and press ENTER Skip mark checked song will...

Страница 33: ...VD Each time the REPEAT A B is pressed shortly the mode is changed as follows This function works during DVD playback Start playback and designate the point at which the A B repeat should start point...

Страница 34: ...er mode on the Action bar and press the ENTER to the ROOT directory When MP3 discs have many folders you can select Enter folder mode or Enter split mode Folder mode You can play songs by navigating a...

Страница 35: ...when you connect a wide screen TV to the system Note Results will vary depending on disc format and TV type TV System You may need to change the color system to match your TV If your television should...

Страница 36: ...the 576P P Scan Signal DVD AV1 AV2 AV3 AV4 S Video DV and TV on the P Scan TV through the Component Video Jack If the TV System select as NTSC you can watch the 480P P Scan Signal DVD AV1 AV2 AV3 AV4...

Страница 37: ...uring playback A list of subtitle languages opens Use the 5 5 b bbuttons to select desired subtitle lan guage and press the ENTER The default subtitle value is OFF It may take a few seconds till a sel...

Страница 38: ...ress the b button to select Level and repeatedly press g g t t buttons to select desired Level Notes The password is preset to 1234 The rating is preset to NO LOCK as a default Press the b t t buttons...

Страница 39: ...supported by the DVD RW Alliance comprising HP Philips Ricoh Sony Yamaha Verbatim Mitsubishi Chemical Dell and Thomson DVD RW Discs A different version of a re writable DVD RW format that is designed...

Страница 40: ...flexible editting of contents Insert the DVD RW disc in the disc tray Select the FORMAT menu of the DISC SETUP menu Message window will be displayed Select the format mode VR or Video using g g t t bu...

Страница 41: ...het tor the ENTER Use the 5 5 b bbuttons to select Finalise Note It takes several minutes to finalise according to amount of the recording data and a kind of DVD media Finalising discs recorded for ve...

Страница 42: ...To pause the recording 1 Press J J PAUSE to pause the disc during recording 2 When you want to continue recording press REC K K A new chapter is added To stop the recording Press H H STOP to stop rec...

Страница 43: ...3 2 1 3 2 1 When you press STOP to complete the recording title closing icon will appear on the display Title closing is to store the recorded data on the disc When the title closing ends the recordin...

Страница 44: ...ck here to add new schedule field and press ENTER The New Scheduled Recording window opens the start time is automatically highlighted with the cur rent time and date displayed by default The end time...

Страница 45: ...Recording is on The unit should wake up 15minutes before the record ing then the unit will be on the stand by mode for the recording 3 minutes after the recording finish the unit will go back to the p...

Страница 46: ...deo content using the virtual keyboard 1 From the keyboard screen use the direction buttons to move to the desired content and press the ENTER 2 Enter the desired text as follow Use the direction butt...

Страница 47: ...il a new selection is made EDIT TITLE NAME Press menu button on the remote control unit Select the title which you want change name Press Enter and select RENAME Virtual keyboard will appear Edit the...

Страница 48: ...n the following chapter will be combined RENAME CHAPTER Press the MENU button on the remote control unit Select the Chapter action and a list of chapters will be displayed Select the chapter which you...

Страница 49: ...cording you can insert chapter marks within a title Automatically inserting a chapter mark You can set the automatic insertion by an interval of 5 10 30 60 mins Select Recording from SET UP menu Selec...

Страница 50: ...s with Dolby Pro Logic II and Dolby Digital decoding at least 5 speakers Left Center Right Left Rear and Right Rear should be used When no action is taken for 10 seconds the Speaker Setup mode will be...

Страница 51: ...RGE SMALL LARGE CENTER LARGE SMALL SMALL SURROUND PAIR LARGE SMALL SMALL SUBWOOFER YES YES NO Balancing relative volume between speakers using Test Tone The test tone function is useful to adjust the...

Страница 52: ...ndividual lis tening situation of the audience During playback of DVD press the SP SETUP Press theb 3 times NIGHT appears on the front panel s display Press the t repeatedly until desired setting appe...

Страница 53: ...select BASS To adjust the level of high frequency sound range select TRE treble 2 Press the VOLUME buttons of the remote control unit to change the setting The level can be adjusted in 2 dB steps from...

Страница 54: ...ral source DOLBY PRO LOGIC II MOVIE The Movie mode is optimized for movies or programs with Dolby Surround soundtracks This mode is also appropriate for use with video game DOLBY PRO LOGIC II MUSIC Th...

Страница 55: ...ection Select the manual tuning mode When the TUNING PRESET button is pressed momentarily 0 5 second or less the fre quency changes by a fixed step FM 100 kHz steps Press the TUNING PRESET button repe...

Страница 56: ...hat you want to listenby press ing the buttons Press the PRGM button briefly While the PRGM indicator is appears select a pre set channel ex 01 02 30 to store the station using the Numeric buttons To...

Страница 57: ...con nected equiment through this unit DIGITAL AUDIO OUT terminal PCM Down Sampling Select how to output audio with sampling frequency of 96kHz This list show the settings for this unit General Setting...

Страница 58: ...t Setting Option RF Out Sound System RF Out Channel RF Out Pattern Option Selection BG DK I 21 68 ON OFF Summary of settings Video Setting Option TV Type TV System Video Output Option Selection 4 3LB...

Страница 59: ...e on the disc Audio Format Auto Chapter Mark Automatically divides a recording a title into chapters by inserting chapter mark ings at a specified interval The markings are made during recording Optio...

Страница 60: ...for Joint Photographic Experts Group 480i 480p Indicates the number of scanning lines and scanning format of an image signal 480p indicates 480 scanning lines with progressive format Aspect ratio Asp...

Страница 61: ...second refresh rate 50 Hz field frequen cy S Video A video signal which improves picture quality over standard composite connections Used on Super VHS DVD high end TV monitors etc Track SVCD VCD Audi...

Страница 62: ...from the battery compartment of the remote unit all memory will be lost You need to re enter all previously programmed codes again The buttons on the remote unit may not work corre spondingly with tho...

Страница 63: ...058 109 122 128 129 130 134 INNO HIT 093 098 097 099 143 077 090 INTERFUNK 164 049 050 145 058 109 142 123 128 129 091 IRRADIO 093 143 053 077 090 Brand CODE No ITT 160 140 058 105 109 122 123 128 148...

Страница 64: ...4 077 136 090 SANYO 160 161 005 033 044 048 060 113 118 071 054 136 SBR 049 142 148 149 088 SCHAUB LORENZ 160 058 109 122 123 128 129 130 134 SCHNEIDER 096 099 049 050 052 019 141 109 142 125 149 078...

Страница 65: ...007 033 032 009 010 006 034 Memolex 000 Movie Time 015 NSC 015 OAK 011 007 OPTIMUS 031 PANASONIC 000 016 031 PARAGON 000 PHILIPS 018 PIONEER 017 025 Popular Mechanics 022 PULSAR 000 QUASAR 000 RCA 031...

Страница 66: ...KOSMOS 004 KRIESLER 016 LENCO 004 021 LUXOR 026 037 MAGAI 022 MARANTZ 012 MASPRO 016 MATSUSHITA 000 METZ 036 MINERVA 036 MULTISTAR 022 MURATO 004 NEC 040 NEIRU 021 NOKIA 026 037 NORSAT 015 Brand CODE...

Страница 67: ...power eCheck the connection to the AC wall outlet Make sure the outlet is not switched by a lamp switch by plugging in another electrical device to see if the outlet is live PROHIBIT icon A appears o...

Страница 68: ...the connected component eCheck the audio output setting eThe sound is muted during pause slow motion fast forward reverse and stepping playback Press the PLAY button to resume normal playback Severe h...

Страница 69: ...l Noise 1kHz 85dB Channel Separation 1kHz 55dB Total harmonic Distortion 1kHz 1 TUNER FORMAT Signal UHF VHF CATV System PAL FM TUNER System PLL quartz locked digital synthesizer system Tuning range 87...

Страница 70: ...IES FM Antenna x 1 Notes M Design and specifications are subject to change without notice M Weight and dimensions are approximate M Illustrationsmaydifferslightlyfromproductionmodels GENERAL Power Sup...

Страница 71: ...hi Tokyo 180 8550 Japan Phone 0422 52 5081 TEAC AUSTRALIA PTY LTD A B N 80 005 408 462 HEAD OFFICE 280 William Street Melbourne VIC 3000 Phone 03 9672 2400 NSW OFFICE Unit 8 20 22 Foundry Rd Seven hil...

Отзывы: