background image

2800 Laura Lane  •  Middleton, WI 53562  |  800.288.9383  |  www.tcsbasys.com  

33

Configuration

Introduction

Congratulations on choosing the UbiquiSTAT™ room controller! The Ubiquistat series of controllers are feature rich, 

multifunction touchscreen devices providing extensive controls across a wide range of HVAC applications.
This manual covers all 16 variations of Ubiquistats including wired, wireless, and built-in dehumidification. It includes all 

the information necessary to configure your UbiquiSTAT room controller, the communication network, and other devices 

via the touchscreen. 
Complete the configuration after installation (refer to the 

UbiquiSTAT Installation Manual

 and after completion of the 

Startup Wizard (refer to the 

UbiquiSTAT Quick Setup Guide

). Refer to the 

UbiquiSTAT BACnet Explorer Guide

 for advanced 

information on using the built-in BACnet Explorer to edit the device’s BACnet programming objects directly.
Your configuration settings will be uploaded to Ubiquity Cloud the first time you make a connection to the site. 

Alternatively, you can skip configuring the UbiquiSTAT via the touchscreen and perform all configurations via Ubiquity 

Cloud or 

TCS Insight software

, which is available for download on the 

TCS website

If you have any questions regarding your UbiquiSTAT room controller, contact TCS Technical Support at 800.288.9383, 

ext. 2. Our Technical Support Department hours are Monday – Friday, 7:00 a.m. to 7:00 p.m. (CST).

Configuring Via the Touchscreen Interface

Home Screen

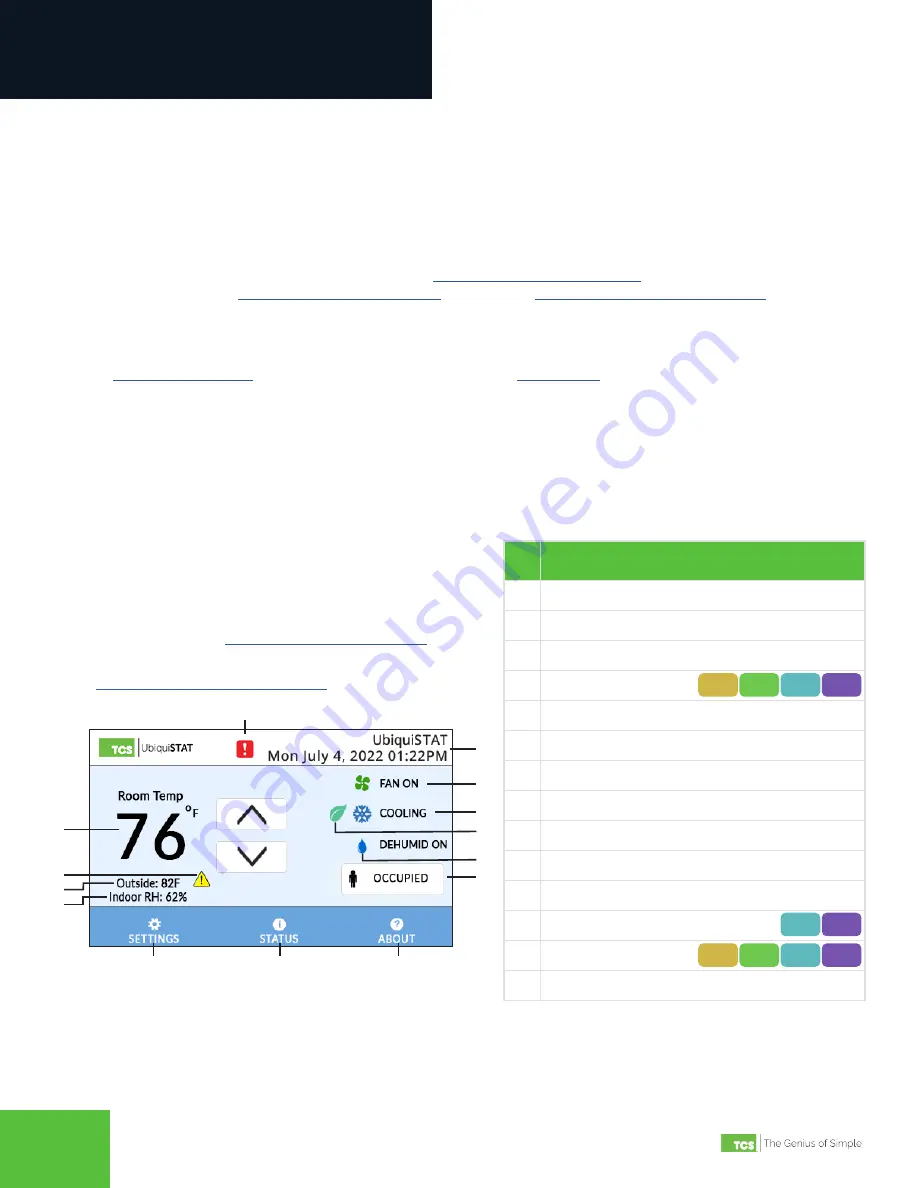
The Home screen displays at-a-glance system information and 

basic user controls. The display automatically returns to the 

Home screen and the display dims after 10 minutes of inactivity.
From the Home screen, you can configure many parameters for 

the UbiquiSTAT. You can also change any initial settings you 

made when following the 

UbiquiSTAT Quick Setup Guide

For configuration options using the built-in BACnet Explorer, refer 

to the 

UbiquiSTAT BACnet Explorer Guide

.

No.

Description  

(All models/versions unless otherwise indicated)

1

Room Temperature and Setpoints

2

Digital Input Setpoint Setback Active Indicator

3

Information Text (from connected sensors)

4

Indoor Relative Humidity

5

Settings Menu

6

Status Screens

7

About Screen

8

Service Status Indicator

9

Display Banner (Device Name and Date/Time)

10

Fan Operation Indicator

11

System Status (Heating/Cooling)

12 Economizer Status 

13 Dehumidification Status

14

Occupancy Status

4X11 4X21 4X41 4X51

4X11 4X21 4X41 4X51

4X4X 4X5X

1

2
3

4

5

6

7

8

9

10

11
12

13
14

Содержание UbiquiSTAT

Страница 1: ...2800 Laura Lane Middleton WI 53562 800 288 9383 www tcsbasys com 202304 Configuration Guide UbiquiSTAT Commercial BACnet Controller...

Страница 2: ...tents 4XXX Model 1 2 4 5 Series Wired 0 Wireless 1 Standard 0 Internal Humidity Sensor 1 4X1X US4010 Series 4X2X US4020 Series 4X4X US4040 Series 4X5X US4050 Series Model Number Definitions A Key to U...

Страница 3: ...loud or TCS Insight software which is available for download on the TCS website If you have any questions regarding your UbiquiSTAT room controller contact TCS Technical Support at 800 288 9383 ext 2...

Страница 4: ...DI This allows the controller to increase the cooling setpoint and decrease the heating setpoint by a predetermined amount and effectively create a setback response to an energy demand The indicator...

Страница 5: ...inimum air circulation requirements Cool The fan runs only when there is a call for cool available only when thermostat type is conventional Choose Fan Mode Screen Fan Mode Selection Example System Mo...

Страница 6: ...east two degrees for most conditions Occupancy Schedule Settings NOTE While all UbiquiSTAT models allow you to configure weekly schedules from the touchscreen holiday schedule settings are only availa...

Страница 7: ...To create a schedule setting Occupancy Schedule Screen STEP 1 Touch the EDIT button on the Occupancy Schedule Entries screen Edit Schedule Days Screen STEP 2 Select the days of the week you wish to as...

Страница 8: ...is assigned Touch DONE to save your entry On the EDIT SCHEDULE screen touch SAVE to save the changes NOTES The first time you connect the UbiquiSTAT to Ubiquity Cloud the schedule settings will be au...

Страница 9: ...wish to attach to the new date Touch DONE to save the settings NOTE Schedule periods stay in effect until the next schedule period start time assigned to that day or until midnight at which point the...

Страница 10: ...n the SETTINGS screen brings up the first of two screens ADVANCED 1 2 has buttons for Network Settings wireless models RS 485 Network wired models Thermostat Type Analog Outputs Display Options and Te...

Страница 11: ...ettings for mode type baud rate device address and device instance Touch the SAVE button on each screen to save any changes RS 485 Communication Mode Screen RS 485 Baud Rate Screen RS 485 Network Sett...

Страница 12: ...ice Instance Number Screen BACnet Wi Fi Settings After selecting BACNET WI FI on the NETWORK SETTINGS screen touch the ENABLE SETTINGS button This will activate the screens for scanning available Wi F...

Страница 13: ...on the ADVANCED 1 2 screen allows you to configure either of the UbiquiSTAT s Analog output ports for HVAC mode to the type of action you wish to assign to the port and the range Analog Output Program...

Страница 14: ...fine tune the weighting between the internal sensor and the external sensor in five percent increments Room Temperature Source Screen Room Temperature Source Averaging Screen Temperature Sensor Calib...

Страница 15: ...D button to confirm your desire to reset the UbiquiSTAT this cannot be undone You will then return to the INITIAL SETUP screen at the beginning of the Startup Wizard refer to the UbiquiSTAT Quick Setu...

Страница 16: ...l logic is disabled and outputs will revert to inactive or zero percent inputs Relay Inputs W1 W2 Y1 Y2 G B O TC Touching the Relay Outputs buttons activates the connected equipment after a three seco...

Страница 17: ...eported when the UbiquiSTAT detects an unexpected behavior Report any faults to TCS technical support System Event Log Screen Internal Dehumidification Sensor Programming Touching the DEHUMIDIFICATION...

Страница 18: ...up the Status section from which you can verify all settings in real time The screens in this section are grouped into three categories System Advanced and Network The information on each screen vari...

Страница 19: ...l sensors e g outside temperature humidity CO2 etc NOTES Inputs for Mixed Air and CO2 are only available on 4X4X 4X5X Input for Humidity is only available on 4X5X Relay Outputs The current state of he...

Страница 20: ...update the status About Section Touching the ABOUT button on the bottom of the HOME screen brings up the About section The main About screen displays the following information Model number Device Name...

Страница 21: ...or value when its signal is at the maximum range 20mA Reference BACnet IDs AV 162 AV 164 In addition there are four read only analog BACnet objects which display the raw readings and the engineering s...

Страница 22: ...is showing on display Faulty wiring Faulty relay Room temperature is above the cooling setpoint or below the heating setpoint Check wiring Check for a relay failure by connecting a jumper across termi...

Страница 23: ...ing and cooling setpoints are correct Reset the UbiquiSTAT by touching and holding the STATUS button for five seconds Analog outputs not working Faulty wiring Improper programming UbiquiSTAT is being...

Отзывы: